Have you lately been receiving a BitDefender threat scanner error message every single time you shut down or try to restart your PC? Of course, you are. Isn’t that the very reason why you guys are here? In this article, we are going to talk about Fix A Problem that has Occurred in Bitdefender Threat Scanner. Let’s begin!
The BitDefender threat scanner error message reads:
“A problem has occurred in the BitDefender Threat Scanner. A file containing error information has been created at c:\windows\temp\BitDefender Threat Scanner.dmp. You are strongly encouraged to send the file to the developers of the application for further investigation of the error.”
First up, you guys might be surprised to get the error message at all if you don’t really have BitDefender installed. Although, the error message may also have resulted because of another antivirus on your computer. That makes use of the BitDefender’s antivirus scan engine. A few antivirus programs that also utilize BitDefender’s antivirus scan engine are Adaware as well, BullGuard, Emsisoft, eScan, Quick Heal, Spybot, etc.
The error message is quite self-explanatory; it alerts the user about a problem with the BitDefender Threat Scanner has experience, and that information regarding. The problem is saved in a file named BitDefender Threat Scanner.dmp along with the file location. In most systems, the generated .dmp file is unreadable by the notepad and doesn’t get you anywhere. The error message also advises you to send the .dmp file to the application’s developers, but going back and forth with company personnel can be strenuous and sometimes futile.
Contents
Fix A Problem has Occurred in Bitdefender Threat Scanner
The BitDefender Threat Scanner problem isn’t really a fatal error, however, merely a nuisance. You can bypass it by simply tapping on OK and continue along with your work. But, if you have grown increasingly annoy with the message, below are a couple of solutions in order to get rid of it once and for all.
The BitDefender Threat Scanner error is a widely encountered issue, and also a number of potential solutions are known to exist. The most common solution in order to get rid of the annoying pop-up message is to use the official patch file. That made available via BitDefender themselves or via reinstalling BitDefender altogether.
The BitDefender Threat Scanner error is primarily experience in pcs employing Spybot – Search and Destroy application has its main antivirus program actually. The error results from corrupt DLL files of the application and can also be resolved via simply fixing these files.
Fix the SDAV.dll file | a problem has occurred
The BitDefender Threat Scanner error occurs because of a corrupt SDAV.dll file on systems using the Spybot – Search and Destroy application as well. The spyware software actually makes use of BitDefender’s antivirus scan engine in order to free your computer of any threats, and the SDAV.dll file is important for the application to work smoothly & without even throwing up any errors.
The SDAV.dll can also go corrupt for a number of reasons, and simply replacing the corrupt file. Along with the original file will also help you resolve the threat scanner error. The original file can also be downloaded from Spybot’s website.
To fix Spybot’s SDAV.dll file:
Steps
- Open File Explorer via pressing Windows key + E on your keyboard.
- Head down the following path C:\Program Files (x86)\Spybot – Search & Destroy 2.
You guys can also copy-paste the above address in the address bar of the File Explorer. And click on enter to jump to the required location.
- Scan the whole Spybot -Search & Destroy folder for a file named SDAV.dll.
- If you guys find the SDAV.dll file, right-click on it, and choose Properties from the context menu or choose the file and tap on the Alt + Enter keys simultaneously.
- Now under the General tab, just check the size of the file.
Note:
The default size of the SDAV.dll file is actually 32kb, so if the Size label also has a lower value. It also implies that the file is indeed corrupt and also needs replacement. But, if you guys didn’t find the SDAV.dll file altogether. Then the file is missing and you will have to place it there manually.
- In either case, corrupt SDAV.dll file or missing, you have to visit the Download Spybot Missing Files (or SDAV.dll Download), and then download the required file.
- When downloaded, tap on the upward-facing error and choose Show in folder (or any similar option relying on your web browser). If you accidentally closed the downloads bar, however, the file was being downloaded, now check the Downloads folder of your computer.
- Right-click on the newly-downloaded SDAV.dll file and then choose Copy.
- Head back to the Spybot folder (check step 2 for the exact address), and then right-click on any blank/empty space and select Paste from the options menu.
- If you guys still have the corrupt SDAV.dll file present in the folder. Then you will receive a pop-up asking if you want to replace the existing file with the one you are trying to paste or skip the file as well.
- Tap on Replace the file in the destination.
Run the available patch
As mentioned earlier, the BitDefender Threat Scanner is a really well-known issue, and BitDefender themselves have released a patch in order to resolve it. Because the patch is advertised as the official solution. Then this method is your best bet to get rid of the error and also has indeed been reported to solve it for most users.
The BitDefender repair tool is available in two different versions actually. One for 32bit operating systems and another for 64bit versions as well. So before you guys go ahead and download the patch, figure out the system architecture and also the OS version running on your computer.
- Open Windows File Explorer (or My Computer in older versions) via double-clicking on its shortcut icon on your desktop or also use the keyboard combination Windows Key + E.
- Right-click on This PC and choose Properties from the making sure context menu.
- In the next window (called the System window), then you will find all of the basic information regarding your computer. Now you have to check the system type label to identify the Windows OS you are running and your processor architecture as well.
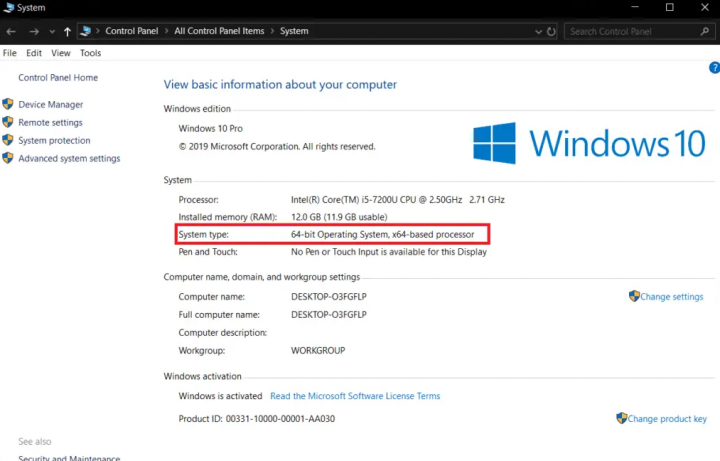
- Relying on your OS version, now download the required file:
For 32bit operating system: BitDefender Repair Tool for Windows32
For 64bit operating system: BitDefender Repair Tool for Windows64
When downloaded, run the patch file and then follow the on-screen instructions/prompt in order to fix A problem that has occurred in the BitDefender threat scanner error as well.
Use Reimage Repair (or any same application) | a problem has occurred
Another method for fixing a missing or corrupt file is actually to use a third-party application. This specialize software, we also know as a repair tool and is also available for a number of different functions. Some work as system optimizers in order to boost the overall performance of your computer. However, others aid in solving a wide variety of common errors/issues that you might face.
A few commonly used PC repair tools are basically Restoro, CCleaner, etc. The procedure to use each one of them is more or less the same, however, nevertheless, follow the below steps. In order to install the Reimage repair tool and fix corrupt files on your computer.
- First of all, open the following link in a new tab and then tap on Download Now present on the right.
- Tap on the downloaded ReimageRepair.exe file and then follow the on-screen instructions to install Reimage.
- When installed, open the application and tap on the Scan Now button.
- Tap on Repair All in order to fix all the damaged/corrupt files currently present on your PC.
Reinstall BitDefender
If the BitDefender Threat Scanner still persists after running the official patch and also fixing the SDAV.dll file. Then your only option is just to reinstall BitDefender. The process of reinstalling BitDefender is actually the same as it would for any other regular application.
- You guys can either select to uninstall BitDefender following the usual path (Control Panel > Programs & Features or Settings > Apps > Apps & Features). And then manually delete all the folders and files associated along with the application.
But, in order to avoid the hassle of manually removing each and every trace of BitDefender from your computer. Then visit the following page Uninstall Bitdefender on your preferred web browser and just download the BitDefender Uninstall tool as well.
- When you downloaded, then run the BitDefender uninstall tool and follow all the on-screen prompts or instructions to get rid of the application.
- Restart your PC for good luck as well.
- Now visit Antivirus software – Bitdefender! and download the installation file for BitDefender.
- Open the file and head through the installation process in order to get BitDefender back on your computer.
Conclusion
Alright, That was all Folks! I hope you guys like this article and also find it helpful to you. Give us your feedback on it. Also if you guys have further queries and issues related to this article. Then let us know in the comments section below. We will get back to you shortly.
Have a Great Day!