
So you guys have been using Windows 10 for quite a while. However, suddenly one day out of nowhere an error pops up saying “Audio services not responding” and also the audio is no longer working on your PC. Don’t worry this is totally fixable, however, let’s first understand why you are getting such an error. In this article, we are going to talk about How to Audio Services Not Responding in Windows. Let’s begin!
The Audio service not running error can actually occur due to outdated. As well as incompatible audio drivers, audio-related services might not be running, also incorrect permission for Audio services, etc. In any case, without even wasting any time let’s now see How you can Fix Audio services not responding in Windows along with the help of the below-listed troubleshooting steps.
How to Audio Services Not Responding in Windows
A suggestion via Rosy Baldwin that seem to work for almost every user, so I have now decided to include in the main article:
- Tap on Windows key + R then type services.msc and click on Enter to open the Windows services list.
- Just find Windows Audio in the services list, click on W to find it easily.
- Now right-click on Windows Audio then choose Properties.
- From the Properties window, just navigate to the “Log on” tab.
- Next, choose This account and make sure Local Service is selected with a Password.
Note: If you guys don’t know the password then either you can type a new password and tap on OK to save changes. Or else you can also tap on the Browse button then click on the Advanced button. Now just tap on Find Now button then choose LOCAL SERVICE from the search results and tap OK.
- Tap on Apply followed via OK to save changes.
- If you’re not able to save changes then first you guys have to change the settings for another service called Windows Audio Endpoint Builder.
- Now right-click on Windows Audio Endpoint Builder and choose Properties. Now navigate to the “Log on” tab as well.
- From the “Log on” tab choose the Local System account.
- Just tap on Apply followed via Ok to save changes.
- Then again try to change the settings of the Windows Audio from the “Logon” tab and this time you guys will be successful.
Restarting Audio Services
Before we resort to more complex and also extensive solutions, we will now try restarting the audio service. Alongside your sound hardware and drivers, there is also an audio service present that is responsible for managing the audio on your PC. A simple restart might reboot its configurations and also solve the issue at hand.
- Tap on Windows + R, type “services.msc”, and press Enter.
- When in services, navigate through all the entries until you guys find “Windows Audio”. Right-tap on it and choose “Restart”.
- Now right-tap on the entry again and choose “Properties”. Just set the startup type as “Automatic”. Tap on Apply to save changes and then exit.
- Head back to services and look for “Windows Audio Endpoint Builder”. Right-tap on it and select “Restart”. If it isn’t started yet, then tap on “Start”.
- After starting the process, just open its properties and choose the startup type as “Automatic”. Now tap on Apply to save changes and exit.
- Restart your PC and then check if the problem still persists.
Checking Audio Components
Just, before moving on to more technical workarounds, first, we will make sure that all the audio components are running. If any of them isn’t, then it may be the cause why you are getting the error message. Also temporarily disable your antivirus since they sometimes block some services because of which you face difficulties. These are services and exclusion of any of them can actually cause discrepancies.
- Tap on Windows + R, type “services.msc” and press Enter.
- Now, just make sure that the following services are in the running state. If they are not, right-tap on them and click “Start”.
RPC Endpoint Mapper
Remote Procedure Call (RPC)
DCOM Server Process Launcher
- Also, just make sure that all these services are set to start as “Automatic”.
- After starting the processes (if they were off), then check if the problem at hand got solved. If it didn’t, then just consider restarting your PC and checking again.
Uninstall Sound drivers | audio services not responding
- You have to download and install CCleaner.
- Head to the Registry window on the left, then scan for all the problems and now let it fix them.
- Next, tap on Windows Key + R then type devmgmt.msc and click on enter to open Device Manager.
- Just expand Sound, video, and game controllers and tap on the sound device then select Uninstall.
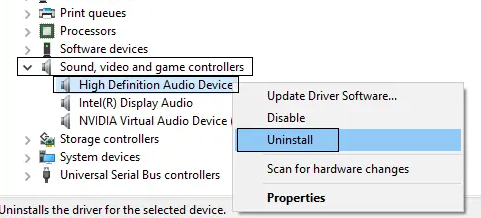
- Now confirm the uninstall via clicking on OK.
- At last, in the Device Manager window, head to Action and then click on Scan for hardware changes.
- Now restart to apply changes.
Restore Registry key from Antivirus
- Just open your anti-virus and go to the virus vault.
- From the system tray right-tap on Norton Security and choose “View Recent History.”
- Now choose “Quarantine” from the Show drop-down.
- Inside Quarantine as well as virus vault, just search for the Audio device or services that are quarantined.
- Now look for registry key: HKEY_LOCAL_MACHINE\SYSTEM\CURRENTCONTROL and if the registry key ends in:
AUDIOSRV.DLL
AUDIOENDPOINTBUILDER.DLL
- Just restore them and Restart to apply changes.
- Now see if you’re able to resolve the “Audio services not responding in Windows 10” issue, so, otherwise repeat steps 1 and 2.
Run Audio Troubleshooter | audio services not responding
- Tap on Windows Key + I to open Settings then click on Update & Security.
- From the left-hand menu, just choose Troubleshoot.
- Now under the “Get up and running” heading tap on Playing Audio.
- Next, tap on “Run the troubleshooter” under Playing Audio.
- Try the suggestions via the troubleshooter and if any issues are found. Then you have to give permission to the troubleshooter to fix the Audio services not responding error.
- The troubleshooter will then automatically diagnose the issue and ask you if you guys want to apply the fix or not.
- Tap on Apply this fix and Reboot in order to apply changes.
Restoring from last Restore Point/ Doing a Clean Install
If all the above methods don’t work, then we are left with no choice. However, to restore Windows to the last restore point. If you guys don’t have a restore point, you can install a clean version of Windows. You can also use the utility “Belarc” to get all your licenses saved. Just back up your data using external storage and then perform a clean install.
Here is the method on how you can restore Windows from the last restore point.
- Tap on Windows + S to launch the start menu’s search bar. Just type “restore” in the dialogue box and choose the first program which comes in the result.
- One in the restore settings, tap on System Restore present at the beginning of the window under the tab of System Protection.
- Now a wizard will also open navigating you via all the steps to restore your system. Tap on Next and proceed with all the further instructions.
- Then select the restore point from the list of options available actually. If you guys have more than one system restore point, then they will be listed here.
- Now windows will also confirm your actions for the last time before it starts the system restore process. Save all your work and then back up important files just in case and proceed with the process.
- When you have restored it successfully, just log into the system and check if the error at hand got fixed.
Conclusion
Alright, That was all Folks! I hope you guys like this article and also find it helpful to you. Give us your feedback on it. Also if you guys have further queries and issues related to this article. Then let us know in the comments section below. We will get back to you shortly.
Have a Great Day!


