
System restore is basically an inbuilt Windows feature that permits restoring system settings from previously save restore points as well. This feature has saved us a lot of time, however, after you guys update to Windows 10 some of us face a problem along with System Restore i.e. System Restore option is greyed out actually. This means neither can we restore to an earlier point nor can we create a system restore point as well. The most common way in order to resolve this problem, is through enabling System Protection, however, if that too is greyed out then what? In this article, we are going to talk about Can’t Turn on System Protection in Windows – Fix. Let’s begin!
When System Protection is turned on, then your Windows will start to create restore points automatically at crucial events. See this fix, if find System Restore is turned on via administrator.
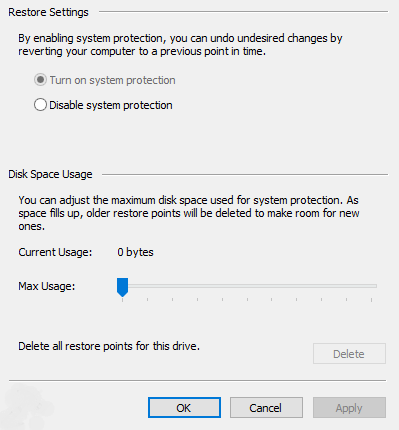
Okay, so today in this article we are now talking about another issue related to System Protection. Actually, after you install some updates, I found that one of my Windows 10 machines have Turn on System Protection option greyed out:
Because of this, I can no longer utilize System Restore. If you guys are also facing this problem, then here’s how you can fix it:
Can’t Turn on System Protection in Windows – Fix
Here, we bring many steps using which you guys can resolve system restore greyed out the problem in Windows 10. Mostly, if you guys are not logged in as System Admin or disk space usage is not set under system protection. Then this problem arises as well.
Thus, before we try and then follow other methods in order to resolve the problem. We have to login as System Admin and adjust disk space as well. For this head to System Properties,> Configure > under Disk Space Usage adjust the slider in order to assign disk space for system protection as well.
This should actually help. If this does not really work, then try to use the following methods.
Via Registry Editor | can’t turn on system protection
- First, you have to open the ‘Run’ dialog box through pressing Win + R key together. Here type regedit.exe and then click on Enter
- Next, you need to navigate to HKEY_LOCAL_MACHINE \ Software \ Policies \ Microsoft \ Windows NT \ SystemRestore. You guys will find this location in the left pane of the Registry Editor window.
- Next, just look for Disableconfig and DisableSR values in the right pane. Choose them and delete them.
Now you have to restart your machine in order to apply settings and check if you are able to use the System Restore option.
Via Group Policy | can’t turn on system protection
- Tap on Windows + R and put gpedit.msc in the Run dialog box in order to open Local Group Policy Editor. Then tap on OK.
- Next, in the GPO snap-in window, just navigate here:
Computer Configuration > Administrative Templates > System > System Restore
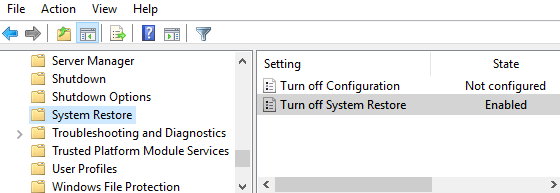
- Now in the right pane of System Restore, just look for the Turn off System Restore setting. If it is set to Enable, double tap on the policy and set the status in order to Disable or better to Not Configured. just tap Apply followed via OK.
Close the Group Policy Editor and then see if you can turn on the System Protection now. If the issue still persists, then try FIX 2.
Via Windows PowerShell | can’t turn on system protection
- Just right-click on Start Button or press Windows + X keys and choose Windows PowerShell (Admin). Open administrative Windows PowerShell this way as well.
- Run the following commands one-by-one and then click on the Enter key after each.
Enable-ComputerRestore -drive "C:\"
*Replace C: with your system root drive.
vssadmin resize shadowstorage /on=c: /for=c: /maxsize=10%
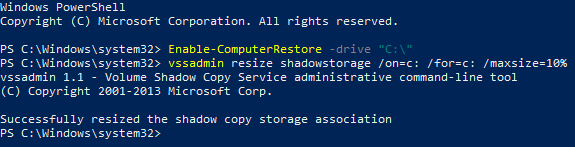
- You have to close the PowerShell window and check along with System Protection. This time you guys should be able to turn on System Protection.
Via Elevated Command Prompt | can’t turn on system protection
- Just type Command Prompt in the search bar. Whenever you see the search result right-click and choose Run as Administrator.
- Then just paste the command
“%windir%\system32\rundll32.exe/dsrrstr.dll,ExecuteScheduledSPPCreation”
and click on the Enter in order to execute it. - There is also a possibility that the related system process maybe not running in the background. Thus, you have to start it.
- If you want to do this, then just open the ‘Run’ dialog box via tapping Win + R key together. Here the type of services.msc,
- Now under Services Window, just locate “Volume Shadow Copy, “service right-tap on it. And from the context menu just choose Start If it is running stop it and then change the Startup type to Automatic.
- From the context menu and then If its Startup type is set to turn off, change it to Automatic, and tap on OK.
Now just check you should be able to use System Restore as well.
Conclusion
Alright, That was all Folks! I hope you guys like this “can’t turn on system protection” article and also find it helpful to you. Give us your feedback on it. Also if you guys have further queries and issues related to this article. Then let us know in the comments section below. We will get back to you shortly.
Have a Great Day!
Also See: Windows 10 – Use WiFi and Ethernet at the Same Time