RetroArch is a multi-system emulator that supports really much every video game system. Atari Lynx, Neo Geo Pocket Color, WonderSwan, Game Boy Color, Game Boy Advance, NES, SNES, Virtual Boy, PC Engine/TurboGrafx-CD, PC-FX, Game Gear, Genesis/Mega Drive, Sega CD/Mega CD, Sega Master System, PlayStation 1, Saturn, PSP, and much more! It’s an open-source emulator available for every operating system and is also 100% free. This tutorial is for the Android version actually. In this article, we are going to talk about the Complete Guide on Retroarch Cores – User Guide. Let’s begin!
The fact that RetroArch covers every video game system provides Android users with a huge advantage. The available single-system emulators only cover the usual assortment of famous systems. There may be some instances where you will have no choice but to use RetroArch as well.
RetroArch is particularly ideal for Android tablets and also Play Store supported Chromebooks. Single-system emulators do not fare well on large screens, however, RetroArch does.
The drawback of RetroArch is that it wants to do everything and also cook your dinner! It’s loaded with an overwhelming amount of features and customization as well. The result is actually a poor user experience. RetroArch is actually confusing for beginners. But, that’s exactly the reason why I created this tutorial. Hopefully, I can make RetroArch easy for everyone 🙂 The Windows version is really good, too.
You can also find RetroArch for download in the Google Play Store.
Contents
Best Cores in Retroarch for Android
- Game Boy Advance – mGBA
- Game Boy/Game Boy Color – Gambatte
- Nintendo (NES) – Nestopia
- Nintendo 64 – Mupen64Plus
- PlayStation – PCSX-ReARMed
- Sega Genesis/Game Gear – Genesis Plus GX (PicoDrive from Sega 32X games)
- Sega Saturn – Yabause (very strenuous performance-wise)
- Super Nintendo (SNES) – Snes9X
Configure Retroarch Cores
After you have your cores all set up, to get it to detect your games now you will need to get the ROMs and ISOs for your games onto your Android device as well. (We stress that these should be copies of games that you already own.)
When you have the games on your device, then you can load them one by one through going to “Load Content”. Then you have to navigate to them from there. Alternatively, you can also set up proper playlists.
If you want to do this, then tap the Playlists icon (middle option at the bottom of your Retroarch screen). Then click “Scan Directory.”
Choose the directory where you keep your ROMs, then select “Scan This Directory.” The ROMs for each console will now be neatly contained in separate folders in the “Playlists menu” as well. You can also select and run your games from here.
Controls for Each Core | retroarch cores
Well, this bit can be confusing. If you are just using the touchscreen, then you do not need to do much. Because each core has its own customizable on-screen touch display to control games. If you are using a controller, but, you may want to do some tweaking.
In order to make changes to controls and so on in each individual core. Then you first need to load that core using “Load Core” and load a game using “Load Content” (or from your playlist).
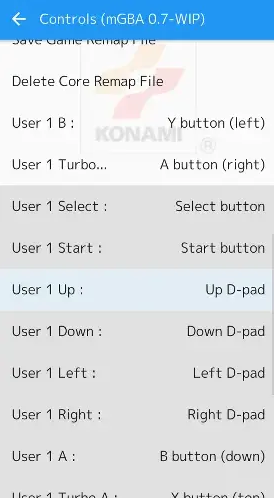
Then, in the Retroarch main menu, you should now see an option called “Quick Menu”. Tap it, then click “Controls” and scroll down to configure controls for that game.
Now here’s the thing: you can then save those controls in order to apply to all games on that core (Save Core Remap File). Or also just to that individual game (Save Game Remap File). Choose the Save option that suits your needs, and then you can get back to your game.
PS1 or PS2 Emulation and BIOS
For the most part, you do not need to worry about BIOS when running emulators and also games. Because the relevant files are also included in the emulators. BIOS files are really much the first thing an emulator looks for when running. Along with a different BIOS file required depending on the global region of the game you are playing.
With PS1 and PS2 games, however, you will have to find the relevant BIOS files yourself (you can find them online). And then put them in the “system” folder of Retroarch on your Android device.
You can also find out more details about PS1 emulation on Retroarch in our guide. It’s for the desktop version however, the same general rules apply. Whenever it comes to BIOS, then the ones you will need are the following:
- scph5500 (NTSC – Japan)
- scph1001 (NTSC – US)
- Also scph5502 – (PAL – Europe)
- scph5552 (PAL – Europe)
Shaders (screen filters) | retroarch cores
Screen shaders (called ‘screen filters’ in other emulators) render your screen in a variety of ways to make it look sharper and beautiful as well. By default, RetroArch actually uses a basic shader that only blurs the screen a little bit. You can also change it to something a lot better! Let’s see how you can do that:
- During gameplay, Click
 for the quick menu then scrolls down to choose Shaders.
 - Then select Shader Preset > shaders_glsl.
- What are the GLSL and slang? GLSL are shaders that work on a wide range of platforms that includes phones and tablets. Slang is shaders compatible along with the new Vulkan renderer. They both should work fine on your Android device. So it does not really matter that which one you select.
- You will arrive at the shaders folder, which is full of subfolders. You have to take a little time to explore these folders. When you are ready to try a shader out, then select the “glslp” file for it.
- Finally, choose Apply Changes for the shader to take effect on your game. This is a global change; all games are now using this shader you just selected.
The Shaders | retroarch cores
RetroArch also offers an overwhelming amount of shaders. I think the count is well over 50 now. On your smartphone’s small screen you guys won’t even notice the subtle differences between most of them. I’m going to make it easy for you and also recommend only 2 shaders.
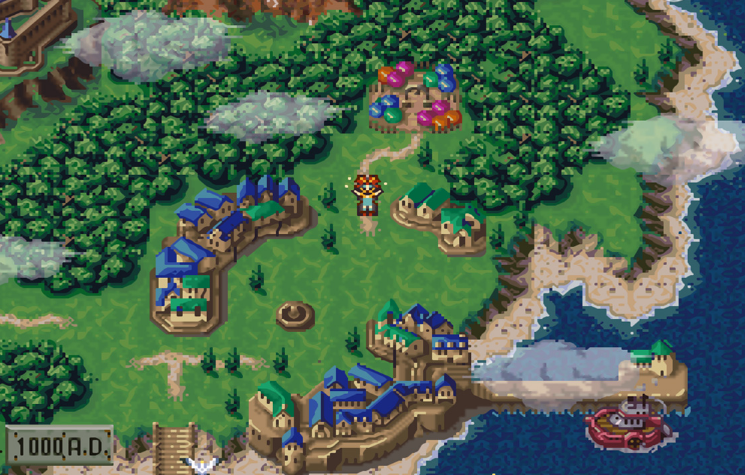
- hq4x: attempts to round pixels together without blurring as well. It is found in hqx > hq4x.glslp. If you feel that the eagle is too smooth or blurry, hq4x is a better choice. Here’s a sample of it with Chrono Trigger (SNES) and Shantae as well (Game Boy Color):
If your Android device is also struggling a bit with the hq4x filter, then try hq3x instead. Even further, hq2x would be ideal for really slow devices as well.
- eagle: a classic shader that smears pixels together along with a slight blur. It is also found in eagle > super-eagle.glslp. If you feel that hq4x (above) is too sharp, then the eagle is a better choice for you. Let’s see a sample of it with Chrono Trigger (SNES) and Shantae (Game Boy Color):
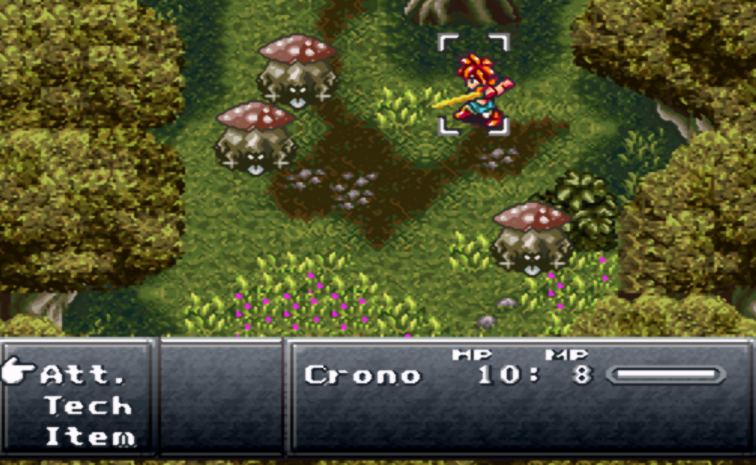
You are previewing the eagle with these large screenshots. Keep in mind that it will look sharper on the smaller screen of your smartphone.
Deleting a core
RetroArch’s interface also makes it easy to accidentally download an unwanted core. The following directions are how you guys can delete a core. It’s oddly many steps and not a convenient process.
- On the Home tab, head to Load Core and then select the core you want to delete.
- At the very top, you should see the header updated along with the core you chose. On the Home tab, scroll down and then choose Information.
- On the Information screen, you have to choose Core Information.
- On the Core Information screen, scroll all the way down and then you will find an option for Delete core. Select it to delete the core now.
Conclusion
Alright, That was all Folks! I hope you guys like this retroarch cores article and also find it helpful to you. Give us your feedback on it. Also if you guys have further queries and issues related to this article. Then let us know in the comments section below. We will get back to you shortly.
Have a Great Day!
Also See: How to use MaMe For Arcade Games in PC