Do you want to disable hard disk after idle in Windows 1o? In Windows 10 a special option enables the user to disable hard drives automatically after a particular amount of inactivity. This feature is really helpful for those who want to save energy, i.e. if you have a laptop using an HDD.
The option is known as Turn off hard disk after is a part of the power management choices of the current power plan. The user can turn on or off it. It depends on the required power plan, it can be turned on or off out of the box. For instance, it is turned on in the Balanced and Power Saver power profiles and turned off in the Performance power plan.
When turned on, your HDD will be disabled once your PC being idle during the configured amount of time. The hard drive engine will stop and its disks can’t spin. Next time your software can access the drive, it takes a few seconds before the drive begins spinning and provide access to files.
What’s More?
Disabling the Hard Disk after an Idle time helps to improve the battery life in Windows 10. The HDD activity is observed and after particular minutes of inactivity, the HDD is disabled. However, it can’t affect the SSD. When you try to resume the PC OS after the HDD being disabled, there will be a delay of a few seconds when the HDD automatically spins back up and is enabled before accessing it. The following tutorial, helps you to disable Hard Disk Idle in Windows 10.
How To Turn off Hard Disk After Idle in Windows 10:
Step 1:
The required choice is located in the Advanced power options applet. In short, run the following command from the command prompt or Run dialog.
control.exe powercfg.cpl,,3
Step 2:
On the other hand, you can head over to Settings and move to System – Power & sleep.
Step 3:
On the right simply tap on the link Additional power settings.
Step 4:
The dialog window then opened. There, tap the “Change plan settings” link.
Step 5:
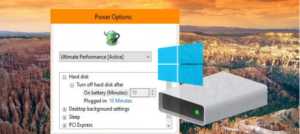
In the other dialog window, simply expand the Hard disk group then open the Turn off hard disk after option.
Step 6:
Then set total minutes of idle should move before the drive will be disabled. Set it to never turn off this feature if you want.
The option default value is 20 minutes.
Caution: Don’t set the idle period for a small number of minutes.
Conclusion:
Here’s all about “Disable Hard Disk After Idle in Windows 10”. If you are facing any issue then let us know. If you think that it is helpful then do let us know your suggestions in the comment section below. Do you know any other alternative method that you think we can’t cover in this guide?
Also Read:


