Today I have come up with few solutions to fix the issue. Of DNS_PROBE_FINISHED_NXDOMAIN or DNS PROBE FINISHED NXDOMAIN on Google Chrome. However, most of the people mostly go through this error.
DNS basically stands for Domain Name Servers. That loads the web pages from the host (the place where web pages are stored in the cloud). If your internet connectivity is slow or because of some other issues, your browser is showing DNS errors. And is not be able to connect to the host. The DNS Probe Finished Nxdomain error generally Occurs because DNS lookup Fails When you try and access the Web page.
You can fix this issue with the following Solutions.
Contents
- 1 Fix DNS PROBE FINISHED_NXDOMAIN Chrome Error
- 2 Change Protocol DNS Probe Settings
- 3 Flush your Outdated DNS/ Probe Finished NXDomain
- 4 Try resetting TCP, IP to resolve DNS Probe Finished NXDomain issue
- 5 Restore Chrome to Default Settings to fix the DNS Probe Finished NXDomain issue
- 6 Update Drivers
- 7 Restart DNS Client
- 8 Disable DNS Prediction Services
- 9 Some Other Methods
- 10 1. Uninstall Antivirus
- 11 Flush your Outdated DNS Probe
- 12 Conclusion
Fix DNS PROBE FINISHED_NXDOMAIN Chrome Error
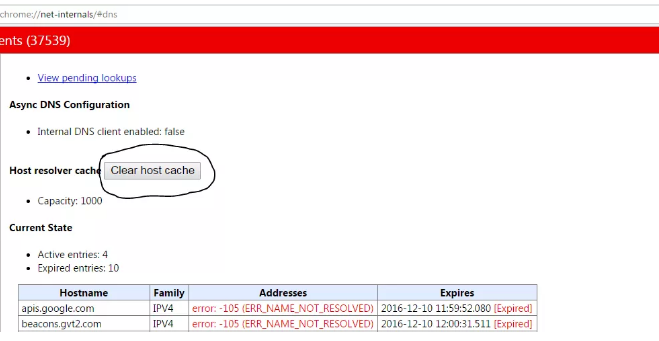
Clear DNS Cache of Google Chrome
Clearing the DNS Cache of Google Chrome could be potentially the best fix to solve the issue of DNS Probe Error.
- Simply visit the URL ‘chrome://net-internals/#dns‘.
- Then click on the Clear-Host Cache button next to the Host resolver cache.
- You will notice the websites are working properly.
- This is one of the easiest and most useful fixes to stop the issue of DNS probe Finished servers.
Change Protocol DNS Probe Settings
- Search ‘ncpa.cpl‘ in Windows.
- Look for the option called Internet Protocol Version 4 (TCP/IPv4).
- Then click on it and click on the Properties button.
- Now manually use following DNS probe servers; Preferred DNS server as 8.8.8.8& Alternate DNS server as 8.8.4.4 (Google’s public DNS) (Set IP as automatic)
- Restart the browser and then check websites.
Flush your Outdated DNS/ Probe Finished NXDomain
The error also happens if the DNS cache is outdated. Then you have is manually to delete it.
- To do so simply enter; Win + R
- And type cmd in the search box.
- Type ipconfig /flushdns and hit Enter.
- Restart your computer
Try resetting TCP, IP to resolve DNS Probe Finished NXDomain issue
Run these commands in the Command Prompt (run each command by pressing ENTER after typing it):
ipconfig /release
Then ipconfig /all
ipconfig /flushdns
ipconfig /renew
netsh int IP set DNS
netsh Winsock reset
Restore Chrome to Default Settings to fix the DNS Probe Finished NXDomain issue
- In the address bar type chrome://flags/ and hit enter.
- You can see a Reset all to default button.
- Click the reset all to default and also restart your Chrome browser.
Update Drivers
Although you think this to be a little offbeat. If you update a software driver can come to your safety as outdated network drivers. Then it may cause some kind of connectivity issues. I have fixed the Chrome DNS Probe Finished NXDomain issues on the number of computers by just updating the drivers. However here are the simple steps, you can do the same.
- Open run menu with Windows + Rkey
- On the search bar, type devmgmt.msc and press enter.
- Now you will be in Device Management Window. Also here look for Network Adapter.
- Right-click and select Update Driver Software from the drop-down menu.
- Then choose the option Browse my computer for driver software.
- In the next step, you choose Let me pick from a list of device drivers on my computer.
- Now you will have to select the compatible hardware, and then click Next.
Once it is done and Drivers are Updated successfully. Then you can restart the computer and check the issue. It should be fixed.
Restart DNS Client
If you restart the DNS client, then it can also fix the ‘DNS probe finished NXdomain’ error on your PC.
- Press Windows Key + R → type services.MSC → Hit Enter to open Services window.
- Find the DNS client and right-click on it.
- Then from the options, click on Restart to restart the DNS client. Done!!
Disable DNS Prediction Services
- Go to the settings of Chrome.
- Then scroll down and also click on Advanced settings.
- Here it will show you an option of ‘Use Prediction Services to Load the Pages more Quickly’
- Then simply uncheck the box and restart your browser.
Some Other Methods
If the methods above do not work for you then try some other methods listed below.
1. Uninstall Antivirus
Some people reported that after uninstalling their Antivirus program (mostly McAfee) the problem was gone.
2. Disable Your Firewall
If you disable the firewalls then it may solve the problem as some applications may interfere when Chrome is trying to connect. This could be the solution for you too. Disable your firewall and also check for the error.
3. Try Connecting in Safe Mode
You have to boot your computer into safe mode and then try to load Chrome. This will help you to know if any third-party software is causing the issue as the safe mode will only consist of inbuilt useful files. However, to do this you need to reboot your computer and also hold down the F8 key. Then select Safe mood with networking from the options in the list.
Flush your Outdated DNS Probe
The error also occurs if the DNS cache is outdated then you have is manually delete it.
- To do so simply enter;
Win + R
- And then type cmd in the search box.
- Type ipconfig /flushdns hit Enter.
- Now restart your computer to check the Chrome of issue fix.
Conclusion
I hope you like this article, give us your feedback if you find this article helpful to yourself. Also if you guys have further issues and queries related to this article. Then let us know in the comments section below. We will get back to you shortly.
Have a Great Day!


