Ender 3 Review: Recently I found out about Ender 3 Pro while browsing budget 3D printers and plan to give it a try. Well, after using it for a month, I feel comfortable recommending it. As I’m new to 3D printing so I’ll keep the review simple and easy so that the people purchasing a 3D printer for the first time can make a good decision. Come let’s begin the Ender 3 Review.
3D printing is a fancy word to pronounce. Also, for FDM or fused filament fabrication technique that builds 3d objects by depositing a small amount of material layer by layer. Modern 3D printers aimed towards hobbyists and creators are small that can even fit on your desk and makes these machines convenient and practical.
Contents
Ender 3 Review:
In the box
Ender 3 Pro comes partially build in a box buried neatly in a layer of foam. If you’ve set anything from Ikea then you’d be able to set this 3D printer without any issue. The box also contains the 3D printer, micro SD card and reader, necessary tools, wire cutter, scraper and some grams of filament. I would also point out that the instruction manual that is just a single sheet of paper may be insufficient but there are some super informative videos on YouTube. However, you can also watch those to guide yourself through the assembly process.
Assembling the printer
Ender 3 comes with all the tools that you would need to assemble the 3D printer. Also, it took about two hours to fully assemble the 3D printer while watching an instruction video. Once you assemble everything, the 3D printer is almost ready to print. Make sure before printing you’ll have to level the bed to ensure the best results. And again, one more time you can watch a YouTube video for that.
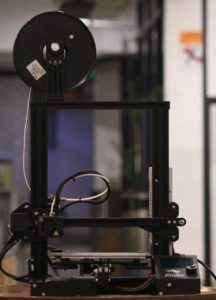
The Ender 3 is a compact. However, it can be positioned on your desk. Also, it gets loud while printing so you might want to put it in a place where people don’t hear it all the time. You can also print a fairly large volume of 220x220x250mm.
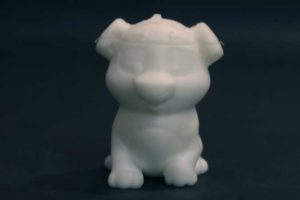
You would have to purchase a roll of filament to begin your 3D printing. Trial as Ender 3 only comes with a tiny amount of filament that is barely sufficient to print the dog that comes preloaded on the SD card.
Buying Filament
Ender 3 can print various materials that can be split into plastics. Some of the most essential materials are PLA, ABS, TPU, etc. All of the filaments have various mechanical properties that make every filament useful for a particular use. For example, PLA is easy to work with and also it is the best suited for beginners. ABS is a stronger material and can be used to functional parts, and TPU is flexible which makes it ideal for flexible prints.
Software
Before printing make sure how do the Ender 3 prints an object?
Most 3D printers use a set of instructions that allow the printer to go to a location on the bed and deposit some amount of material. It’s all done layer by layer and all these instructions are save in a gcode. Ender 3 only reads the gcode files so we require software to generate that file.
The software is also known as a Slicer takes in a digital 3D model. Slice it horizontally into layers that make it easier for the printer to understand. You can also use any one of Ultimaker Cura, Simplify3D, or ideaMaker to cut your 3D models.
However, cutting software can not be used to creating 3D models and you would either have to use 3D modeling software like Autodesk 3DS Max, Blender, or Tinkercad or install amazing 3D models from Thingiverse. Learning to create your own 3D prints can be an amazing process in itself and tools like Tinkercad make it quite simpler. If you don’t want to get into building your models then don’t worry. You can still find many useful models on Thingiverse for free.
Slice the Code
Well, I use Ultimaker Cura Slicing software to create gcode files for any model. But you can use any slicing software that you like. You can also stick to default settings while setting up Ender 3 settings and generate a preview by tapping the Slice button. The Slicer also enables you an estimated time, filament required, and cost of the model. Simply put the gcode file in the micro SD card. Then plug the card into the slot on the Ender 3.
Print Quality
If you assemble the Ender 3 perfectly, you will get pretty cool results without installing any upgrades or tweaking any settings. I encountered some issues while testing and fixed it within minutes. Mind you these problems arise only because of my sloppy installation or some issue in the slicer configuration. Also, it doesn’t count as a flaw in the 3D printer itself.
These are some of the issues that I faced.
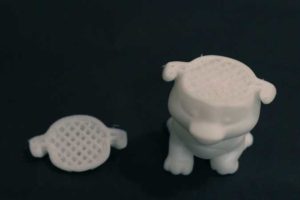
Doggy Print:
Filament ran out in the middle of the print. As a result, the skipped layer made the print fail at the position. To resolve this problem, just check the filament left on the roll before you start the installation.
It also fell off after a while.
Spinning top:
Accidentally I hit the printing bed. Make sure the printer can’t touch at all while it is printing.

Giant AirPod:
This was a multipart print and I saw many stringing that should not exist. I tweaked some settings in the Slicer and the stringing vanishes after that.
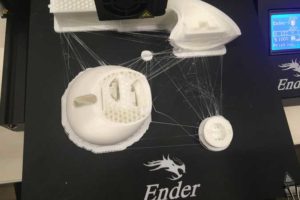
This is how it looked after resemble.

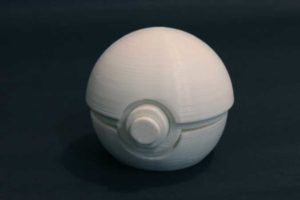
Pokeball Hinge:
The hinge printed with moving parts but the moving parts got stuck. I try to fix it by applying force but the print still breaking instead.
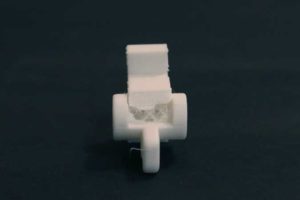
To fix this you need to print it solid to add strength. So that the moving part release upon force. However, this may not be the case for every print, the next print will tell you why.
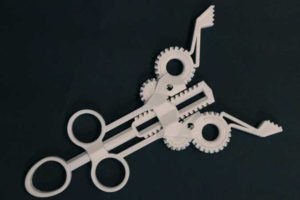
Caliper:
I printed this caliper and it broke rather than moving. Because layers were stuck again. I printed this to check how much the layers were sticking. I found out that I had to tweak some settings in the Slicing software to make it work. After that, it worked like a charm.
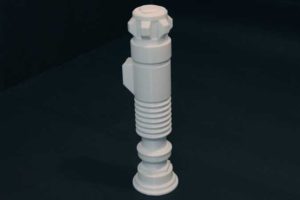
Lightsaber: Now I know to do a test print if it has any moving parts to check if the print will work or not. I like to print the lightsaber so I print the test first and to my surprise. But it wasn’t smoothly cylindrical as it couldn’t have been a slicer issue. This was a loose belt on the X-axis and after tightening the belt the test came out smooth and so lightsaber.
Printing Speed
While all these prints look amazing when finish. Every object took some hours to a few days depending on the size of the print. The average speed is around 60mm/s to 70mm/s. Ender 3 advertise high printing speeds of up to 180mm/s but it’s good to stay in the sub 100mm/s range to make sure the best quality.
Details
The common way of checking a 3D print is from the layer lines. But the standard layer height 0.2mm, you can enhance the quality of your model by modifying the layer height to 0.12mm. It would also take more time but the quality is quite better.
Tech Specs- Ender 3 Review
| Technology | FDM |
| Power Supply | Universal |
| Print Volume | 220x220x250mm |
| Machine Size | 440x410x465mm |
| Weight | 8.6Kg |
| Max Printing Speed | 180mm/s |
| Filament Diameter | 1.75mm |
| Filament Type | PLA, ABS, Wood, Carbon Fiber |
| Layer Thickness | 0.12mm – 0.4mm |
| Mode | USB or microSD |
| Max Nozzle Temperature | 255℃ |
| Max Hotbed Temperature | 110℃ |
Conclusion:
While using Ender 3 for the past few weeks has been an excellent experience. Also, the printer offers many values for your buck. However, the printer can’t plug and play, learning to remove issues is fun in itself. But when you tune the printer, printing becomes effortless and fun. If you like a budget 3D printer and expect decent prints then Ender 3 is a decent choice. There are not many competitors that can match the quality you can buy one from Amazon or the Creality Store.
Here’s a complete “Ender 3 review”. For further queries and questions let us know in the comments section below!
Also Read: