
Getting Gyromag Systems in Warframe is actually a real catch-22 situation. You can purchase them for 1,000 Vox Solaris standing from Little Duck, however, you have to be at the rank of Hand along with the Vox Solaris syndicate to be able to make such purchase as well. In order to level up to the rank of Agent (that precedes the rank of Hand) with Vox Solaris, you need 15 Gyromag Systems along with 10 Vega Toroids and many other items as a sacrifice. In this article, we are going to talk about How Do I Gyromag Systems in Warframe. Let’s begin!
Most of the Warframe players have stuck in this kind of situation where you need Gyromag Systems. In order to upgrade to a rank where you’re allow to purchase these same Gyromag Systems as well. If you find yourself in this kind of situation, then this article provides everything you have to know to get Gyromag Systems in Warframe.
Now before even continuing, there’s one thing you guys must take note of about Gyromag Systems in Warframe. Getting them is hard, for most of the players. The difficulty is not actually in acquiring the item, however, in the requirements to upgrade to the ranks in which getting the item is possible. It’s the consequence of a terrible design choice of the Vox Solaris Syndicate system on the part of the game’s designers. However, until a patch is release to fix that, you guys can make do along with the techniques outline below.
Contents
The Different Ways to get Gyromag Systems
Let’s now take a look at all the available ways to get Gyromag Systems in Warframe. Also, even if they’re all not feasible. These are listed below in increasing order of difficulty too:
- The easiest way to get Gyromag Systems is via purchasing them from Little Duck for 1,000 Vox Solaris standing. As mentioned earlier, you, however, have to get to the rank of Hand for that to be possible, and you have to sacrifice 15 Gyromag Systems in order to get to the rank preceding that (Agent rank). Thus, this option is ruled out for most players because you most probably don’t have any Gyromag Systems to sacrifice if you are reading this article.
- Another way to gather Gyromag Systems is via acquiring them as rewards from Heist Bounties offered through Vox Solaris. There’s also another catch here; Heist Bounties are available only after you guys have reached Old Mate rank along with Solaris United.
- Now, Old Mate is actually the highest rank at Solaris United. Thus, this is where you should start from if you are looking to get Gyromag Systems; level up to Old Mate along with Solaris United. Then as Heist Bounties become available to you, and it’s time to start participating in them to stand a chance of getting Gyromag Systems as well.
Further
From the above progression, here is actually a summary of the steps. That you’d have to obtain Gyromag Systems in Warframe (in its current state):
- Reach Old Mate rank along with Solaris United. Heist Bounties become available.
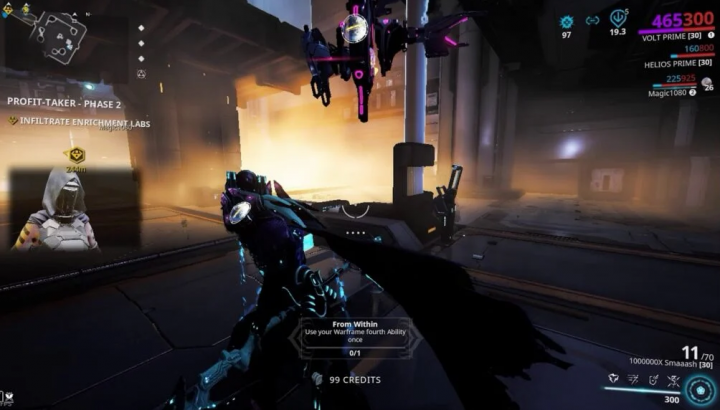
- The only Heist Bounty that offers Gyromag Systems as one of its rewards is the Profit-Taker Orb Heist. Thus, the next step is basically to participate in the Profit-Taker Orb Heist and acquire Gyromag Systems from the rewards drop at the end of the bounties. There are techniques to this as well.
Performing Profit-Taker Orb Heists
Well, the Profit-Taker Orb Heist consists of four different bounty phases. And there are a lot of rewards at the end of each phase along with different drop chances, according to the game’s RNG as well. Important to us here is that Gyromag Systems, alongside Repeller Systems and Atmo Systems, are also available as rewards for all four phases. Gyromag Systems also has a drop chance of 25% in the first three phases, and 28.57% in Phase 4 as well.
If you guys are familiar with games such as Warframe with reward systems influenced via a Random Number Generator (RNG) system,. Then you’d know you have to farm these bounty phases in order to acquire all the Gyromag Systems that you need. The trick is in finding an efficient way to decrease the time spent farming. When acquiring all the important items from the reward drops at the end of the phases.
Now here’s also the technique to it. The drop chances are just the same across Phase 1-3, and there’s just a really slight increase in Phase 4. Thus, the wise thing to do would be to farm the phase along with the shortest duration, that is Phase 2. Phase 2 lasts for between 3-5 minutes. So it’s best to focus on this bounty because you’re going to be doing a lot of farming in order to acquire enough Gyromag Systems.
Profit-Taker Phase 2 Heists – The Efficient Technique for getting Gyromag Systems
As mentioned above, Phase 2 is actually the fastest of all four Profit-Taker bounty heists. However, you have to complete Phase 1 at least when before you can perform Phase 2. In order to do Phase 1, simply visit Fortuna, then just use Fast Travel in the game’s menu (Main Menu >> Fast Travel >> Little Duck). In order to get to the backroom inside Fortuna. When in, talk to Eudico at the briefing table and also accept the Phase 1 heist.
After you guys complete Phase 1, you don’t have to get back inside Fortuna in order to proceed to Phase 2. Simply talk to Little Duck outside the elevator at Fortuna in the Orb Vallis to commence Phase 2 as well. Here is a summary of the steps that you can take to instantly complete Phase 2 heists:
Steps
- After talking to Eudico and accepting the bounty, just enter the Orb Vallis and start moving towards the Enrichment Labs.
- When inside the Enrichment Labs building, just head to the backroom at the far end of the building. If you guys are confused about which of the rooms you’re heading to. Well, here’s a hint: the room should be the same one you encountered during the Spy bounty mission.
- Inside this room, then you’ll encounter three directors: the Armaments Director, Vivisect Director, and also the Sentient Research Director as well. These Directors are spawned at different intervals in succession along with the first being the Armaments Director. And you guys must be swift to kill each one before the next one is spawned. Or you are going to have a tough fight on your hands as well. This might not be easy at first, however, as you replay Phase 2 over and over again. You’ll learn the exact spots on which the Directors are spawn and be ready for them as well.
- After killing the three Directors, you have to exit the Enrichment Labs from the rear. And you’ll be met with two Terra Ambulas guarding a data vault. The data mass contained inside the vault is what you need to complete the Phase 2 heist. So proceed in order o to eliminate the Ambulas.
- When the Ambulas are out of the way, just grab the data mass and head back to Fortuna to close out the heist.
- Relying on how fast you blaze through the whole phase, there might still be ongoing dialogue via the time you finish the heist. Because you can’t start a new heist while dialogue from a previous one is still on. Then you can cancel the ongoing dialogue via talking to Eudico at the entrance of Orb Vallis.
Then
It actually becomes a matter of repeating the above steps each and every time you farm the Profit-Taker Phase 2 bounty. And you’ll soon enough get used to the whole process and speed via the heists. Note that you’d need a weapon that deals heavy damage in order to take out the Ambulas, and generally. A well-stocked and modded Warframe would actually make the heists a lot easier as well.


