When we install new programs on our System, then by default they will be installed in System drive that is C drive usually. The programs which are 32 bit will be installed in the “C:\Program Files(x86)” folder and the programs that are 64 bit will install in the “C:\Program Files” folder by default. In this article, we are going to talk about How to Change the Default Installation Location in Windows.
If you guys are running out of space in your C drive, then you can move some files to other drives. Program Files is one of the most essential folders in C drive that takes a lot of space if more software is installed in the system actually. There is one way to free up space in C drive is to change the default installation location of C:\Program Files. This will actually not move the currently installed programs however, all of your future programs will be installed in the new location also. Without manually changing the default installation path when installing the application as well.
Let’s have a look at how we can change the default installation folder in Windows 10. You can apply the same to Windows 7 and Windows 8.1 as well.
How can you Change the Default Installation Location in Windows
You have to proceed with the following steps in order to change the default location of the installation folder for new installing programs.
- You have to type Regedit in the Start menu or taskbar search box or in the Run dialog box and then tap on the enter key to continue.
- Head for the following keys
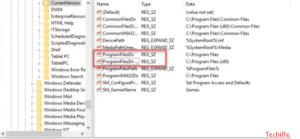
“HKEY_LOCAL_MACHINE\SOFTWARE\Microsoft\Windows\CurrentVersion”. And double tap on “CurrentVersion”. Then on the right-hand side window will expand actually. You have to go for ProgramFilesDir from the list. If your Operating System is 64 bit then there will be two entries actually, ProgramFilesDir and ProgramFilesDir(x86) as well.
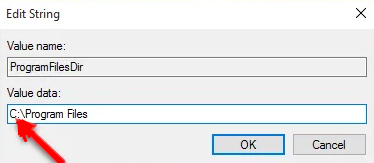
- Double-tap on any one of them and then see the entries. It is C drive first actually. You can also edit any drive where you want to save all of the installations. And then click Ok after editing.
- Finally, close the Registry Editor and then reboot your system if you want to apply the change. You might need to restart your computer in order to apply the change. Download a program and then try to install it and you have to check if it’s installed in the new installation directory.
- Restart the system for changes in order to take effect. And the new installation will be done in your new folder as well.
You have to apply these manageable and painless steps in order to change your default installation location actually. This may help you in making your System drive’s space manageable and in control as well. Now move any of your large files, games, or software between storage drives in few clicks actually.
Conclusion
Alright, That was all Folks! I hope you guys like this “default installation location” article and also find it helpful to you. Give us your feedback on it. Also if you guys have further queries and issues related to this article. Then let us know in the comments section below. We will get back to you shortly.
Have a Great Day!


