FreeNAS basically assigns a dynamic IP address configuration automatically during the setup. But, because it’s a server sharing files and other services to a local network, it’s recommended for you to use a static IP address instead. In this article, we are going to talk about How to Change FreeNAS Static IP – Tutorial. Let’s begin!
If you do not assign a static IP address, then the services FreeNAS provides to other devices will eventually stop working actually. This is because, by default, connected devices use dynamic IP addresses that are assigned by the DHCP server (mostly your router). That can change as soon as you restart the server or after the dynamically assigned configuration expires as well.
In this guide, you guys will learn the steps in order to set a static IP address configuration on FreeNAS version 11.2 or higher as well. (You can also use these steps for setting a static IP on Windows 10.)
Contents
What is FreeNAS?
FreeNAS is actually based on FreeBSD, itself born of BSD, that is a version of Unix developed at the University of California, Berkeley. FreeBSD is a full-fledged server operating system, however, FreeNAS has been optimized strictly for file serving and storage as well. It supports SMB or CIFS (Windows file shares), NFS (Unix file shares), and AFP (Apple File Shares), plus FTP and iSCSI as well.
FreeNAS also works with an array of plug-ins for things such as automated network backups, BitTorrent downloading, a Plex Media Server, MiniDLNA, and much more than that. The FreeNAS website has also an extensive FAQ and community section that’s definitely worth checking out.
Things you need to build a FreeNAS server
FreeNAS is basically compatible with all supported FreeBSD hardware that virtually every x86 platform (per the FreeBSD website). And it supports an extensive array of chipsets and network controllers as well.
Ideally, FreeNAS should be installed on a small SSD or also even a flash drive (although average hard drives also work fine in a pinch). And the system should feature one or more reliable hard drives for bulk storage as well. If you want to emphasize reliability: Then we have framed this article around using spare hardware. However, you should not use abused or utterly ancient drives for mission-critical storage as well.
How can you assign a static IP address via FreeNAS console
Use these simple steps if you want to set a static IP address on FreeNAS using the console:
- First, open FreeNAS console
- Type option 1 and tap the Enter.
- Then type option 1 to select the network adapter and tap Enter.
- Type n in order to skip removing current settings and click Enter.
- You have to type n to skip the DHCP configuration and then press Enter.
- Type y to set a new IPv4 configuration and then tap Enter.
- Now type an interface name (such as em0) and press Enter.
- Type the new static IP address (such as 10.1.2.158) for the FreeNAS server and then click Enter.
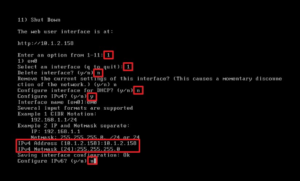
- Then type the subnet mask address of the network (such as 255.255.255.0) and then tap on the Enter.
- Now, type n in order to skip the setting up a static IPv6 configuration and then click Enter.
When you complete all the steps, then you can now connect to the FreeNAS server via the new static IP address.
How can assign a static IP address via FreeNAS web interface
You have to use these steps to set a static IP address on FreeNAS via the web interface:
- First, you have to open FreeNAS in your web browser.
- Now sign in to your root account.
- Tap on Network from the left pane.
- Then tap on Interfaces.
- Click the settings (three-dotted) button next to the active network interface and then choose the Edit option.
- In the “Interface Name” field, you have to type a descriptive name for the interface. For example, em0.
- Now clear the DHCP option.
- In the “IPv4 Address” field, you need to specify a static IP address that matches your network outside the DHCP scope. Such as 10.1.2.158.
- Use the “IPv4 Netmask” drop-down menu and choose the subnet mask. Such as 24 if the network is “255.255.255.0.” Mostly, you guys can find this information on your router or querying the IP address configuration of your Windows 10 machine.
- Now click the Save button.
- You have to Check the Confirm option.
- Tap on the OK button.
After you complete all of these steps, make sure to refresh the FreeNAS web interface using the new static IP address as well.
Conclusion
Alright, That was all Folks! I hope you guys like this article and also find it helpful to you. Give us your feedback on it. Also if you guys have further queries and issues related to this article. Then let us know in the comments section below. We will get back to you shortly.
Have a Great Day!


