Windows 10 basically gives you a range of customization options for your mouse, so you have flexibility in how your cursor behaves actually. In this guide, we will walk you through the available settings and the impact that they have on your pointer as well. In this article, we are going to talk about How to Configure the Mouse Settings in Windows 10. Let’s begin!
If you guys use a laptop or a desktop PC, then there is a high chance that you depend on your mouse or on your touchpad to use it. Working with Windows 10 actually implies the use of one of these devices. However, you can also connect a Bluetooth mouse to your tablet if that makes it easier for you to work on it. Thus if you want to be more productive, then it is important to configure your mouse just the way you like it. If you guys want to change what its buttons do, or change your mouse sensitivity to be higher or lower. Then read this tutorial and find out how can you do it in Windows 10:
NOTE: The settings illustrated in this article cover most accessories, however, some more advanced mice and touchpads have specialized drivers along with additional options. If you want to configure those settings, then you have to refer to the user manual of your particular pointing device.
Before we go further, it’s worth mentioning that Windows 10’s mouse settings are still split across Control Panel and the Settings app actually. The Settings app’s Mouse page is currently extremely basic and it contains only one option that you won’t find in the Control Panel.
Contents
- 1 Primary mouse button and scroll wheel | mouse settings in windows 10
- 2 Further
- 3 ClickLock | mouse settings in windows 10
- 4 Pointer speed and sensitivity | mouse settings in windows 10
- 5 Finding the cursor | mouse settings in windows 10
- 6 Change the mouse wheel in vertical and horizontal scrolling options
- 7 How you can see mouse hardware information
- 8 How can you configure a mouse that has more than two buttons
- 9 Have a Look
- 10 Conclusion
We will head to Settings first, so open the app (Win+I keyboard shortcut). Tap on the “Devices” category and then navigate to the “Mouse” page from the menu as well.
The page lets you customize the scroll wheel’s operation and then change which mouse button acts as the primary one. The mouse wheel can be made to scroll via lines or entire screens. (As if you pressed the Page Up or Page Down buttons). And you can customize how many lines or screens should scrolled all at once.
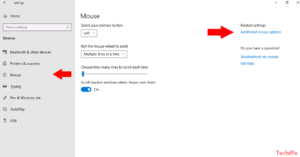
Well, the last toggle button on the page, “Scroll inactive windows when I hover over them,” is the only mouse setting not available in the Control Panel actually. This feature was basically new for Windows 10. Per the description, it also lets you scroll the contents of any window on your desktop through hovering over it and using the mouse wheel as well. You guys do not need to switch focus to the window first, addressing a long-standing complaint along with previous versions of Windows. You guys will probably want to keep it turned on most of the time.
Further
The rest of Windows’ mouse settings are push away in the Control Panel. You can access them along with the “Additional mouse options” link to the right of the Mouse settings page as well. This will bring up the “Mouse Properties” popup that has not changed much via generations of the Windows operating system as well.
The first tab of this screen basically gives three options. The first one is duplicate from the Settings app and lets you customize your primary mouse button. The second one lets you change when double-clicks are registered – if you find Windows is not detecting when you double-click. Or is making false positive matches, then you can use the slider and test area in order to finetune how long a double-click has to last.
ClickLock | mouse settings in windows 10
The final option on the page is controls a little-use accessibility feature called ClickLock. Whenever it is turn on, you guys do not need to hold down your mouse button when tapping and dragging. Rather, you hold the button briefly, that starts the selection. You can then release the button, move the mouse in order to complete your selection. And then tap on the button again to confirm the operation. It’s primarily for folks who may find it hard to depress the mouse button for an extend period of time actually.
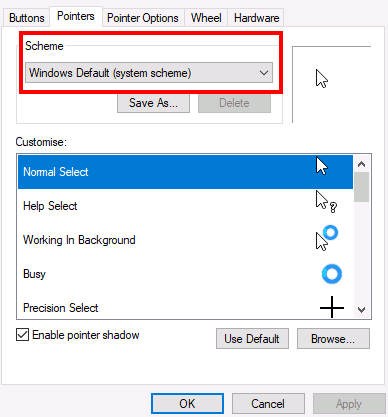
However, the second tab of the Mouse Properties dialog enables you to change the presentation of your cursor as well. You can pick and select from the themes installed on your device, or also specify your own pictures to use for different cursor states.
Pointer speed and sensitivity | mouse settings in windows 10
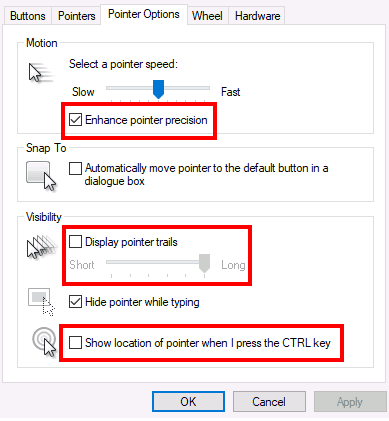
The Pointer Options tab is actually more directly applicable to your mouse’s operation. The first set of options are basically related to the movement of your cursor. You guys can also control how fast the cursor moves, that enables you to decrease or increase the effective sensitivity of your mouse.
There is also an “Enhance pointer precision” checkbox, that dynamically adjusts all of the effective sensitivity relative to how fast you actually move the mouse. When you guys are moving slowly in order to select a small button. Then Windows will adjust the sensitivity on-the-fly in order to keep the cursor motion precise as well. If you guys have a gaming or professional mouse. Then you should note that both of the pointer speed and precision options may conflict along with the DPI and sensitivity settings offered by your mouse as well.
The second section of the Pointer Options tab basically controls “Snap To,” an accessibility feature that automatically moves your cursor as new popups open on your screen. Your cursor will then automatically “snap to” the default button in each and every popup, so you do not need to move your mouse to tap “OK.”
Finding the cursor | mouse settings in windows 10
Finally, the “Visibility” section lets you guys control when the cursor should be hidden. You can turn off automatic cursor hiding while typing with the “Hide pointer while typing” checkbox as well.
Using the “Display pointer trails” option, it is also possible to display pointer trails. That track your mouse across the screen if you have difficulty following your cursor. A final usability tweak is “Show location of pointer when I press the CTRL key” – a self-explanatory checkbox. That can come in handy for those “lost my mouse” situations actually.
That is it for Windows’ mouse settings. We are not covering the other Mouse Properties tabs; Wheel is duplicate in the Settings page we describe when Hardware lists technical information about your mouse actually. It’s possible that you will see more tabs in Mouse Properties relying on your specific device. Such as many laptop touchpad drivers add additional pages here which lets you customize their operation as well.
Change the mouse wheel in vertical and horizontal scrolling options
If you want to customize mouse wheel options, then click or tap the Wheel tab of the Mouse Properties window.
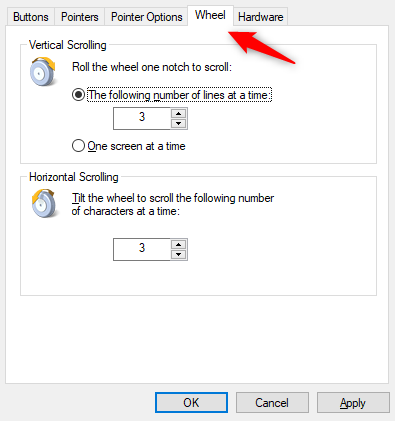
The “Vertical Scrolling” options are the same as the ones in the mouse settings page from the Settings app as well. You can also select how much content you scroll at a time. And set the number of lines if you guys select the first option.
Now under Horizontal Scrolling, you can also set how many characters to scroll horizontally when you tilt the mouse wheel. Keep in mind that this does not work on every kind of mouse. You need one that supports horizontal scrolling actually.
How you can see mouse hardware information
If you want to see your mouse hardware options. Then click or tap the Hardware tab of the Mouse Properties window.
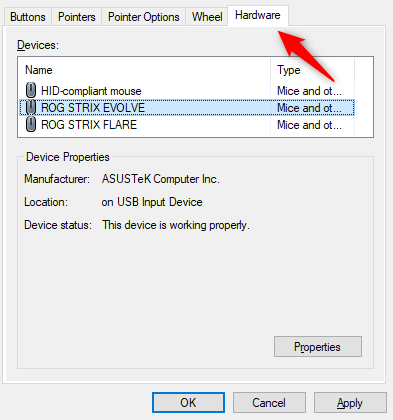
Here you guys can see all the mice and touchpads connect to your computer, their manufacturer. What port they are actually plug in, and if the devices are working correctly. Mostly, there is no need to access this page, and the hardware properties are meant to be used only through advanced users actually.
One of our readers asked how can you configure a mouse that has more than two buttons. Unfortunately, the answer to this question is that you cannot actually set the additional buttons. That found on your mouse, through solely Windows 10. If you have such a mouse, then you can configure what the extra buttons do only. Through using a software application offered by your mouse’s manufacturer actually. You guys mostly get the right software for your mouse together. Along with its drivers, on the CD or DVD that also came with it. Or from the mouse’s manufacturer website as well. Let’s have a look at the list of the software used by some of the most popular mice:
Have a Look
- Microsoft mice buttons can mostly be configured along with Microsoft Mouse and Keyboard Center
- Logitech mice can be configured with Logitech Options or Logitech SetPoint as well
- Razer gaming mice buttons can be set along with Razer Synapse
- ASUS gaming mice can be controlled with ASUS Armoury Crate or also ASUS ROG Armoury
- SteelSeries gaming mice can be configured along with the help of the SteelSeries Engine software
- Corsair gaming mice use the Corsair Utility Engine software in order to map their extra buttons
Another option that you guys can use in order to configure what the extra buttons found on any mouse do in Windows 10. It is to use a third-party application for example X-Mouse Button Control. This one actually works on any Windows operating system from Windows XP to Windows 10, regardless of your mouse model and make as well.
Conclusion
Alright, That was all Folks! I hope you guys like this “mouse settings in windows 10” article and also find it helpful to you. Give us your feedback on it. Also if you guys have further queries and issues related to this article. Then let us know in the comments section below. We will get back to you shortly.
Have a Great Day!


