One really easy way in order to free up some disk space in Windows is to delete temporary files, most of the time referred to as temp files. Temp files are exactly what they probably sound like: files that your operating system only required to exist temporarily. When in use, but are now just wasting space. In this article, we are going t talk about How to Delete Temporary Internet Files Windows 10. Let’s begin!
Most temporary files are saved in what’s called the Windows Temp folder, the location of which differs from computer to computer, and even user to user as well. You guys can see the steps below.
Manually cleaning out the Temp folder in Windows mostly takes less than a minute. However, it could take longer depending on how large the collection of temporary files is.
Contents
- 1 Delete temporary Internet files using Settings
- 1.0.1 Delete temporary Internet files on Windows 10 version 1903 and later
- 1.0.2 Delete temporary Internet files on Windows 10 version 1809 and earlier
- 1.0.3 Automatically delete temporary files on Windows 10 version 1903 or later
- 1.0.4 Automatically delete temporary Internet files on Windows 10 version 1809 or earlier
- 1.0.5 Delete temporary internet files using Disk Cleanup
- 1.0.6 Delete Temporary Internet Files Using Temp Folder
- 1.0.7 Note
- 1.0.8 Conclusion
What are the temporary files?
Temporary files are mostly referred to as those files that apps store on your computer to hold information temporarily. But, Windows 10 has many other temporary file types, that includes those leftover files after installing a new version, upgrade logs, error reporting, temporary Windows installation files, and much more than that.
Typically, these files won’t cause any issues, however, they can grow rapidly using valuable space on the hard drive. That can be the reason avoiding you to install a new version of Windows 10, or they can be the reason that you are running out of space.
If you are using Windows 10, then you have a few ways to safely delete temporary files on your machine through the Settings app and the Disk Cleanup tool.
In this guide, you guys will learn the steps to instantly delete temporary files on Windows 10 to free up space. Or also to reclaim storage space after installing a feature update, such as Windows 10 version 1909.
Delete temporary Internet files using Settings
On Windows 10, you guys can use the Settings app to delete temporary files manually or automatically. However, the steps will be slightly different depending on the release that you are running.
Delete temporary Internet files on Windows 10 version 1903 and later
If you want to remove temporary files on Windows 10 version 1903, 1909, 2004, and later releases, then you can use these steps:
- First, open Settings on Windows 10.
- Then tap on System.
- Tap on Storage.
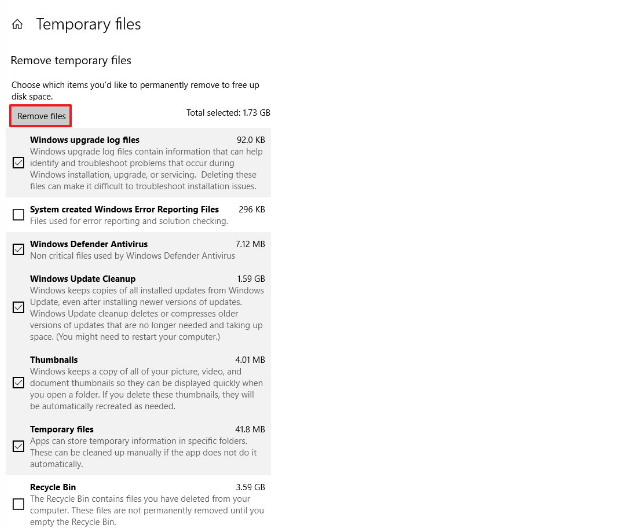
- Under the “Local Disk” section, you need to click on the Temporary files option.

- Choose the temporary files you want to remove.
- Then tap the Remove files button.
After you complete the steps, then junk files will be removed from your computer freeing up space for more important files.
Delete temporary Internet files on Windows 10 version 1809 and earlier
In order to manually remove temporary files using the Settings app on version 1809 and older releases. You need to use these simple steps:
- First, open Settings.
- Then tap on System.
- Press on Storage.
- Then tap on the Free up space now option.
- Choose the files you want to delete, that includes:
- Windows upgrade log files.
- The system created Windows Error Reporting files.
- Windows Defender Antivirus.
- Windows Update Cleanup.
- Thumbnails.
- Temporary files.
- Recycle Bin.
- Temporary Internet Files.
- Delivery Optimization Files.
- DirectX Shader Cache.
- Previous Windows Installation(s).
- Click the Remove files button.
When you complete the steps, then those files you selected will be permanently deleted from your computer freeing up space for more valuable files.
If you are removing a previous version of Windows 10, then consider that you won’t be able to roll back to an earlier version without these files. But, after a feature update, installs on your device, the operating system automatically deletes these files anyway after 10 days.
Automatically delete temporary files on Windows 10 version 1903 or later
Just like that , you can use “Storage sense” to automatically free up space. By deleting those temporary files and content from the recycle bin.
In order to delete files wasting space automatically using Storage Sense on Windows 10 version 1903 or later releases:
- First, open Settings.
- Tap on System.
- Then tap on Storage.
- Now under the “Storage” section, then turn on the toggle switch.
After you complete these steps, Storage sense will delete most of the temporary files as well as those files that are in the recycle bin for more than 30 days.
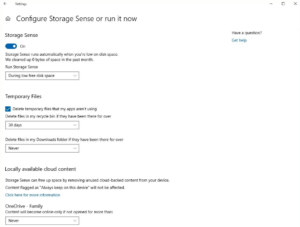
Plus, you can always tap on the Configure Storage Sense or run it now option. In order to adjust the cleanup settings or run Storage Sense on-demand.
Automatically delete temporary Internet files on Windows 10 version 1809 or earlier
In order to delete files wasting space automatically using Storage Sense on Windows 10 version 1809 or earlier releases:
- First, open Settings.
- Tap on System.
- Then tap on Storage.
- Now turn on the Storage sense toggle switch.
After completing these simple steps, Windows 10 will automatically delete temporary files. And also those files that have are in the recycle bin for over 30 days.
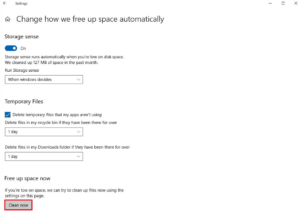
You can also tap on the Change how we free up space links to schedule an automatic cleanup. Or you can run Storage sense on-demand, in order to free up space on Windows 10.
Delete temporary internet files using Disk Cleanup
If you guys are getting a message that your device is running out of space. Then you can also use the Disk Cleanup tool in order to delete temporary files to free up space on your device.
If you want to remove temporary files from Windows 10 using Disk Cleanup, then use these simple steps:
- First, open File Explorer on Windows 10.
- Then tap on This PC.
- Right-click the drive with the Windows 10 installation and then choose the Properties option.
- Tap on the Disk Cleanup button.
- Then tap on the Cleanup system files button.
- Check the items that you want to delete. Such as Temporary Windows Installation Files, Windows upgrade log files, Recycle Bin, Temporary Files, and System created Windows Error Reporting as well.
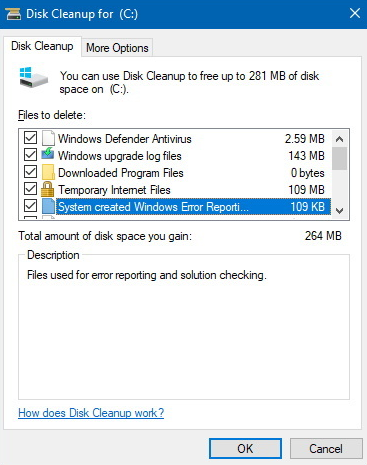
- Now click the OK button.
- Click the Delete Files button as well
When you complete these simple steps. Then the temporary files will permanently be deleted from your computer making room for new files.
Delete Temporary Internet Files Using Temp Folder
-
From the Start menu, yo0u have to open the Run dialog box or you can also Press the “Window + R” key to open the RUN window.
-
Type “%temp%” and then tap on the OK button.
Note
-
Choose all the files and folders containing it and then tap on the “Delete” key. In order to delete all the temporary files and folders to the “Recycle Bin”.
-
Finally, open the “Recycle Bin” and through tapping on the “Empty Recycle Bin” option. You can also delete permanently all the temporary files and folders if you want as well.
Conclusion
Alright, That was all Folks! I hope you guys like this article and also find it helpful to you. Give us your feedback on it. Also if you guys have further queries and issues related to this article. Then let us know in the comments section below. We will get back to you shortly.
Have a Great Day!