
Well, Diagnostic Policy Service is there in Windows OS in order to detect, troubleshoot, and resolve issues along with Windows Components. Whenever this service is disabled, diagnostics will then no longer be functioning. Because this is actually a background service and is needful for Windows. It is automatically started whenever you guys start your system and keep running as well. In this article, we are going to talk about How to Fix Service Host Diagnostic Policy Error. Let’s begin!
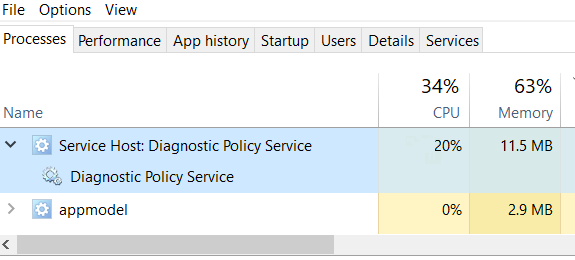
However, most of the time you may notice high CPU usage along with Diagnostic Policy Service. This is not desirable for a background service actually. High CPU usage from a single process basically makes the system slower in order to respond to other processes. And then you guys face lagging problems. Check out the below-shown screenshot that basically shows a really high CPU usage from Diagnostic Policy Service as well.
Contents
What Is Service Host (Svchost.exe)?
Some of the apps and programs on your PC are called stand-alone executables and can actually run via themselves. But, most of these services are DLLs (Dynamic Link Libraries) that don’t contain all of the information needed to run through themselves actually.
These DLLs need a Service Host in order to load and run on your PC. For this reason, you mostly have many Service Host processes running whenever you open your Task Manager actually.
Service Host basically helps “host” certain services on your PC. These services are mostly designed in order to run in the background and not cause many problems. However, there are some cases where Service Host apps can actually become corrupt and then begin consuming more processing power than they actually should.
Also, keep in mind that it is mostly one process that Service Host is running and not Service Host itself that is actually causing the error. That does not really mean that you guys can end the service and uninstall it as well. Microsoft Windows has a lot of integral services that need the Service Host app in order to run them. If you end some of these, then your PC system will become unstable.
How to Fix Service Host Diagnostic Policy Error
General Suggestions
- First of all, just try to end the task process and let it restart itself as well. See if high CPU usage occurs from the process now or not. If this continues, then just reboot the machine.
- You need to run the System File Checker scan or run DISM commands in order to repair inbox corruption.
- Try to create a new user account and check if the problem persists on that.
- Also, make sure you install the latest Windows Updates.
- Then run System Performance troubleshooter.
- YOu have to update your machine’s BIOS firmware to the latest version.
- Make sure you have the latest drivers installed on the system as well.
Via File Explorer
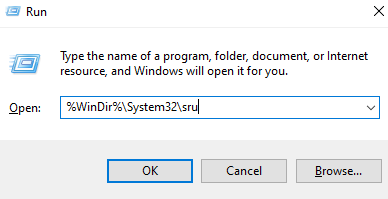
- Press Windows + R and then type the following in the Run dialog box, press the Enter key:
%WinDir%\System32\sru
- Now in the sru folder so open, just locate the SRUDB.dat file and then delete it.
- you need to close File Explorer and then restart your system.
From Task Manager
The simplest of all the solutions is basically to stop the task from the task manager and let it restart itself. When it restarts, then just observe for a while and see if the problem is resolved or not.
- First, right-click on an empty space in your taskbar and then tap on the Task Manager option from the right-click context menu as well.
- By default, Task Manager would open up along with the Processes tab. Then under the processes tab, you guys have to scroll down and locate the section named Windows processes.
- Under Windows processes, you need to find the process named Service Host: Diagnostic Policy Service. Right-click on it and then from the right tap context menu, just select the option End task.
- Now you guys will get a UAC window that asks for your confirmation on shutting down the system process Service Host: Diagnostic Policy Service. Also, make sure to check the checkbox Abandon unsaved data and shut down in order to make the Shutdown button active and when it comes active, then just click on it.
Well, that’s it. The process will now restart itself in a few seconds. When it restarts, then just observe for a while and check if your problem is gone or not. If not, go on to the next method as well.
Remove the SRUDB.dat file from the SRU Folder
So, if the above 2 methods do not work, we then have to delete the SRUDB.dat file from the sru folder as well. The SRUDB.dat file is basically related to the Diagnostic Policy Service service. This file most of the time could grow extremely large and can actually cause a lot of memory consumption. Whenever we delete this file, most of the issue of Diagnostic Policy Service service taking up lots of CPU power goes away with it. You have to follow the simple steps listed below in order to achieve the same:
- Open the Run dialog box through tapping the WIN + R keys together. When it opens up, then copy-paste the following and then tap on the Enter key.
- You guys might now be notified that you do not have enough permissions in order to access the sru folder. Well, in that case, just tap on the Continue button.
- You guys will now be able to see all of the files in the System folder sru. You need to locate and right-click on the file that is named SRUDB.dat. From the right-click context menu, just tap on the Delete option.
- If you guys by chance get the message that says that SRUDB.dat file cannot be deleted because Diagnostic Policy Service is using it. Then you need to open the Diagnostic Policy Service and turn it off to successfully delete the SRUDB.dat file as well.
Conclusion
Alright, That was all Folks! I hope you guys like this article and also find it helpful to you. Give us your feedback on it. Also if you guys have further queries and issues related to this article. Then let us know in the comments section below. We will get back to you shortly.
Have a Great Day!
Also See: How To Fix ‘Windows Can’t Format This Drive’ In Windows 10


