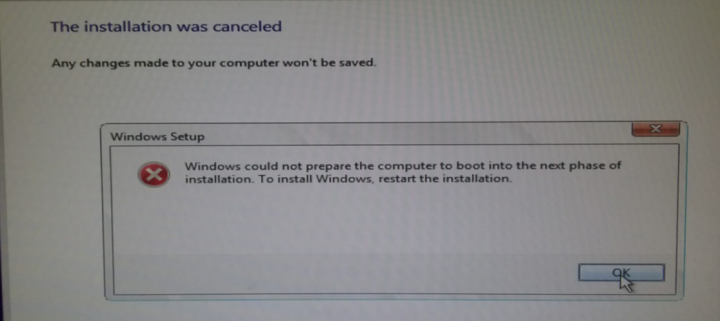
Do you want to fix the Windows installation error? If yes, then you are in the right place. Some users are facing the “Windows could not prepare the computer to boot into the next phase of installation” error while trying to installer download Windows or trying to upgrade an existing model. The problem is not exclusive to a specific Windows variant. But it occurs with Windows 7/8.1/10 installations.
Contents
- 1 Causes:
- 2 How To Fix Error ‘Windows could not prepare the computer to boot into the next phase of the installation‘:
Causes:
We examined this particular problem after looking at different user reports and the repair strategies that they used to fix it. These methods are based on what we gathered. However, there are lots of common cases that cause this Windows Installation Error:
- Non-essential devices are plugged in – Some BIOS models are known to act up when lots of non-essential hardware is plugged in during its installation process. Many users can fix the issue after removing or turning off every unnecessary hardware.
- Badly written installation media – Some users confirmed that the issue occurs because of improperly created installation media. After recreating it properly, the issue resolved.
- BIOS can’t support the Windows version – Mostly the issue occurs with Mini-PC and the same PCs. Some smaller motherboards versions that are recently launched feature a BIOS version that can’t support Windows 7 or under.
- System file corruption – It’s also a possibility that system file corruption causing this particular error. Users in the same situation claimed that the issue fixed after they removed all partitions and did a clean install.
If you’re currently searching for fixes that will let you fix the error, this guide will provide you with many potential repair strategies.
Dive down below, you’ll discover lots of methods that can help you to fix Windows installation errors. Come let’s have a look:
Also See: Easy Way of Accessing Router Remotely
How To Fix Error ‘Windows could not prepare the computer to boot into the next phase of the installation‘:
Fix 1: Turning Off All Non-Essential Hardware
The most effective fix when encountering the “Windows could not prepare the computer to boot into the next phase of installation” error is to erase/disable any non-potential hardware. This is effective when a user tries to upgrade an existing Windows installation.
Some users are claiming that the issue occurs due to the bugged BIOS version on older PCs. It can only occur when there are many external or peripherals devices connected to the PC.
With this in mind, erase any non-critical hardware like network adapters, Universal Serial Bus (USB) devices, sound cards, serial cards, etc. If you have various SDDs or HDD, then disconnect all these that are not required during the installation. Also, erase any optical drives that are currently active on your PC.
Whenever your PC is running with the bare minimum hardware. Then restart your PC and then start the installation again. There might be a chance that will be able to complete the process without viewing the Windows installation error again.
Fix 2: Prepare Installation Media Properly
Another main issue is badly written installation media. Well, it’s confirmed that the “Windows could not prepare the computer to boot into the next phase of installation” error might occur if the media is written badly. So if you want to fix the issue after starting the process again from various installation media.
Here are two different methods that you can follow just to create Windows installation media. Follow any of the method given below that are more effective in your current situation:
Also See: How to Change Messenger Sound in iOS 10
Creating a Windows 7 Bootable DVD or USB To fix Windows Installation Error
- Simply install or download the Windows 7 bootable USB/DVD Download Tool after tapping here. Then tap and execute the downloaded file Windows7-USB-DVD-tool.exe. A prompt appears and asking you to choose the ISO file for which you like to create the USB/DVD. Install the required Windows 7 ISO file.
- Download: Link
- Then tap on the Browse button and choose the downloaded ISO file. Then tap Next. Choose your media-type either the DVD or the USB.
- Once you choose the media-type, a prompt appears asking you to choose the appropriate device from the drop-down. Choose the correct media type and then tap on Begin Copying.
- You’ll then view bar progress when it writes to the media to create the bootable media. When the process is successfully completed, you can then create a bootable media for Windows 7 that can be used to boot and install Windows 7 on systems.
Some devices now allow you to directly boot through USB if this option is unavailable. You can then change the order of boot from the BIOS. Check for the options at start-up before the system brand’s logo is shown. Y0u can access these options by F keys.
Creating a Bootable USB drive via Rufus or MediaCreation Tool
- Download or install Windows10 and keep in mind that you have a minimum of 8GB of USB storage to create the media.
- Then you need a program known as Rufus. It is a small utility to create bootable media for GPT or MBR Partitions.
- Download: Rufus
- When ISO or Rufus has been successfully downloaded. Then open the Rufus and select the Device (USB) that can be used as your bootable media.
- Then, select the GPT partition scheme for UEFI. You can then leave the File System & Cluster Size to default settings. Don’t forget to label the drive.
- Check to Create a bootable disk and make sure that the ‘ISO Image’ is chosen from the drop-down. You can then use the small drive icon to locate and select the image.
- Next, select Start to finish.
Repeat the whole process with the newly created media and check if you’re still facing ‘Windows Installation Error’. If it still occurs, then dive down below!
Also See: Windows 10 Issue ‘Windows Needs Your Current Credentials’ – How To Fix It
Fix 3: Check BIOS can support Windows version
If you’re trying to install or download an older Windows variant on your new desktop or laptop. Then there might a chance that your BIOS version can’t support the Windows version that you’re trying to install. There are many cases with this occurring on the Mini-PC version. Well, all the new versions can’t support Windows versions older than 8.1.
If you think this method might be convenient for your current situation. Then call your warranty service or search online to view if the BIOS version present on your computer supports the Windows model that you’re trying to install.
On the other hand, try to install a new Windows version and check if the issue ‘Windows Installation Error’ resolved or not.
Method 4: Removing all partitions To Fix Windows Installation Error
Some users also claimed that they were finally able to move through the installation and complete the whole process without the error. They can only do this after they removed all partitions. Then begin the OS installation process from the start.
Well, it can be a huge inconvenience if you were just trying to upgrade an existing Windows installation. But if things go wrong, we recommend you to create a Windows System Image backup before you move further with the deletion of all available partitions.
When you successfully create the backup. You can then restart your PC and force your PC to boot from the installation media. After you reach the screen where you get to choose where to install the OS. Then remove every available partition and then create new ones from the unassigned space. Then proceed further with the Windows installation normally. I hope you fix the issue of Windows installation error.
Conclusion:
These were some of the best methods to resolve ‘Windows Installation Error’. If you are facing the same issue, then try these fixes. If you like this guide, then share it with your friends. Also, if you have any doubts regarding any of the methods, feel free to ask any questions or queries in the comments section below.
Also Read:


