
Well, Windows Updates deliver crucial updates for the services. Windows Updates not only help us to keep the Windows along with the latest patches for security along with newer versions of the Windows components. However, also help keep the firmware, software, hardware, etc in the computer up to date. If the Windows Updates effect through any kind of errors, it will then affect the entire Windows platform. And cause Windows, Internet browsers, and any applications install on the PC to malfunction. Net updates and ALSO new versions are too delivered via these Updates. Office 2016, Office 2013, Office 2010, Office 2007, Office 365 are also updated through Windows Updates. In this article, we are going to talk about How to Fix Windows Update Error Code 8024a008. Let’s begin!
Windows could not search for new updates
There was a problem checking for updates.
Error Code 8024A008
Windows Update ran into a problem.
As you guys can see, it was actually the error code 8024A008 that entertained us. But, you might get a different error code along with this same issue.
How to Fix Windows Update Error Code 8024a008
Before you guys begin, also create a system restore point first. If you ever change your mind then in such a case, it will definitely help you to ever revert the undesirable changes as well.
I would suggest you try them in a sequence way as it is done here. Let us see them in detail
Fix 8024a008
- First of all, you have to download the Windows Update PowerShell Module.
The module is actually in ZIP format, so you guys can easily extract it via decompression software. Such as 7-zip so that you guys will get the PSWindowsUpdate folder.
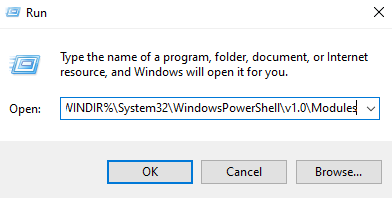
- Now press Windows+ R and type this into the Run dialog box and tap Enter key and click on OK:
%WINDIR%\System32\WindowsPowerShell\v1.0\Modules
- Then copy the extracted ZIP folder named as PSWindowsUpdate from the first step to Modules folder so opened from the 2nd step:
- Now, head to Start Screen, press Windows + I, then tap on Tiles and set the slider to Yes for Show administrative tools. From administrative tools so pinned in order to Start Screen now, you have to open the administrative Windows PowerShell ISE. And then execute the following commands one by one after tapping Enter key:
Set-ExecutionPolicy RemoteSigned
Import-Module PSWindowsUpdate
Get-WUInstall
- You can get the things to work done until you are asked to reboot. When you do the reboot, then you can check, download, or also install Windows Updates as usual.
The Windows Update Troubleshooter to fix 8024a008
Windows Update Troubleshooter is actually a built-in tool that can effectively fix the common problem associated along with the Windows Update. It also checks the status of services relates to the process and then restarts the system if you need it.
- In order to run it, just navigate to the Windows Settings (Win+I) > Updates and Security > Troubleshoot actually.
- Now, you have to move to the right pane, scroll a bit and then just run the Windows Updates Troubleshooter.
- When you guys complete the process, then restart your device and also check if it solves the problem or not. Otherwise, you can move down to the next potential workaround.
There is also another possibility of occurring error code 8024A000, which is the DLL file actually. Maybe it is not registered in the accurate form actually. By the way, it is actually mainly reported to have occurred on the older Windows version. If it is related to your current conditions, then you have to again register the DLL update.
- In order to do this, just tap on the Start button and then type Notepad.
- Now from the best match list, just do a right-click on the result and choose Run as administrator.
- If UAC prompts on the screen, then just tap on the Yes button to give the administrative privileges.
- Then inside the elevated Notepad, just copy and paste the following commands
regsvr32 c:\windows\system32\vbscript.dll /s
regsvr32 c:\windows\system32\mshtml.dll /s
regsvr32 c:\windows\system32\msjava.dll /s
regsvr32 c:\windows\system32\jscript.dll /s
regsvr32 c:\windows\system32\msxml.dll /s
regsvr32 c:\windows\system32\actxprxy.dll /s
regsvr32 c:\windows\system32\shdocvw.dll /s
regsvr32 wuapi.dll /s
regsvr32 wuaueng1.dll /s
regsvr32 wuaueng.dll /s
regsvr32 wucltui.dll /s
regsvr32 wups2.dll /s
regsvr32 wups.dll /s
regsvr32 wuweb.dll /s
regsvr32 Softpub.dll /s
regsvr32 Mssip32.dll /s
regsvr32 Initpki.dll /s
regsvr32 softpub.dll /s
regsvr32 wintrust.dll /s
regsvr32 initpki.dll /s
regsvr32 dssenh.dll /s
regsvr32 rsaenh.dll /s
regsvr32 gpkcsp.dll /s
regsvr32 sccbase.dll /s
regsvr32 slbcsp.dll /s
regsvr32 cryptdlg.dll /s
regsvr32 Urlmon.dll /s
regsvr32 Shdocvw.dll /s
regsvr32 Msjava.dll /s
regsvr32 Actxprxy.dll /s
regsvr32 Oleaut32.dll /s
regsvr32 Mshtml.dll /s
regsvr32 msxml.dll /s
regsvr32 msxml2.dll /s
regsvr32 msxml3.dll /s
regsvr32 Browseui.dll /s
regsvr32 shell32.dll /s
regsvr32 wuapi.dll /s
regsvr32 wuaueng.dll /s
regsvr32 wuaueng1.dll /s
regsvr32 wucltui.dll /s
regsvr32 wups.dll /s
regsvr32 wuweb.dll /s
regsvr32 jscript.dll /s
regsvr32 atl.dll /s
regsvr32 Mssip32.dll /s
- Now, just tap on the File menu and choose the Save as an option.
- Then on the next screen, select a suitable location and then save the file as WindowsUpdate.bat. By the way, you guys can also change the file name as per your need. However, the extension of the file name must be a batch file actually.
- When you guys create the batch file, then double-tap on it. And whenever UAC prompts on the screen, then tap on the Yes button.
- Now after that, reboot your device and when it starts up, then check if the error code 8024A000 still persists or not. If it is, then just move down to the next effective workaround actually.
Conclusion
Alright, That was all Folks! I hope you guys like this “8024a008” article and also find it helpful to you. Give us your feedback on it. Also if you guys have further queries and issues related to this article. Then let us know in the comments section below. We will get back to you shortly.
Have a Great Day!


