Do you want to make a black and white picture in Windows 10? The best method to save colored ink on a printer is to print pictures in grayscale whenever you want. In some cases, you can’t avoid printing in color. For instance, if you want to print a pie chart, but some images work just as well in white or black. Black and white is known as graryscale, needs only black ink to print. Come let’s check how to make a picture black and white in paint windows 10 without compromising the quality.
Contents
How To Make Black And White Picture In Windows 10
Dive down below to learn how to make a black and white picture in Windows 10:
Print Dialog
Assuming you want to print the picture, and the picture isn’t part of a doc. You can then check if your printer’s print options enable you to print in grayscale. The MS Print to PDF app unfortunately doesn’t have this choice. Also, you can use Microsoft Edge to print in black and white.
Paint.net
If your printer’s print options dialog doesn’t let you print a colored image in grayscale. Or else the picture quality collapses too much when the printer converts it. Then you can convert the picture to grayscale first, and then print it.
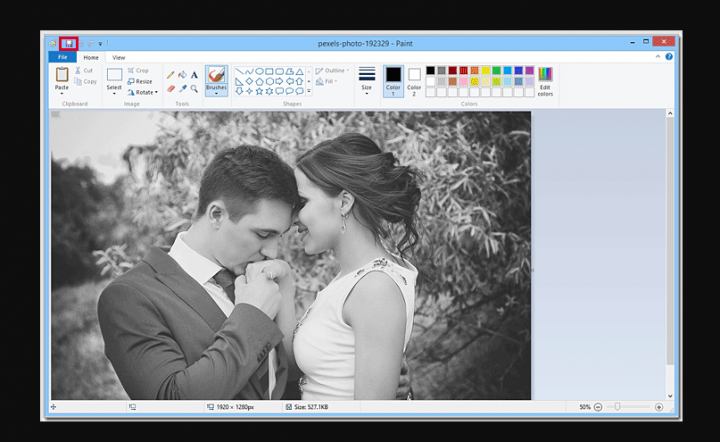
One of the best tools to convert an image to grayscale is Paint.net. The tool is easy and free to use. All you need to do is to install or download the tool Paint.net. Then follow the steps to make a black and white picture in Windows 10!
- Head over to the image that you like to convert to grayscale in Paint.
- Then use the Ctrl+A keyboard shortcut to choose everything on the current layer.
- When you successfully choose the layer, move to Adjustments>Black and White.
- Then save the new image and specify its file name. Then allow it to overwrite the original image. The resulting picture is too good in terms of quality.
Microsoft Office Suite
If you’re trying to add images to a PowerPoint presentation, Word document, or an Excel spreadsheet and you have no time to individually convert them all to grayscale using Paint.net. Then you can use the applications ’ built-in picture editing options to change images to grayscale.
If you want to convert a picture to grayscale in any of the Microsoft Office suite apps. Then:
- Right-tap the picture and choose Format Picture from the context menu.
- As it’ll open an image editing panel on the right.
- Head over to the Picture tab (the very last one).
- Now expand the Picture Color options, and then tap the little dropdown located next to the Presets for Color Saturation.
- Choose the black and white preview of your picture, and it will be successfully converted to a grayscale image.
If you want to make things faster, you should add all your pictures into the presentation, document, or spreadsheet first. You can then apply the saturation to one picture, choose the next one, and then set up the Re-do function to apply it to the required image.
There is an online tool that helps you to convert an image to grayscale. But if you’re not satisfied with the image quality that Paint.net gives you. Then them as well. For photographs, it’s good to use a professional tool such as Photoshop that enables you to control the individual color channels. Also, you can find something that’s very cheaper than Photoshop.
Conclusion:
Here’s all about ‘Make Black And White Picture In Windows 10’. Is this article helpful? Do you know any other alternative method to make a black and white picture in Windows 10? Share your thoughts with us in the comment down the section below. Also, for further queries and questions let us know below!
Also Read:


