On Windows 10, Storage sense is basically a feature to automatically free up space when you are running low on storage. The feature actually works through deleting junk system files, those files that have been in the recycle bin. Or Downloads folder for more than a month and makes OneDrive content that you have used in a while online-only. In this article, we are going to talk about How to Make Powershell Delete Files Older than 30 Days. Let’s begin!
Although this feature can be very useful in order to control the storage space. It’s limited and does not really offer an option to manually add different locations to monitor and delete files that haven’t change in the last month or so.
If you store non-important files on a different location, then it is possible to use PowerShell and Task Scheduler to monitor. And clean up files from any other folder that are older than a specified number of days as well.
Use PowerShell to delete files older than 30 days on Windows 10
If you guys have different folders with a lot of files and you would like to clean up through deleting those older than many days. Then you can use these simple steps:
- First, open Start.
- Then search for Windows PowerShell, right-tap the result, and choose the Run as administrator option.
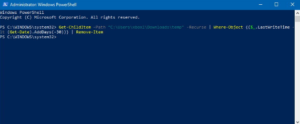
- Type the following command in order to delete files that have not been modified in the last 30 days and then tap Enter:
Get-ChildItem –Path "C:\path\to\folder" -Recurse | Where-Object {($_.LastWriteTime -lt (Get-Date).AddDays(-30))} | Remove-Item
In the above command keep in mind to change "C:\path\to\folder" specifying the path to the folder that you want to delete files. And then change -30 to select files with a last modified date.
Use Task Scheduler to delete files older than 30 days automatically on Windows 10
The command in the previous instructions gives you permission you to delete files in a folder that are older than 30 days. However, you have to open PowerShell and then execute the command manually each and every time you want to free up space.
Create a PowerShell script via Notepad | PowerShell delete files
If you want to run a task using the Task Scheduler. Then you guys will need to create a PowerShell script along with these simple steps:
- First, open Start.
- Search for Notepad and then tap on the top result to open the experience.
- You have to copy and paste the following command into a Notepad text file:
Get-ChildItem –Path "C:\path\to\folder" -Recurse | Where-Object {($_.LastWriteTime -lt (Get-Date).AddDays(-30))} | Remove-Item
In the above command keep in mind to change "C:\path\to\folder" that specifies the path to the folder. That you want to remove files and change -30 to select files with a last modified date.
- Tap on the File menu.
- Choose the Save as an option.
- Then ave the file using the cleanup.ps1 name and extension as well.
Create a task via Task Scheduler | PowerShell delete files
If you want to automate the process, then you guys need to use the Task Scheduler. In order to create a task that executes the command at specified intervals.
- First, open Start.
- Then search for Task Scheduler and tap the result.
- Right-tap the Task Scheduler Library folder.
- Then tap the New Folder option.
- Type any name for the folder and tap OK. (We are creating a new folder to keep tasks organized and separated from the system tasks.)
- Right-click the recently created folder, and then choose the Create Task option.
- In the “Name” box, you have to enter a name for the task.
- In the “General” tab, under the “Security options” section, choose the Run whether the user is logged on or not an option. (This is the option that will make the command window not to appear when the task runs automatically actually.)
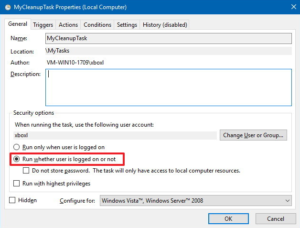
- Then clear the Do not store password option.
- Tap on the “Triggers” tab.
- Then click the New button.
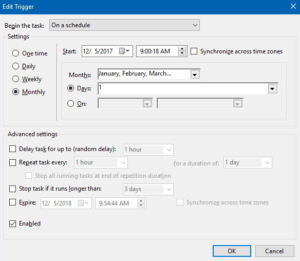
- Using the “Begin the task” drop-down menu, then choose On a schedule.
- Under “Settings,” specify when you want the task to run (such as, On time, Daily, Weekly, Monthly). Whatever the option you select, make sure to specify the Start settings on the right side as well.
Further about PowerShell delete files
- Tap on the OK button.
- Then click the Actions tab.
- Press the New Button.
- Using the “Actions” drop-down menu, you need to select the Start a program option.
- In the “Program/script” field, you have to type the following command:
powershell.exe
- Then in the “Add arguments” field type the following command and then tap the OK button.
-ExecutionPolicy Bypass C:\path\to\cleanup.ps1
In the above command remember to change "C:\path\to\cleanup.ps1" that specifies the path to the PowerShell script you have previously created to remove files.
- Tap on the Settings tab.
- You need to check the following options:
- Permits task to be run on demand.
- Run tasks as soon as possible after a scheduled start missed.
- If the task fails, then restart everything.
- Tap on the OK button.
- Type your administrative username and password (if its applicable).
- Tap on the OK button.
When you have completed the steps, the PowerShell script will then run on the schedule deleting the files in the location. That is older than the number of days you specified. Just remember not to change the name or move the folder to another location, otherwise, the task will fail actually.
Conclusion
Alright, That was all Folks! I hope you guys like this PowerShell delete files article and also find it helpful to you. Give us your feedback on it. Also if you guys have further queries and issues related to this article. Then let us know in the comments section below. We will get back to you shortly.
Have a Great Day!
Also See: How to Change from Static to Dynamic IP Windows 10


