Do you want to redesign the font cache in Windows 10? Just like icon cache, Windows creates a cache for fonts to load them quicker and show the user interface of documents, apps, and other controls faster. When it is damaged, fonts might not appear properly, or some fonts are missing in the list of font available for some apps. In this guide, we will discuss how to redesign the font cache.
The font cache is a an amazing and special file in the folder.
%WinDir%\ServiceProfiles\LocalService\AppData\Local\FontCache.
This folder is secured by default so if you directly access this path. However, Windows also provides you an error. Fonts are cached in a list of files in this folder. If for whatever reason, your fonts are corrupted or damaged and not showing properly, you might want to delete these files just to redesign the font cache. Come let’s check how to do this:
Before moving further, remember that your user account has administrative rights. Now, follow the steps below.
Contents
How To Redesign Font Cache in Windows 10:
If you want to redesign the font cache then try to do the following things:
Step 1:
Hit Win + R shortcut keys on the keyboard to open the Run dialog. Then input services.msc in the Run box.
Step 2:
Once done, the Services console will be opened.
Step 3:
Just look at the Windows Font Cache service on the list.
Step 4:
Tap on the stop button on the toolbar.
Step 5:
Head over to This PC in File Explorer.
Step 6:
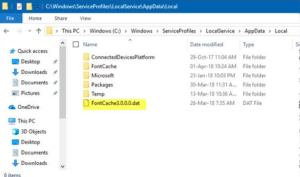
Move to the following folder after navigating one folder at a time. Don’t copy-paste the path directly as some folders are secure and you might want to hit the Continue button to access them:
C:\Windows\ServiceProfiles\LocalService\AppData\Local\FontCache
Step 7:
Remove the contents of that folder.
Step 8:
Then remove the file %WinDir%\System32\FNTCACHE.DAT.
Step 9:
Now, you can initiate the Windows Font Cache service which you earlier stopped.
Step 10:
Restart Windows 10.
Note: After you stopped the service but still can’t remove the files, here is a method.
- Download or install ExecTI.
- Use ExecTI to execute cmd.exe as TrustedInstaller.
- At last, the command prompt opened as a trusted installer, input, or copy-paste the command mentioned below:
del /A /F /Q "%WinDir%\ServiceProfiles\LocalService\AppData\Local\FontCache\*FontCache*"
This should fix the issue.
Tip: You can also use the following command to end and begin the Windows Font Cache service.
net stop FontCache
net start FontCache
On Windows 7, 8.1, the Font Cache files are placed directly in the following folder:
%Windir%\ServiceProfiles\LocalService\AppData\Local
There is no separate FontCache directory such as Windows 10. In this situation, you must be careful to not remove the other folders. Remove only the *.DAT files related to the font cache.
Note: If your fonts are still making a fuss and showing invalid characters after resetting the cache. Then the installed fonts in C:\Windows\Fonts themselves might be damaged. If you want to recover the default fonts that ship with Windows, execute the following command from a grand command prompt:
sfc /scannow
Let Windows recover the original font files.
Conclusion:
Here’s all about “Redesign Font Cache”. If you are facing any issue then let us know. If you think that it is helpful then do let us know your suggestions in the comment section below. Do you know any other alternative method that you think we can’t cover in this guide?
Also Read:


