Are you wondering to remove your Google activity? Consumers who are looking for methods to limit their online exposure can take an approach to protect their data and online activities. It minimizes a company’s ability to gather your confidential information in an efficient and effective way.
You can select to remove your Google Activity and restrict how much of your online data can be gathered.
“Doesn’t the Google Incognito function and removing my browser history keep my data secure?”
People certainly have the misconception that removing their web search history periodically will be quite enough to keep them private and secure. But that’s not the case. After using an incognito tab, your anonymity is still exposed by your ISP. Also, the information provided to major corporations who can pay for the data being gathered.
There are other choices out there that will prioritize your privacy. Like DuckDuckGo, which can’t track your online movement. I recommend using Brave, myself. Brave is a secure and safe browser that enables you to swap between search engines at your ease.
You can also make use of Google as your search engine. But you might want to take control of the information gathered after erasing some, or all, of your browsing activity. Just removing all your web-browsing activity that can’t get rid of every bit of information Google has collected. You want to remove a few things separately like your maps activity if you allow Google to record your location.
Even if you removed every bit of your activity. Then Google keeps track of how you used its web browser. It means after you perform a search, it’ll remember what you’ve looked for and when. According to Google, your all data will be removed after you start the removal.
Contents
- 1 How To Manage Your Google Activity Controls
- 2 How To Download Your Google Search/Browser History
- 3 How to Remove Your Google Activity
- 4 Removing Your Android & iOS Device Google Search History
How To Manage Your Google Activity Controls

Permanently wiping Google history will help you to complete your goal of maintaining security over your online identity. You will like to get a grip on personalizing your Activity Controls as well.
Google Activity continues to keep track of your browsing and search history unless you select to turn them off. Once turned off Google can’t gather and save that data from you in the future.
We’ll start with disabling the Google Activity that you don’t like to save. You can be particular or just erase it all in your quest to optimize your online security. Also, it ensures the specified information can’t be tracked. It’s quite an easy task and can be accomplished after the following:
Step 1:
Open up your browser and head over to Activity controls.
Step 2:
Move down the page and disable the activity you don’t like Google to save.
Step 3:
Tap ‘Pause’
When toggled, you’ll then view a popup window where you want to confirm your choice after choosing Pause.
After you select to remove all of your browsing histories, your saved passwords will be cleaned too. Remember your passwords before proceeding further. If it happens to have a Password Manager app such as LastPass already set up, performing this action can’t affect it.
Before I cover how you’ll move about removing all of your recently collected Google Activity, I’ll discuss how to archive it for personal use. So, if you would like to have a chance to download or install your Google search history. Then move to the next section.
How To Download Your Google Search/Browser History
If you want to look back on some of your past browsing escapades. Then Google gives you a method to hold on to your search history. To get an archived list of your browsing history so you can always access the data, you want to:
Step 1: Tap ‘Privacy & Personalization’
Then sign in to your Google Account. On the menu from the main page to the left choose Privacy & personalization.
Step 2: Download, remove or make a plan for your data
Move down to the page until you find the “Download, delete, or make a plan for your data” section. Then tap on “Download your data”.
Step 3: Make Your Own Choice
You’re redirected to a page where you want to choose which data you like to add in the archive download. By default, all choices are toggled on. If you’d like, then there is a Select None button that can unmark all your options making it simpler if you only want to download a smaller amount of data.
Step 4: Tap ‘Next Step’
When you’re satisfied with your selections, tap Next.
Step 5: Select your format
Select what format you want your archive to be installed in. Your choices are “File type”, “Archive size”, and “Delivery method”.
Relying on the services you have plugged into your Google Account. Then you’ll find your data archive waiting for you at the delivery method of choice. However, it is here where you have the alternatives of installing the file to your computer (or Mac).
Now onto the removal process.
Step 6: Removing Your Google Browser History
After launching the Google Chrome browser from your computer. Remember that you are logged into your Google account and follow these steps:
Step 1:
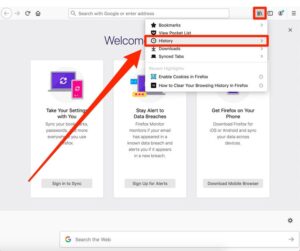
Head over to the ‘History’ on Chrome. Then tap History from the menu. PC users can input the keyboard shortcut (Ctrl + H). Mac users can also type CMD + Y to open History.
Step 2:
On the other hand, at the top right, head over to the Get More/Settings menu after tapping the three vertical dot icon. Then choose ‘Settings’ from the drop-down.
Step 3:
‘Tap Browsing Data’
Step 4:
On the left side of the screen, choose Clear browsing data. A window will open in a new tab.
Step 5:
Tap on the ‘Advanced’ tab. The window provides you two tabs, “Basic” and “Advanced”. The “Basic” tab will list three options while “Advanced” provides you a few more. If you like to perform a deep scrub of your browser history, then move to the “Advanced” tab and choose all of the menu choices that apply.
Step 6:
There is also a drop-down menu marked “Time range” which enables you to choose how much history you like to be removed. Choosing “the beginning of time” will remove everything.
Step 7:
Tap on ‘Clear Data’. When the boxes you like to remove have been marked, tap Clear browsing data.
How to Remove Your Google Activity
Removing your search history is amazingly not the same thing as removing your browser history. If you want to perform this action:
Remember you are logged in to your Google account and move to My Activity and follow these instructions:
Tap ‘Delete activity by’
On the left side menu, choose Delete activity by to take you to a page where you can remove your Google history by product or topic.
Choose your range
Tap the drop-down under “Delete by date” and choose All time to remove all of your browsing information. Then choose the items you want to remove.
Tap ‘Next’ then ‘Delete’
Tap on the ‘Next‘ button then tap the Delete button to confirm.
You can also select to pick particular items or activities rather than all of them after using the other drop-down menus provided. Browse by product or day from the “Delete activity by” page or look for particular items using the search bar on the “My Activity” page.
If you move into “Other Google activity” you’ll then view all of the individual activity that Google tracks. You can also tap on ‘Manage Activity’ for most of these if you like to get a bit more detail. You can also select to remove the information collected for each of these activities from their individual pages.
At this point, your computer Google browsing history is secure than when you start, but what about your mobiles and tablets? Removing your Google activity permanently. It includes all the android devices that will definitely help you to improve your online security.
Removing Your Android & iOS Device Google Search History
Follow this instruction just to remove your Google search history from your mobile or tablet:

Step 1:
While on your mobile device, simply launch the Chrome app and head over to myactivity.google.com. After using an iOS device, you can simply get to the site via the Safari app as well.
Step 2:
Click on the Choose more icon and choose Delete Activity by.
Step 3:
Just under the “Delete by Date” section, simply click the drop-down arrow and choose All Time to remove it all.
Step 4:
Click on the Delete button and a warning popup will appear. Click OK to fully remove your Android Google search history.
Google has too much taken over the internet at this point. Now it’s up to you to make sure that information that they don’t want out in public is safe and secure. After using the settings in google itself it is possible to restrict at least some of the privacy problems, so it is a good place to begin.
Conclusion:
Here’s all about “Remove Your Google Activity”. If you want to share any other method or tips regarding the article then let us know below. For further queries and questions let us know in the comment section below!
Also Read:


