Applications can also run with regular user privileges, or they can run with admin rights as well. When an app needs to run with admin rights, then it is mostly because it needs to make a significant change to the system. This may be something big such as editing the Windows registry, or something small such as saving a file to a certain protected location. With apps, it’s really obvious that they use different types of privileges depending on what they need to do however, the File Explorer also follows the same rules. By default, it always runs along with standard user rights. If you need to run File Explorer along with admin rights, you will have to launch it from the Explorer.exe file. In this article, we are going to talk about How to Run File Explorer As Admin in Windows 10. Let’s begin!
As you may already know, that the File Explorer in Windows 10 runs with the least privileges – only enough permissions that apps need to run are granted by default. This security model was actually introduced in Windows Vista and is called User Account Control (UAC). As a result, you see a lot of UAC confirmations when trying to browse many folders and then modify files. If you need to operate with protected files, or files owned by another user account, then it can be time-saving to run File Explorer as Administrator for you.
Further
You should not run Explorer as administrator all the time but you might want to run it as an administrator to do some file operations. That involves lots of UAC prompts. Or maybe some shell extension (e.g. right-click menu extension) still has not been updated to work with UAC and it also fails to work until it is run as admin. There is also no Microsoft-provided way to elevate shell extensions that fail to work properly. So instead of always running all apps with UAC set to the default setting, you can set UAC to the highest level permanently and rather temporarily elevate File Explorer in a separate process so you could get your stuff done as an admin and then close it.
However, it is not easy to run File Explorer as an Administrator. This ability is lock and you can’t enable it easily. Let’s see how you can enable this feature.
Run File Explorer
In order to run the File explorer as an Administrator in Windows 10, do the following.
- Download the portable app ExecTI and then unpack it to any folder you such as Download ExecTI.
- Then unblock the downloaded file.
- Using ExecTI, you have to run the “regedit.exe” app. You can see the screenshot below.
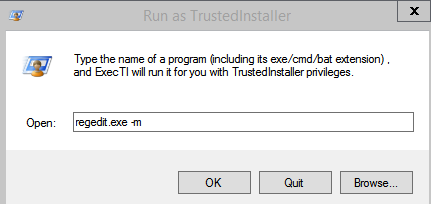
This will then open a new instance of the Registry Editor app running with TrustedInstaller permissions, so it will permit you to modify the required registry key.
- You have to go to the following Registry key:
HKEY_CLASSES_ROOT\AppID\{CDCBCFCA-3CDC-436f-A4E2-0E02075250C2} - In the right pane of Registry Editor, you will then see a value named ‘RunAs’. You need to simply rename this value or delete it so Windows permits you to run Explorer as administrator when you need it. Rename ‘RunAs’ to anything you want. Such as RunAs_my (so you remember you made this change).
- Then close Registry Editor and restart Windows 10.
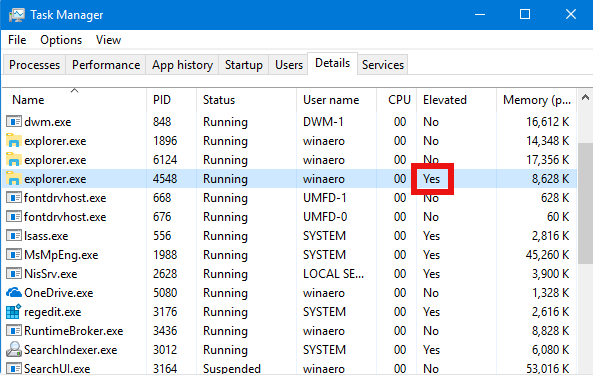
That is it. Now if you right-click the C:\windows\Explorer.exe file and then select ‘Run as administrator’. Then you will be able to run it as admin! Another way to run it as admin is to start File Explorer from the Start Menu or Start Screen through tapping Ctrl+Shift+Enter. It will start as a separate process that you can also see in Task Manager.
File Explorer along with admin rights
In order to run File Explorer with admin rights, you have to open a File Explorer window and then navigate to the following location;
C:\Windows
Here, look for explorer.exe and then right-click it. From the context menu, you have to select Run as administrator, and File Explorer will launch with admin rights.
You can also run File Explorer along with admin rights from the Task Manager. Open the Task Manager and then head to File>Run New Task.
In the Create new task box, you should enter explorer.exe and then check the ‘Create this task with administrative privileges’ option. Click Ok, and a new File Explorer window will open along with admin rights.
Keep that in mind that File Explorer can run many instances of itself. When you run it with admin rights, then you run one instance of the app with those rights. All other instances that were already running along with normal privileges will not elevate to admin rights.
Running File Explorer with admin rights will permit you to access many restricted directories on your system. But it will not magically unlock every single directory. Some folders on your system are owned by TrustedInstaller and if TrustedInstaller avoids you from accessing a folder. Then you will not be able to do so even if you are running File Explorer along with admin rights.
Further
It is rare that you will ever need to run File Explorer along with admin rights. The app is used to find other apps or files on your system and normally, it is those apps or files that you have to run along with admin rights. An Explorer window with ordinary rights will work just as well as one working with admin rights. That said, for those rare occasions when you do need to run File Explorer along with admin rights, then you can.
It goes without saying that if you are doing this from a normal user account. Then you will be prompted to enter the admin username and password as well.
Conclusion
Alright, That was all Folks! I hope you guys like this article and also find it helpful to you. Give us your feedback on it. Also if you guys have further queries related to this article. Then let us know in the comments section below. We will get back to you shortly.
Have a Great Day!


