The Recycle Bin size grows in order to accommodate the files that you delete. By default, it will take up to 5% of free space. You can shrink it, or grow it if you need to. What you can’t do is just check the Recycle bin content size. If you have removing files for a few days, or weeks you can delete each and everything, and as the files delete you will be able to see how much space they were taking up. In this article, we are going to talk about How to See Recycle Bin Size in Windows 10. Let’s begin!
If you guys want to check the Recycle bin content size without even deleting files you can. However, it’s a little tricky. This was much easier in order to do on Windows XP.
Contents
Recycle Bin Content Size
First, open File Explorer and go to the View tab on the ribbon. At the far right end, you will see an Options button. Press the dropdown button under it, and then choose the ‘Change folder and search options’ option.
On the Folder Options window head to the View tab. Here, you choose to select the “Show hidden files, folders and drives option. Next, you have to find the ‘Hide protected operating system files (Recommended)’ option, and then uncheck it. Whenever you uncheck this option, you will see an on-screen prompt telling you that turning off the option will make system files visible and that it could be really dangerous. You have to accept the prompt and then press the Apply button.
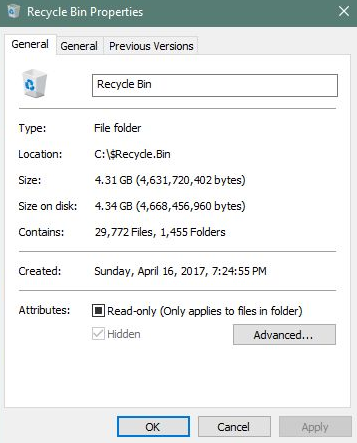
Next, you have to open File Explorer and head to your Windows drive i.e. The drive that you guys have Windows 10 installed on. It’s mostly the C drive. At the root of this drive, you have to look for a folder called $Recycle.Bin. Inside this folder, you guys will see the Recycle Bin. Right-tap on it and choose Properties from the context menu. The Recycle Bin Properties window will also show you its current size that is the size of all the deleted files in it.
Further | recycle bin size
This is obviously not the best actually, or also the easiest way in order to view the size of the content in the Recycle bin. However, if you want to view it without using any third-party apps or running a widget, etc., this is actually the only way.
When you’ve checked the Recycle bin content size, then it’s a good idea to hide the system files. If you guys don’t, then you will start seeing files called desktop.ini appear on your desktop and in folders as well. You will also see other files that you never really need to access or also use. If you accidentally delete or modify one of these files, then something might break which is why it’s a good idea in order to hide them again, when you do that.
Stop Using the Recycle Bin and Have Items Removed Immediately
If you prefer to have things deleted immediately instead of sitting in the Recycle Bin, you can make that happen. We don’t recommend it for general use as well, however, it can be handy in some situations. Maybe you need to remove a bunch of things at once that you guys know you won’t need again and you don’t want to affect what’s already in the Bin as well.
In order to make this happen, in the Recycle Bin Properties window, choose the “Don’t move files to the Recycle Bin. Delete files immediately whenever you remove.” option.
Whenever you guys have this option enabled, then it might be wise to also enable the confirmation box via ticking the “Display Delete Confirmation Dialog.” This option forces Windows in order to prompt you any time you guys delete something, in order to make sure you really want to delete it.
Set Recycle Bin to Remove Files Automatically After a Set Time
In one of the early updates to Windows 10, Microsoft added a feature named Storage Sense as well. That’s aimed at helping you free up some space on your drive. The big thing Storage Sense can do is automatically clean up your hard drive the way that Disk Cleanup and tools such as Ccleaner do.
It also includes one set that relates to your Recycle Bin: the ability in order to delete files from the bin automatically. When they have been there for a specified number of days: you can then set it to 1, 14, 30, or 60 days.
In order to enable it, open up Settings via tapping Windows+I, head to System > Storage. And then press the “Change how we free up space automatically” link.
On the next page, just scroll down a bit to the “Temporary Files” section and then turn on the “Delete temporary files that my apps are not using” option. You can use the first drop-down menu in that section in order to set the number of days you want as well.
Conclusion
Alright, That was all Folks! I hope you guys like this “recycle bin size” article and also find it helpful to you. Give us your feedback on it. Also if you guys have further queries and issues related to this article. Then let us know in the comments section below. We will get back to you shortly.
Have a Great Day!


