Do you wnat to set or use the timer on Windows 10? Well, there is not an official timer app for Windows 10, you can use the Timer in Clock app & Alarms to keep a record of time. Whenever you forgot something in the oven as you were all caught up in a video game. Also, you promised yourself to go to bed in 11 minutes, the Windows 10 Timer can also come quite handy. Also, you can use it easily and a helpful tool if you don’t like to burn down your kitchen or destroy your beauty sleep. This guide teaches you everything you want to know about it, so come let’s begin:
IMPORTANT NOTE: The features are available in Windows 10 November or later. After using an older model of Windows 10, you probably not accessible to all the features. You can also check your Windows 10 build and, if needed, get the newest Windows 10 update available for you.
Contents
Access Windows 10 Timer -> Here’s HowTo
Windows 10 Timer is added to the Alarms & Clock app. Here are different methods to access the app. But we find it easiest or simplest to enter “alarms” in your taskbar’s search area, and then tap or click on Alarms & Clock.
The app opens, displaying 4 tabs at the upper side of the window. Tap or click on the Timer tab to access the feature.
After using the Timer often, you can simply create a tile for it in your Start Menu. Tap or click on the “Pin timers to Start” button.
A pop-up appears to confirm your choice. Click or tap on Yes.
Now the Timer tile is added to your Start Menu, and you can then use it to open the tool directly.
Also, you can use Microsoft’s virtual assistant – Cortana – to access the Timer. Just ensures that she’s listening and say “timer.“ The Alarms & Clock app opens.
NOTE: This guide focuses on using the Windows 10 Timer manually, the outdated way. Microsoft’s Cortana is, however, well-integrated with the Alarms & Clock app.
Add Timers in Windows 10
You can also set timers in Windows 10 for any duration from one second to 23 hours, 59 minutes and 59 seconds. Whenever your device is on and awake, it notifies you when the countdown reaches to ‘0’, also if your PC is locked. You have more than twenty timers saved. Also, they can also count down at the same time.
Adding a new timer is easy and simple. All you need is to click or tap on the “Add new timer” (+) button under the right of the window.
In the New timer window, move and tap on the required values for hours, minutes, and seconds to set a timer duration.
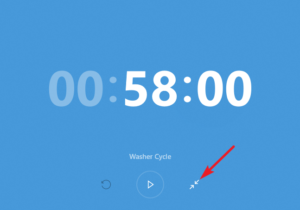
Whenever you tap or click on the field at the bottom of the Timer’s name. You can then input a name for your timer to replace the default name Timer (1). Our timer is named lunch, and it’s set to five minutes, notifying us when your lunch is ready.
If you don’t think like naming your timers, Windows 10 helps you to differentiate between them after adding a new number after every generic Timer. Once done entering your numbers, hit the Start button under to start the timer.
Now your timer is all set, and it begins counting towards zero.
Until you want to keep a proper eye on your timer(s). Also, you can close the Alarms & Clock app once you are done. Windows 10 allows you to know when your timer ends counting down.
Use Timers In Windows 10
All the timers you create are shown in the Timer tab of the Clock app & Alarms.
Step 1:
To keep a proper eye on a timer from afar, or if you just like to focus on a particular timer, tap or click on the Expand button, which seems like a double-headed arrow.
Step 2:
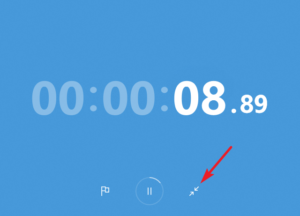
The timer expands to take up the whole window. Hit the Restore button to return back it to normal.
Step 3:
If you want to pause a timer, tap or click on the round Pause button in the center.
Step 4:
Tapping or clicking on Start resumes the countdown of a paused timer.
The default behavior when a timer completes counting down is to notify you by playing a sound and showing a banner under the right corner of your display screen. The volume of any other sounds playing from your PC or device is lowered to make sure you hear the sound of alert. Click or tap on Dismiss to stop the notification and hide the banner.
To modify this behavior, you want to tinker with the alerts for the Alarms & Clock app.
TIP: Tapping or clicking on the banner in the area showing the timer’s details also stops the notification, while opening the Timer tab of the Alarms & Clock.
Also, when the timer completes its job, you can then view shown it in the Timer window. Its Start button is active if you want to use it again.
If you want to edit a timer, tap or click on it. You can also edit timers that either completes counting down or are recently paused.
The Edit timer window also opens, allowing you to modify the name and the time duration of your timer in a similar way you did after you created it.
How To Erase Timers In Windows 10
When your timers reach zero, they don’t get erased from the Timer tool. They are stored in case you want them again. However, erasing a timer is quite simple. When your timer is not counting down, tap or click on it to open the Edit timer window. To erase it, either hit the Delete key on your keyboard or tap or click on the trashcan-looking Delete button under the window.
Confirm your choice after tapping or clicking on Delete again, and your timer is gone.
To ignore the confirmation window and easily remove any one-timer, whether it is enabled or not, right-tap or hit-and-hold on it, and then tap or click on Delete.
The timer is erased, and you can’t view is shown at the bottom of the Timer tab. From this tab, you can also remove many timers at the same time, whether they are paused, stopped, or recently counting down. Initially, tap or click on the Select timers button under the window.
Your selected box appears for each timer. Choose the timers you like to delete after checking the box.
You can just use the Delete selected timers button under the window to erase the selected timer(s).
No confirmation is needed, and you can also view that all the selected timers are quickly erased from the Timer tab.
Conclusion:
Setting timers in Windows 10 is essential, especially when you spend more time on your PC. Why do you want timers for? Do you think you want more than the 30 timers? If you know any other method or trick then let us know below!
Also Read:


