Windows 10 offline file functionality is actually a network function of Sync Center that makes it possible for users to access files stored on another point in their network (so not their own computer). In order to access even if the network connection itself is not working. Such as, a file can still be available from another computer even if the shared network is down due to maintenance. Enable or disable offline files with these simple steps. In this article, we are going to talk about How to Turn On Offline Files Windows 10. Let’s begin!
Windows 10 includes a feature called Offline Files that permits making network files and folders available offline when you are not connected to that network. This feature is very useful when you need to access network resources when you are offline. Let’s see how to enable it.
It is worth mentioning here that Offline Files is not a new feature of Windows 10. It was available at least in Windows 2000.
Offline Files actually makes network files available to a user, even if the network connection to the server is unavailable or slow as well. When working online, file access performance is at the speed of the network and also server. When we are working offline, files are retrieved from the Offline Files folder at local access speeds. A computer actually switches to Offline Mode when:
- Always Offline mode has turned on
- The server is unavailable
- The network connection is slower than a configurable threshold
- The user manually switches to Offline Mode through using the Work offline button in File Explorer
It is also possible to enable Offline Files with either Control Panel or a Registry tweak. Let’s review both methods.
Contents
Turn on Offline Files in Windows 10,
In order to Turn on Offline Files in Windows 10, you need to do the following.
- First, open the classic Control Panel app.
- Then switch its view to either “Large icons” or “Small icons” as shown below.
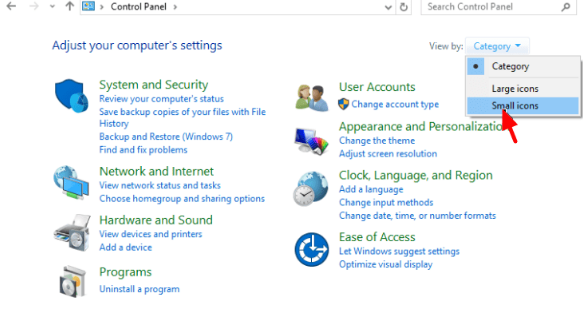
- Now find the Sync Center icon.
- Open Sync Center and tap on the link Manage offline files on the left.
- Tap on the Enable offline files button.
- Then restart Windows 10 to apply the changes.
Alternatively, you can turn on the feature with a Registry tweak.
Turn On Offline Files with a Registry tweak
- First, open the Registry Editor app.
- Then go to the following Registry key.
HKEY_LOCAL_MACHINE\SYSTEM\CurrentControlSet\Services\CSC
- Now on the right, modify or create a new 32-Bit DWORD value Start.
Note: Even if you are running 64-bit Windows then you must still create a 32-bit DWORD value.
Set its value to 1 in decimal to turn it on the Offline Files feature. - Now, head to the key HKEY_LOCAL_MACHINE\SYSTEM\CurrentControlSet\Services\CscService.
- There, you have to set the Start 32-bit DWORD value to 2.
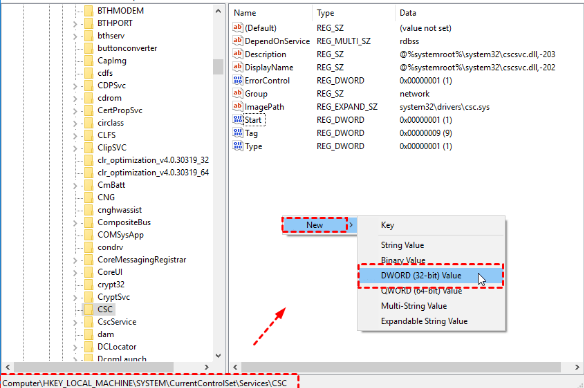
- Then restart Windows 10.
You are all done. In order to save your time, you can also download the following ready-to-use Registry files:
The undo tweak is included as well.
If you need to Turn it off Offline Files, then use the same Control Panel applet. Navigate to Control Panel\All Control Panel Items\Sync Center, tap on the link Manage offline files on the left. In the next dialog, tap on the button Disable Offline Files.
Just like that, you can use the provided Registry tweak to turn it off. Also, you can apply it manually by setting the Start 32-bit DWORD value to 4 under the keys HKEY_LOCAL_MACHINE\SYSTEM\CurrentControlSet\Services\CSC and HKEY_LOCAL_MACHINE\SYSTEM\CurrentControlSet\Services\CscService.
Conclusion
Alright, That was all Folks! I hope you guys like this article and also find it helpful to you. Give us your feedback on it. Also if you guys have further queries related to this article. Then let us know in the comments section below. We will get back to you shortly.
Have a Great Day!


