If you guys are a network administrator or someone who is into Ethical Hacking. Then there are many times when you guys have to get IPs from the network. At times, you also have to look for active ports, also allocated IPs in the network. And the best in order tool to do all this stuff is the Angry IP Scanner. Even if you guys are not a network admin, then you can still use Angry IP Scanner to instantly scan your network. Find the IP address of your devices, assign static IPs, and also troubleshoot network issues, etc. So in this article, we are going to talk about How to Use Angry IP Scanner – User Guide. Let’s begin!
Contents
What is Angry IP Scanner
Angry IP Scanner is an absolutely free, lightweight, cross-platform, and open-source tool in order to scan networks. It basically helps you to scan a range of IP addresses in order to find live hosts, open ports, and much other relevant information of each and every IP address as well.
For this article, I’m now using the Windows 10 variant of Angry IP Scanner. But, the process is just the same for the Mac and Linux variants.
Note: You need to have Java installed on your system for angry IP scanner in order to run.
How to Use Angry IP Scanner – User Guide
Well, using Angry IP Scanner in order to scan IP addresses and hosts is pretty easy.
In order to start off, download Angry IP Scanner and install it just like any other Windows software.
When you install it, then open the application via searching for it in the Start Menu. As you guys can see, the home screen of the application is really simple and straightforward. By default, the Angry IP scanner will enter your local IP address range and your PC name as the hostname.
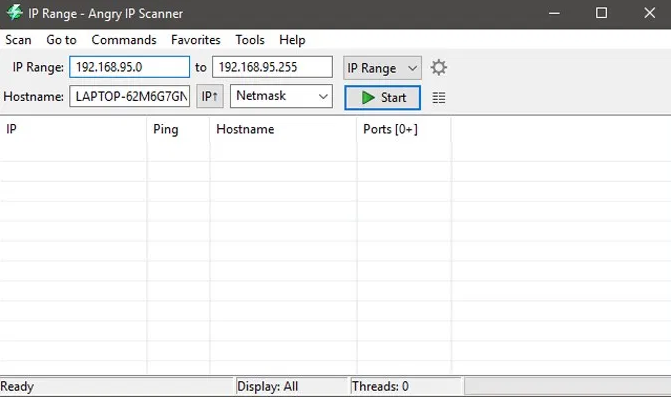
The good thing about Angry IP Scanner is that it actually lets you scan IP addresses in three different ways. Well, they are, the range you specified, a random IP address, or a list of IP addresses from a text file as well. You can easily choose the scan mode from the drop-down menu next to the IP address field as well.
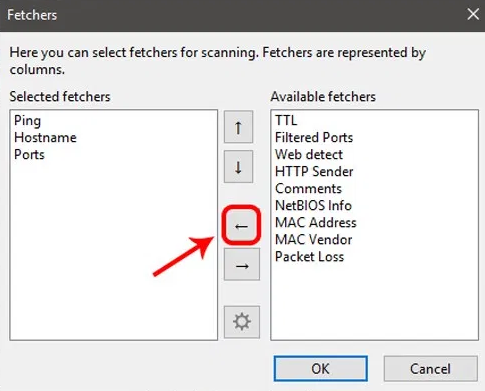
As you guys can see from the above picture, the Angry IP Scanner will now include default fetchers such as Ping, Hostname, and Ports as well. But, you can also add more fetchers in order to get and see more information about an IP address. If you want to do that, just choose “Tools > Fetchers.”
Further | how to use angry IP scanner
Well, in this window, you will see all the current fetchers on the left pane and also all of the available fetchers in the right pane. If you want to add a fetcher, then choose the fetcher on the right pane and then tap on the button that looks like the “Less than” sign. Well, in my case, I’ve also added new fetchers such as MAC address, NetBIOS info, Filtered ports, and the Web detects as well.
Furthermore, Angry IP Scanner will only tell you if the ports are open or not. It will not list the individual ports that are open actually. So, if you want to do a port scan, then you just have to configure the application. In order to do that, just simply navigate to “Tools” and then choose the option “Preferences.”
Here, just navigate to the “Ports” tab and then enter the ports you want to scan in the “Ports Selection” field. As you can also see, I’m scanning for port 80 and port 443 basically. If you guys want to scan a range of ports, then just enter the port range such as “1-1000.” After you guys have entered the port number, then just tap on OK in order to save the changes.
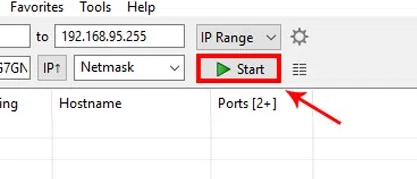
When you guys do configure the Angry IP Scanner, then you can also continue to scan. In order to start off, set the scan mode to “IP Range,” and enter the IP address range in the “IP address” fields. And then tap on the button “Start” as well. For instance, I’ve also entered an IP range that is known to have live devices also connected to it.
What’s More | how to use angry IP scanner
Relying on the number of addresses in the range, it may take a while to complete. When complete, then the application will show you a summary of the scan as well. The summary also includes the number of hosts that are alive and also the number of hosts that have open ports. Just tap on the button “Close” in order to continue.
When you guys close the summary window, you will see the list of all the IP addresses. You can also view additional details in different “fetcher” columns. In case you are thinking, then here’s what the colored dots next to each and every IP address mean.
Red: It shows that the IP address is inactive, dead or there is no device connected to this IP address.
Blue: The IP address is either active or busy and also not responding to the requests sent via the Angry IP Scanner. This mostly will be your own IP Address.
Green: The IP address is active, and the device that is connected to it is responding to the requests made via the Angry IP Scanner. There may also be open ports as well.

With double-tapping on any IP address, Angry IP Scanner will show you all of the details. That it has gathered in just a simple summary window. You can also add your own comments in the blank field at the bottom of the window as well.
Then | how to use angry IP scanner
Also, apart from copying the details of an IP address, you guys can also perform a range of different activities on the entries too. You can open an IP address in the web browser, then do an FTP, trace routing, etc. For instance, if you want to traceroute an IP address, then just simply right-tap on the target IP address. After that, just choose the option Open and then tap on Traceroute.
When you do the scanning an IP address or the IP address range. Then you can actually save the scan results. If you want to do that, then just choose the option Scan from the menu bar. From the drop-down tap on “Export All”. Here, you need to enter the name of the file, choose the destination, and then tap on the button “Save.” This action will basically save the file as a text file.

Now, if you guys are going to scan this IP address or range in the future, then you can also add it to your favorites. This basically eliminates the need to re-enter the IP addresses each and every time as well. In order to do that, just navigate to “Favorites” and then choose the option “Add current.”
Name the favorite and then tap on the button “Ok” in order to save the changes. Now that’s just all there is to do. If you guys ever want to scan the same IP address or range. Then all you have to do is just select the saved IP Lists from the “Favorites” menu actually.
Conclusion
Alright, That was all Folks! I hope you guys like this article and also find it helpful to you. Give us your feedback on it. Also if you guys have further queries and issues related to this article. Then let us know in the comments section below. We will get back to you shortly.
Have a Great Day!
Also See: Easy Way of Accessing Router Remotely


