Whenever you get a new device or you are upgrading an existing hard drive (HDD) or solid-state drive (SSD). It’s really a good idea to test their performance to make sure the drive is working as advertised. In this article, we are going to talk about How to Use crystaldiskmark in Windows 10. Let’s begin!
Although you guys will find a bunch of tools out there, on Windows 10, you can also use CrystalDiskMark, which is a known tool. That gives you permission to perform a number of tests in order to measure the reads and writes speeds of virtually any kind of drive.
CrystalDiskMark can also run sequential and random read and write tests, and it will then display the benchmark results in megabytes/second (MB/s) and Input or Output Operations Per Second (IOPS). That is really useful information that you can use to understand the performance of your new drive or figure out if your old drive is losing performance or not.
So, in this guide, you guys will learn the simple steps to use the CrystalDiskMark. In order to test the performance of your solid-state drive or traditional rotating platter hard drive as well.
Contents
crystaldiskmark
CrystalDiskMark is basically a small HDD benchmark utility for your hard drive. That enables you to rapidly measure sequential as well as random read or write speeds. It measures sequential reads or writes speed, measure random 512KB, 4KB, 4KB (Queue Depth=32) reads or writes speed, select test data (Random, 0Fill, 1Fill) as well.
How can you measure hard drive speed performance via CrystalDiskMark | how to use crystaldiskmark
If you want to measure a drive reads and writes performance via CrystalDiskMark. Then close all the running programs, and use these simple steps:
- First, download CrystalDiskMark from the Microsoft Store.
- Tap on the Install button.
- Then open Start.
- You have to search for CrystalDiskMark and choose the top result to open the app.
- Now using the first drop-down menu on the left, choose the number of runs. (If the default is 5, you can also change it to 3, that is enough to get more accurate results actually.)
- Using the second drop-down menu, you need to select the file size that the app will use to benchmark the drive. (The default selection is actually more than enough in most of the cases.)
- Using the third drop-down menu on the right, choose the drive (HDD or SSD) that you guys want to test.
- Tap on the All button.
Whenever you are using the All option, then the tool will run all the available tests. That also includes the sequential reads and writes and three different 4KiB random tests. If you only want to run a single test, then you guys can tap on the green button on the left.
Further | how to use crystaldiskmark
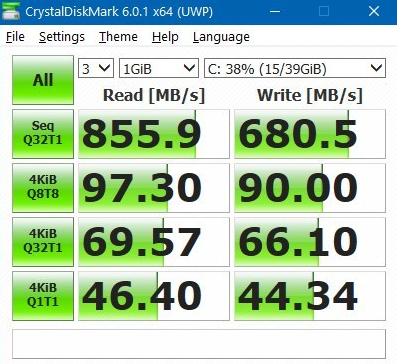
When you have completed all of these steps, then the performance tests will run on the disk for many minutes. That depends on the drive, and after they have completed, then you will see the benchmark result in megabytes/second. You can hover over the result in order to see the IOPS results for the tests.
If you guys are not sure about the results, then the “Seq” Q32T1 tests the sequential (1,2,3,4…) read and write performance of the drive as well.
The “4KiB” Q8T8 uses 4K file sizes in order to test the drive using random (2,5,7,1…) reads and writes. That is more resource-intensive than the sequential test actually. But, this test is less demanding than Q32T1 and Q1T1 options as well.
The “Q” means “queue depth,” which defines the number of requests has at one point in time. And the “T” basically means “threats,” that defines the number of processes accessing the disk at a specific time actually.
Then you can compare the result along with the performance information provided by the manufacturer. In order to see if the drive is performing as advertised, or if you guys are testing a drive that you had for a while. You can figure out if it’s time for a newer and faster replacement as well.
Conclusion
Alright, That was all Folks! I hope you guys like this “how to use crystaldiskmark” article and also find it helpful to you. Give us your feedback on it. Also if you guys have further queries and issues related to this article. Then let us know in the comments section below. We will get back to you shortly.
Have a Great Day!


