So you guys want to hang something heavier than the normal photo frame from your drywall. If you are putting in a nail to support a towel rack laden along with damp bath towels, a paper towel holder that gets regular use. Or even a heavy mirror, that you’ll certainly want it to stay there and not suddenly rips via the drywall under the weight of whatever it supports. In this article, we are going to talk about How to Use Drywall Anchors to Hang Objects on Wall. Let’s begin!
Unfortunately, that’s the way the drywall crumbles actually without proper reinforcement. Fortunately, there are a variety of options in order to secure a rack (or what have you) to the wall. And one of the most popular ways involves the drywall anchor actually. These pre-screw installments are basically designed to grip the brittle drywall and help hold your fastener in place. Follow this illustrated guide for how you can use drywall anchors properly in your next project. And you can also rest easy knowing that your hard work will hold up as well.
Contents
What Exactly Are Drywall Anchors?
Ideally, you want to hang heavy stuff from your walls through using the studs as the anchor. But, this is not always possible, especially if there’s an exact location that you want something hung and there’s not a stud behind it.
Unfortunately, if you were to just drive a screw into drywall, the brittleness of the drywall material wouldn’t actually permit the threads of the screw. To fully bite into the drywall, that makes the holding strength of the screw pretty weak overall as well.
This is where drywall anchors can actually save the day. A drywall anchor actually goes between the screw and the drywall, biting into the drywall much more effectively than a screw would. Then, you screw into the anchor, so everything stays in place as well.
Depends on what you’re hanging or mounting, you may want to use a particular kind of drywall anchor. And there are much more to choose from.
What You Need for that
Before we start this, though, there are a few tools that you will need, most of which you probably already have:
- A hammer
- A power drill and full drill bit set
- Drywall anchors
Make absolutely sure that you get a drill bit set and not just one or two drill bits actually. You need different sizes because drywall anchors come in all different shapes and sizes.
With that, all out of the way, let’s now start this!
Expansion Anchors
These types of anchors are actually the most common, and when you think of drywall anchors, then you probably think of these as well. They are small little plastic anchors that are really basic, and you will see them included in most shelf kits that you can always buy at the store.
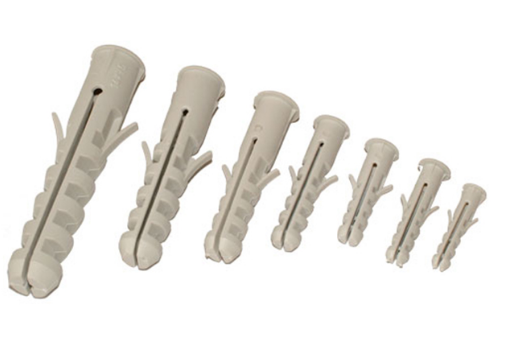
They are called expansion anchors because when you drive in the screw, they expand and push against the drywall in order to bite into it as well. Well, they are not the best type to use, because they are not able to hold a whole lot of weight (maybe 10 to 20 pounds at most). However, they’re great for heavier picture frames and small shelves as well. Anchors will most of the time list the holding strength maximum on the packaging. But if not, it’s best to play it safe and go with a stronger anchor (such as the ones discussed below) if you are unsure.
In any case, to use an expansion anchor, start through drilling a hole in the drywall that’s roughly the same diameter just like the anchor.
Further
Then gently hammer the anchor into the wall. This is where you will find out of the hole you drilled is either too big or too small. You want the anchor to go in really smoothly with a bit of resistance, but you don’t want to be fighting with it to get it to go in. Hammer the anchor in unless it’s flush with the wall.
Next, take your screw and then begin driving it into the anchor. Make sure to position your shelf (or whatever you guys are mounting) up to where you want it and then drive in the screw. But, if you are just hanging a mirror or a picture frame, that you can drive the screw in by itself and also hang the mirror afterward. Stop driving when the screw becomes slinky.
Molly Bolts
These are not as easy to use as the other drywall anchors. However, they are still good to have on hand for medium (10 pounds to 25 pounds) to heavy loads (25 pounds to 50 pounds). Pointed mollys (right) can be tapped into place along with a hammer. Nonpoint versions need an installation hole and work really well in old plaster-and-lath walls.
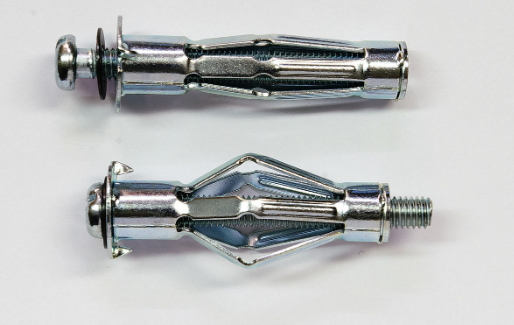
How to use them: Seat the round flange flush with the wall surface through tapping the screwhead. Then turn the screw to “mushroom” the slotted sleeve against the back wall surface. Take care not to overtighten; you will know that this will happen if the anchor flange starts to depress the surface of the plaster or drywall. When the molly is secure, then unscrew the bolt and then replace it with the item in place.
Best for Towel racks on plaster, heavy-duty shelving on drywall and plaster as well. Curtain rod supports on drywall and plaster, and also wall-mounted mirrors (over 20 pounds) on plaster as well.
Toggle Bolts | drywall anchors
Toggle bolts are pretty much the strongest wall anchors that you can buy, however, they are vastly different when it comes to installing them. Metal toggle bolts can support heavy loads (25 pounds to 50 pounds) in drywall, plaster, and then hollow-core concrete block. Plastic versions hold medium loads (10 pounds to 25 pounds) in drywall and plaster as well.
First, start by drilling a hole that’s big enough for the toggle in order to squeeze through when it’s folded down. In most of the cases, this hole will be large enough for the head of the screw to fall through. So these are really only good for mounting shelves or other items where they can also act as a washer of sorts and also stop the screw from going all the way through.
You will also want to make sure that you feed the toggle bolt onto the item. That you are mounting first by unscrewing the toggle from the screw. Feeding the screw via the shelf mounting hole, and then screwing the toggle back on. From there, you need to fold down the toggle and feed it through the hole that you drilled in the wall. When inside the wall, the toggle will spring back open.
From there, start screwing down the bolt. You’ll need to pull gently on the bolt because you’re screwing it in to avoid the toggle from spinning around with the bolt. You may need a second pair of hands in order to help you with this.
Tighten it down until it’s snug and you’ll then ready to go.
Threaded Anchors | drywall anchors
Most of the time called Zip-Its, threaded anchors are kind of like larger screws. They come with much larger threads than screws mostly do. That allows them to really bite into the drywall and then create a pretty nice hold.
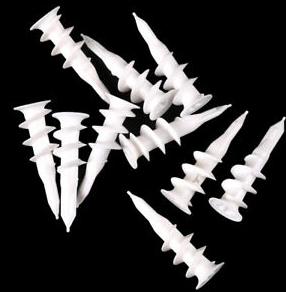
But, they only have a little bit more holding power than expansion anchors. So they should still only be used for light-duty applications as well. But, I think they are a bit easier to install.
Start by drilling a hole about the size of the tip of the threaded anchor actually. Then, take your power drill and drive the threaded anchor into the drywall just like you would with an average screw. As with the expansion anchor, drive it in until it sits flush along with the drywall.
Then, take your screw and drive it into the anchor, stopping when it feels snug. Most of the time the tip will break off entirely, sometimes not.
Conclusion
Alright, That was all Folks! I hope you guys like this drywall anchors article and also find it helpful to you. Give us your feedback on it. Also if you guys have further queries and issues related to this article. Then let us know in the comments section below. We will get back to you shortly.
Have a Great Day!


