Learn How you can See Print History On Windows. You can get the complete print history of all the documents that you print when working on your Windows PC through turning on the logging of that history in your windows along with the guide that we are going to discuss here. In this article, we are going to talk about How to View Print History on Windows. Let’s begin!
There are a lot of reasons why you guys might want access to your computer’s print history.
Maybe you’re trying to remember if you printed a document that has now gone missing. Or maybe you guys are trying to determine if someone else is printing from your PC without your permission or not. No matter the reason, the good news is that it is actually possible to view the history of your printed document on your Windows 10 computer.
And the bad news, however, is that you guys have to turn on the setting manually and if you have not already do that. Then it’s unlikely that you guys will be able to see your printing history up until this point. If you guys find yourself lamenting that you did not turn the setting on before, then that’s all the more reason in order to turn it on now.
Contents
How to View Print History on Windows
You guys can print the documents, images, etc through your computer via using the Print command on windows. You can also get further options in order to manage the printing if you are using windows. On windows, you guys can easily manage the documents that you are going to print, just set the paper size, no. of copies, etc. These options help the user in order to print the documents in desired form factors and also help in order to prevent the double printing of a document.
The history of all the paintings that were made can also also be accessed and can be used to avoid double printing. You may also have to access print history anytime for any reason, however, you might be confused about how you can actually access it. Here in this article, you guys will know about the method of accessing the print history on windows.
The method is really simple and straight and in order to see the print history on the windows, you have to follow up the simple steps that are given below.
Steps to See Print History on the Windows:
- First of all, you have to tap on the “start” menu and then open up the “Control panel” from there. In the control panel, just choose the “All Control Panel items“. This will now show you a list of settings in the control panel.
- From the list of settings that are available, you have to choose the “Administrative tools” option and then choose “Event Viewer” from further options. Tap “Applications and services” from the window that launches.
- Now choose “Microsoft“, and then select the “windows” option and then tap on “Print Service“.
- This will now lead you to the menu where you guys can manage the options related to the printing of documents as well. You can now turn on the history log for the print options through right tapping on the “operational” option and choose “Enable log“.
This will basically turn on the print history on your window and the record will be kept for your future prints. After that, you guys can check the history from the Print service window of Step 3 as well.
Turn on Long-Term Print History
The print queue will then provide a short-term overview of your previously printed documents actually. If you guys want to see a long-term list, then you will have to use the Windows Event Viewer.
- In order to start, right-click your Windows Start menu button and tap on the “Event Viewer” option.
- The Event Viewer will then permit you to view a list of previously printed files. However, you will need to set Windows in order to begin logging your long-term printer history first.
Turn on Print History in Event Viewer
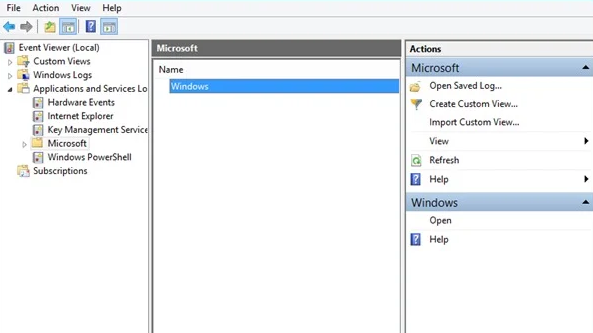
- Well, in the Windows Event Viewer, just tap on Applications and Services Logs > Microsoft > Windows in the “Event Viewer (Local)” menu on the left actually.
- This will basically reveal a significant number of Windows services. Scroll down in order to find the “PrintService” category.
- From here, right-tap on the “Operational” log and then tap on the “Properties” button.
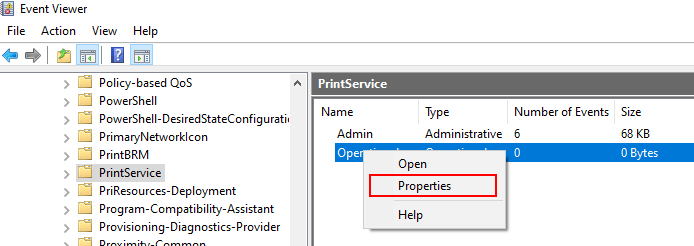
- Click to turn on the “Enable Logging” checkbox and then set a maximum size for the log. The larger the size, the longer Windows will basically record your printed document history.
- Now tap on the “OK” button in order to save the setting.
Windows will then automatically save the printer history for all of your installed printers to a log file. That you can access within Event Viewer actually.
See Print History in Event Viewer
When your printer history is turned on, you can then access it at any time from the Event Viewer.
- In order to do that, just find and open the “PrintService” category and then tap on the “Operational” log.
- A history of all Windows printer events will be listed there, from initial printer spooling in order to completed or failed prints.
- Now under the “Task Category” section, items listed as “Printing a Document” are documents. That actually has been successfully printed. Failed prints will also appear in this category as well.
- In order to make it easier to sort, you guys can group your print log via categories. That makes it pretty easy to separate the “Printing a Document” events into their own section. If you want to do that, right-tap on the “Task Category” heading and then press the “Group Events via This Column” button.
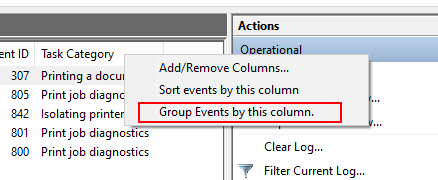
- Your items will now be separated into categories.
- You guys can also minimize the other categories, that leaves the “Printing a Document” category in order to display only a list of your previously printed documents.
Via Third-Party Print Logging Software
Whenever the Event Viewer is functional, it does not really provide the clearest view of your printed documents actually. You guys can use third-party print logging software such as PaperCut Print Logger in order to view your long-term printer history rather.

- PaperCut Print Logger basically provides you with a time-stamped list of your printed documents. That includes information on the Windows user who printed the document, the document name, and also the number of pages and copies.
- The admin page can also accessed from the default PaperCut Print Logger directory as well.
- On Windows 10, this is most of the time
C:\Program Files (x86)\PaperCut Print Logger. Just double-press the “ViewLogs” shortcut to open the admin panel. There a list of your print documents that will available, which separates through date. - When you have opened the PaperCut Print Logger admin page, under the “View” category. Press the “HTML” button in order to access your print history for that date within the panel.
- You guys can also tap on the “CSV/Excel” button under the “Date (Day)” or “Date (Month)” categories. In order to export your daily or monthly print history as a Microsoft Excel XLS file actually.
- Also, you can also access these logs from the Logs > CSV folder inside your PaperCut Print Logger installation directory as well.
Conclusion
Alright, That was all Folks! I hope you guys like this article and also find it helpful to you. Give us your feedback on it. Also if you guys have further queries and issues related to this article. Then let us know in the comments section below. We will get back to you shortly.
Have a Great Day!
Also See: What is StartMenuExperienceHost – Can You Disable It?


