We all have that one person who messes with our iPad every single time. Even if he/she does not know the passcode. This leads to the message “iPad is disabled connect to iTunes,” try again in a few minutes. To hours; depending on the number of times they enter the wrong passcode. After six wrong attempts, it will lock you out of the iPad, and it will then display the said message.
Is your iPad is disabled now for entering the wrong password? Well, here are some fixes to resolve the issue quickly and safely. Refer to the detailed guide given here.
This is not the end of the world; there are many ways to get rid of this problem. But again, the solution is not simple, and you will need to restore your iPad to get it back to life. Things are more straightforward if you have backed up your iPad using iTunes. Otherwise, it’s a bit complicated. Let’s start at…
Contents
iPad is Disabled Connect to iTunes-Fix
Unlock Disabled iPad with iTunes Backup
The option will only work if
- You have synced your iPad with iTunes before.
- Also, if you have to restart your iPad after the sync. then you will need to trust the PC again. That is not possible because you are locked out.
- Assuming that you have synced your iPad with the PC and also, not restarted the iPad after that.
- If you have to Find My iPad turned on in the Settings on your iPad. Then you won’t be able to restore without going to the recovery mode.
Assuming, you have synced your iPad and also not enabled Find My iPad under the Settings application. We can proceed with the guide.
Steps
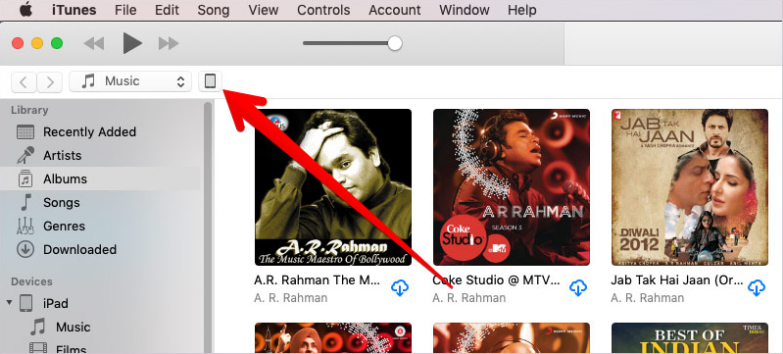
- Connect your iPad with the PC and open iTunes.
- From the upper-right corner, click the iPad device icon.

- Click on “Summary” from the left menu → Now select “This Computer” under Automatically Backup option and click “Done” to start the backup process.
- After the backup process is complete, click on “Restore iPad” in the Summary tab itself.
- Once the process finishes, set up your iPad as new.
- Finally, Tap on Restore from iTunes Backup.
This is one of the safest options as you won’t lose any data. Though, you’ll have to invest some of your time. Now, if you do not have iTunes backup. Then head below to understand how to get your iPad back to life.
Restore Your iPad without iTunes Backup
If you have never synced your iPad with iTunes, then you will need to restore your iPad using recovery mode. Please note here that you will lose all the data unless you enable the iCloud backup.
- Assume that you have connected your iPad to the computer. Now, turn off your iPad by pressing the top-button for few seconds. When slider appears on display, you need to drag it right to turn-off.
- Now press and hold the Home button with top-button. Keep holding until you see the recovery mode screen on the iPad.
- Open iTunes, and it will automatically detect your iPad in recovery mode and also show a pop-up. Then click on “Restore.”
- iTunes will then start downloading the firmware for your iPad, and it may take some time. Your iPad will leave the recovery mode after fifteen minutes. So when the download is finished, repeat the above steps to get your iPad back to recovery mode and then restore the device.
Restore iPad Using iCloud
If you have “Find my iPad” turned on before you were locked out. Then you have an option to restore it using iCloud. The condition is that your iPad should have a working internet connection. When you are following these steps.
Note: Before going ahead, Ensure that you take a backup of your iPad using iTunes as shown in the first method.
Steps
- Login to iCloud.com using the Apple ID and Password you used on your iPad.
- Once logged in, click on “Find iPhone.”
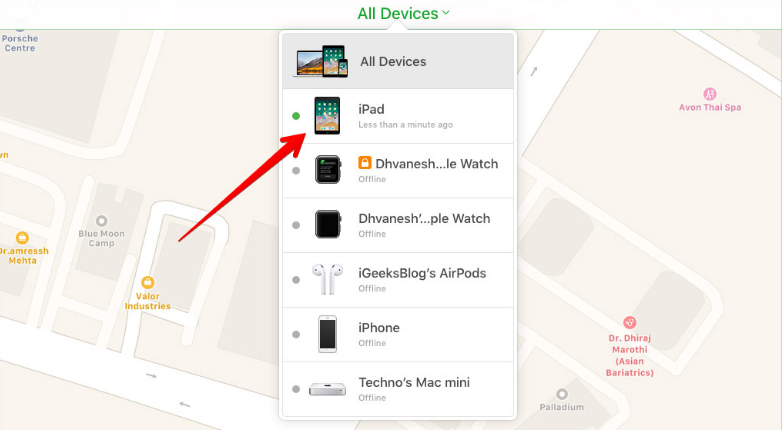
- Now click on “All Devices” on the header. And from the list, click on your iPad.

- It will load the map along with the current location of your iPad. On the right, you will see different options, click on “Erase iPad”. And again click on “Erase” when prompted.
- You will also need to confirm your Apple ID credentials again, do this to continue.
- Next screen you will be presented with the security questions you had set before. Answer them to continue. After that, it will ask you to enter an alternate phone number. It is optional so that you can click “Next.”
- Enter a message if you wish to, this too is optional. Then click on “Done.”
That is it; your iPad will erase in a few minutes, and then you can set it up like new. If you had a backup, then you can restore it.
Conclusion
Alright, That was all folks. I hope you like iPad is Disabled Connect to iTunes this article and find it helpful for you, give us your feedback. Also if you guys have further issues related to this article. Then let us know in the comments section below. We will get back to you shortly.
Have a Great Day!


