Do you want to make your PC lock automatically after inactivity in Windows 10? When you move away from your computer, you like to ensure to lock it so other users can’t access your PC and its data. You can also manually lock your Windows 10 computer by clicking Windows Key + L or Ctrl + Alt + Del. But certainly you forget. The best thing is that you can make Windows 10 to automatically lock after a set time of inactivity. Here is a look at some methods you can set this up.
For a security measure, you might want to lock your Windows 10 PC, after a specific period of inactivity, so that when you are far away from it, no one can access it – and also you’ll be able to access it only when you input your password. You can also do this after using REGEDIT, Dynamic Lock, GPEDIT, Screensaver settings, or a free tool.
Contents
- 1 Make Your PC Lock Automatically After Inactivity Via Screen Saver
- 2 Make Your PC Lock Automatically After Inactivity Via SecPol
- 3 Turn On Windows 10 Auto Lock Via Registry
- 4 Make Your PC Lock Automatically Via Built-In Dynamic Lock
- 5 Use Group Policy To Make PC Lock Automatically
- 6 Use Third-Party Tool To Make It Lock Automatically
Make Your PC Lock Automatically After Inactivity Via Screen Saver

This might be the easiest method and an old trick.
Step 1:
Simply head over to the Start and type: change/modify screen saver and tap on the “Best Match” result.
Step 2:
Then, the Screen Saver Setting windows will open. Simply set your screen saver to something uisng the dropdown list. Well, I personally use the “Blank” option. But the best part to do is to make sure to check the “On resume, display logon screen” box. You can then set the “Wait” time to many minutes you like and tap OK.
That’s all about it. After the set up the period of inactivity, your screen saver will come up and needs you to input your PIN or password to unlock it.
Make Your PC Lock Automatically After Inactivity Via SecPol

If you’re working on the Windows Pro version, you can then use the Local Security Policy feature. If you want to launch it.
Step 1:
Simply press Windows Key + R and type: secpol.msc and tap OK or press Enter.
Step 2:
Head over to the Local Policies > Security Options and then move down and double-tap “Interactive Logon: Machine inactivity limit” from the list.
Step 3:
Input the required amount of time you like Windows 10 to shut down after no activity on the PC. After the Limit Properties window opens. You can simply input in an inactivity limit between one to 599940 seconds. Just remember that the max is 166 hours. Also, you don’t want the number of seconds too low as it would get irritates to have your system lock all the time.
Step 4:
After you complete this, you want to sign out of your session or restart your computer for the modification to take place.
When you come to check out a few seconds to use, so it’s good to use the time unit conversions using your favorite search engine. For instance, 10 minutes would be 600 seconds.
Turn On Windows 10 Auto Lock Via Registry
After executing Windows 10 Home, you don’t need any access to the Local Security Policy tool. However, you can also do the same thing after hacking the Registry. But this is a technique only experienced users can try. If you’re using Windows 10 Home, you probably want to use the Screen Saver trick.
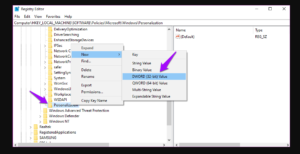
If you want to get begin, press Windows Key + R and type: regedit and tap OK or press Enter to launch the Registry.
Then move to the following path:
HKEY_LOCAL_MACHINE\SOFTWARE\Microsoft\Windows\CurrentVersion\Policies\System
You can then create a new 32-bit DWORD Value known as InactivityTimeoutSecs and provides it a value between 0 or 599940 – again. So, that is the number of few inactivity seconds you like to pass before locking your PC.
You can then sign out to your session or restart your computer for the settings to move into effect. If you like to modify the time, just move back into the InactivityTimeoutSecs key and modify it.
Make Your PC Lock Automatically Via Built-In Dynamic Lock

Dynamic Lock can help you to lock Windows 10 automatically after you step away. Also, it locks down the Windows 10 PC automatically after using your mobile. But when your mobile phone is connected to your PC via Bluetooth. Alternatively, when you move away from your PC with your mobile. Then your PC will lock itself down. But it might not work properly if your PC can’t support the Windows Hello function.
Use Group Policy To Make PC Lock Automatically

Step 1:
Head over to the Group Policy Editor and move to the following setting:
- Computer Configuration > Windows Settings > Security Settings > Local Policies > Security Options.
Step 2:
Then double-tap on Interactive logon: Machine inactivity limit setting.
Windows checks the inactivity of a logon session. However, when the amount of inactive time exceeds the limit of inactivity, then the screen saver will run, locking the session.
Provide it a value between 1 and 599940 seconds, save, and exit.
Use Third-Party Tool To Make It Lock Automatically

Smart PC Locker Pro is a free tool that allows you to easily lock your Windows PC. Also, it offers lots of configuration options.
Conclusion:
Whether you move the simple route or digging into your PC, this is the best thing to have set up when you walk away from your PC and forget to lock it down. You will also want to modify the time values relying on the situation you’re in. But after having the auto-lock backup will provide additional peace of mind.
Also Read:


