
Many PC users connect their internet through wireless adapters. Practically, the majority of laptop users access the internet on their devices through wireless adapters. What if your wireless adapter on Windows starts that cause a problem for you? Yes, a lot of users reported that whenever accessing the internet via wireless adapter they encounter trouble. They also get an error message while connecting along with the wireless adapter. In this article, we are going to talk about How to Fix Problem with Wireless Adapter or Access Point. Let’s begin!
Contents
- 1 How to Fix Problem with Wireless Adapter or Access Point
- 1.1 Update the wireless drivers
- 1.2 Connect via Wired Connection
- 1.3 Remove your current Wi-Fi profile | problem with wireless adapter
- 1.4 Make sure to use the correct Password
- 1.5 Reset Wireless Router
- 1.6 Turn on the WMM option for your router | problem with wireless adapter
- 1.7 Enable Wireless Adapter
- 1.8 Temporarily turn off Antivirus software | problem with wireless adapter
- 1.9 Power-cycle the modem-router-computer in case of APIPA
- 1.10 Turn on Wireless Network Related Services
- 1.11 Conclusion
How to Fix Problem with Wireless Adapter or Access Point
You guys may encounter the “Problem with wireless adapter or access point” problem probably because of your corrupted Wi-Fi configuration profile. In this case, you guys can delete your wireless profile and then reconnect your wireless network in order to fix the issue. Here you guys can learn two ways to delete your wireless profile:
Update the wireless drivers
- Searching and downloading drivers manually can actually be a long, risky and tedious process. Thus, you might want to use DriverFix, an awesome tool that automatically downloads and installs the important drivers.
- After many tests, our team concluded that this is the best-automatized, hassle-free solution as well.
- It’s extremely easy to use too, however, you can judge that by yourself. Start via downloading and installing DriverFix, then just start the program.
- The software doesn’t even need any command since it will start the automatic scanning of your system. Now just look for missing or problematic drivers.
- After this short process, you guys will receive a list of recommended drivers in order to install.
- All that’s left now is just to install them separately or as a whole. Through checking the Select All box from under the Updates Center.
- Of course, it’s easier to install them all together, however, if you have any reasons not to. Then you can still choose one or a lot of via checking the corresponding box to the left of their names.
- The install buttons are to their right side, now after the Info column.
Connect via Wired Connection
It is quite understandable that connecting the laptop along with a wired connection for the internet kills the vibe. Well not for everyone, however, for some folks it does. But, if you’re not able to access the internet via WiFi, the best alternative is just to try in order to connect to the Internet through a wired connection. You just have to connect your laptop to the router along with the LAN cable as well. This may be able to solve your issue and you guys will then get the internet connectivity back.
Remove your current Wi-Fi profile | problem with wireless adapter
You guys may not able to access the internet due to the corrupted wireless profile. If this is the issue then it can also cause a problem along with the wireless adapter or access point. So you have to either remove your current wireless or WLAN profile or also forget the current Wi-Fi network. Now there are 3 ways via that you guys can do
Make sure to use the correct Password
One of the most common problems along with wireless adapters or also access points is not entering the right password. You guys may accidentally be entering the wrong password thus, it is recommended to double-check that you are entering the right password in order to access WiFi. Did you check the keyboard? Yes, many times particular keys of your keyboard may not be inserted because of which you would not be able to insert the right password. Let’s try the On-screen keyboard to enter the correct password and then check if you are able to connect to the internet.
Reset Wireless Router
If your router is not configured properly, then you may get an error message on your device regarding the wireless adapter. You just have to tap on the Refresh button on your router or you also can open the settings of your router then locate the reset option in the setting.
- Turn off your WiFi router or modem and then unplug the power source from it as well.
- Now wait for 10-20 seconds and then again connect the power cable to the router.
- Now switch on the router and again try to connect your device and then see if this Fix Problem along with the wireless adapter or access point.
Turn on the WMM option for your router | problem with wireless adapter
This is another workaround in order to fix the problem with the wireless adapter or also access point on Windows 10. But, it seems a bit weird solution but a lot of users reported that they solved their wireless adapter problem along with this method.
- Tap on Windows key + R then type devmgmt.msc and hit Enter in order to open Device Manager.
- Now expand the Network Adapter section as well. It will also open a list of all network adapters installed on your system as well. Here you have to right-click on your wireless network adapter and chose Properties.
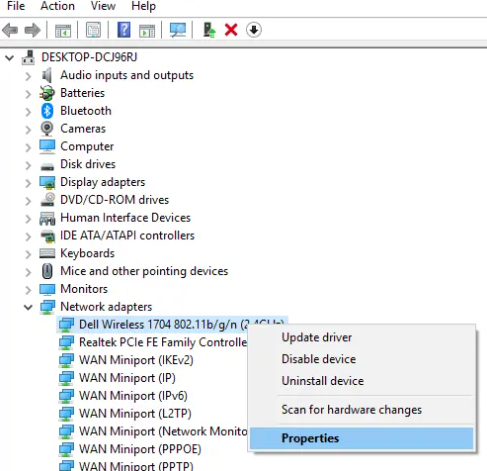
- You have to navigate to the Advanced tab and then locate the WMM option.
- Choose the WMM option then from the Value drop-down select Enabled.
Hopefully, now you guys will be able to get an internet connection via your Wireless adapter.
Enable Wireless Adapter
Many times the wireless adapter gets disabled because of installing of any third-party software on your system. You have to check the settings to make sure that it is not disabled:
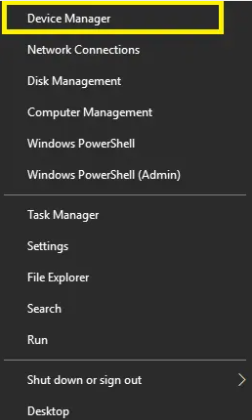
- You have to open Device Manager. Tap on Windows Key + X and then select Device Manager.
- Now under Device Manager, you have to expand Network Adapters.
- Next, double-tap on your wireless adapter device in order to open its Properties window.
- Navigate to the Driver tab and take a look at the Enable button. If you guys don’t see the Enable button, then it means the wireless adapter is already enabled as well.
Flush DNS and Reset TCP/IP
- Right-tap on Windows Button and choose “Command Prompt(Admin).“
- Now type the following command and then tap on Enter after each one:
ipconfig /release
ipconfig /flushdns
ipconfig /renew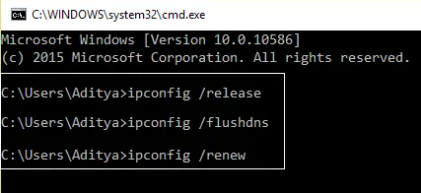
- Again open Admin Command Prompt and then type the following and click on enter after each one:
ipconfig /flushdns
nbtstat –r
netsh int ip reset
netsh winsock reset
- Reboot in order to apply changes. Flushing DNS seems in order to Fix the Problem with the wireless adapter or access point.
Temporarily turn off Antivirus software | problem with wireless adapter
Many times the Antivirus program can also cause the Network Adapter Driver issue and in order to verify this is not the case here. You guys have to disable your antivirus for a limited time so that you can also check if the error still appears whenever the antivirus is off.
- Right-click on the Antivirus Program icon from the system tray and then choose Disable.
- Next, you have to choose the time frame for which the Antivirus will remain disabled.
Note: just select the smallest amount of time possible for example 15 minutes or 30 minutes.
- When you do that, again try to connect to the WiFi network and then check if the error resolves or not.
Power-cycle the modem-router-computer in case of APIPA
- Tap on Win + R in order to open the Run window and type the command cmd. Tap on Enter to open the Command Prompt window.
- Now type the command ipconfig and press Enter. It would then display a set of information.
- From the set of information, you have to check the value of the IPv4 address. If it is 169.254.***.*** something, then it indicates a condition called APIPA where the system assigns itself an IP address as well.
- In order to resolve the condition, we would have to power-cycle the modem-router-computer as well.
- Just switch OFF all the 3 devices.
- Switch ON the modem.
- Now, wait till all lights are up and stable.
- Then switch ON the ROUTER as well.
- Wait till all lights are up and also stable.
- At last, boot your system and then check if it is able to connect to the network.
Turn on Wireless Network Related Services
- Tap on Windows Key + R then type services.msc and click on Enter.
- Now you have to make sure the following services are started and their Startup type is set to Automatic:
DHCP Client
Network Connected Devices Auto-Setup
Network Connection Broker
Also, Network Connections
Network Connectivity Assistant
Network List Service
Also, Network Location Awareness
Network Setup Service
Network Store Interface Service
WLAN AutoConfig
- Right-tap on each of them and then choose Properties.
- Make sure the Startup type is set to Automatic and then tap on Start if the service is not running.
- Now click Apply followed via OK.
- Reboot your PC in order to save changes.
Conclusion
Alright, That was all Folks! I hope you guys like this article and also find it helpful to you. Give us your feedback on it. Also if you guys have further queries and issues related to this article. Then let us know in the comments section below. We will get back to you shortly.
Have a Great Day!
Also See: How to Stop Autoplay on Google Chrome


