Well, as the leading video game vendor on the internet, Steam actually has hardly given users any reason for complaint. But, in spite of its best efforts, errors on Steam are unavoidable along with most users getting some sort of issue or another. The corrupt disk error on Steam is one such problem that occasionally pops up. In this article, we are going to talk about How to Fix Steam Corrupt Disk in Windows. Let’s begin!
There are a lot of things that might have gone wrong and caused this problem to appear. We have chosen the most common ones among users in order to help you find out about your scenario and the best way to resolve the problem as well. Just check out the list below:
- Corrupt download files – If your downloading process was interrupted via a BSOD, a power outage, or something similar, it’s really possible that the file being downloaded went corrupt. In that case, it’s good to reset the files being downloaded and start all over again.
- Hard drive problems – It’s quite possible that your hard drive also has run into problems and you should check for errors via the built-in error-checking tool.
- The hard drive is being turned on – There is an option in order to turn off the hard drive after some time of inactivity to save power. And it’s possible that this caused the problem as well. Make sure you turn off this setting.
How to Fix Steam Corrupt Disk in Windows
As the name suggests, the issue is via corrupt files on the installation disk. These files are created whenever the installation process is interrupted through power outages or other system issues. Plus, preexisting broken and corrupt files in the Steam installation folder can also cause this error as well. Read ahead to discover a few methods you can follow in order to overcome the error.
Rename the Downloading Folder
This problem mostly occurs if a file being downloaded becomes corrupted all of a sudden because of various reasons. Such as system crashes or random computer shutdowns. If that is the case, then the download can’t proceed beyond the corrupted file and the Corrupt Disk error message appears. Follow the steps below in order to restart all downloads via renaming the “downloading” folder.
- Just navigate to your Steam installation folder. If you guys haven’t configured any changes during the process of installation regarding the required installation folder. Then it should be Local Disk >> Program Files or Local Disk >> Program Files (x86).
- But, if you have the Steam program’s shortcut on the desktop, you can simply right-tap on it and select the Open file location option from the context menu that will appear.
- Locate the steam apps folder in the main folder, then open it, and locate the downloading folder inside. Right-tap on it and select the Rename option from the context menu which will appear. Change the folder’s name to something just like old.
- Reopen Steam and you should see that all downloads also reset. Check to see if the problem still appears whenever trying to download. Or update the have that was giving you problems!
Clear Download Cache
The second method is just the same as the first one but this one looks to clear download files. That are no longer necessary and which won’t interrupt the downloading process as well. It’s not as effective as the first method, however, it has also helped plenty of users.
- Make sure you start the Steam client via double-clicking it on the Desktop or through searching for it with your Start menu open and clicking on the first result.
- Tap on the Steam option from the menu at the top of the client’s screen and select Settings. In the Settings window make sure that you navigate to the Downloads tab and then check the bottom of the window for the Clear Download Cache.
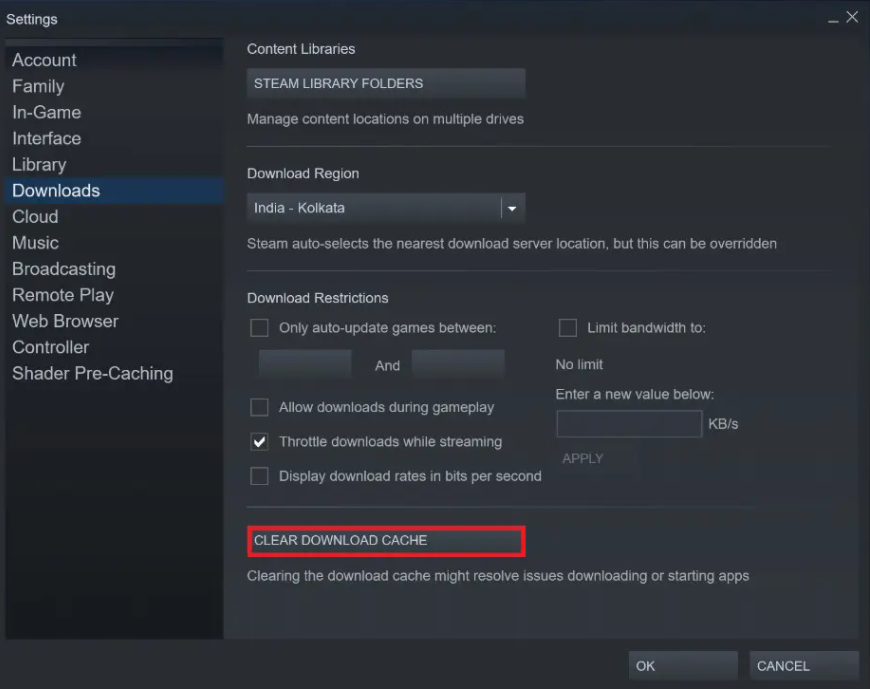
- A new window should open prompting you in order to confirm your choice and all unnecessary download files should now be deleted.
- Tap on the Steam option at the top left part of the Steam client and select Exit to exit Steam completely (don’t just click the x button at the top right corner). Reopen Steam, relaunch the download, and then check to see if the Corrupt Disk error appears.
Run the Error Checking Utility | Steam Corrupt Disk
Running the Error Checking utility for the drive where your game is installing does wonder for this error message. Just like it manages in order to fix file errors and resolve drive issues whenever it comes to filing management. Resolving these errors for the drive where the game actually is located should resolve your problem immediately.
- Open your Libraries entry on your PC or then open any folder on your computer and tap on This PC option from the left side menu. If you guys are using an older version of Windows (Windows 7 and older), then simply open My Computer from your Desktop.
- Right-tap on the drive where your game is installed and select the Properties option from the context menu that will appear.
- Navigate to the Tools tab in the Properties window and tap on the Check button under the Error-checking. Just follow the instructions which will appear on-screen and the process shouldn’t take more than a few minutes. Check to see if the problem still appears or not.
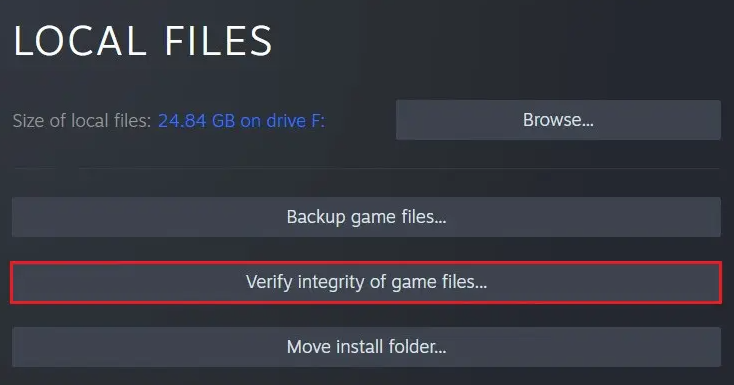
Verify Integrity of Game Files
Games that have been installed, however, do not run after the installation process are probably facing errors along with their files. These files can be corrupt or damage causing an issue on your PC as well. With verifying the integrity of your game files, you can make sure that all the files associated along with the game are in working condition. And hence fix the ‘Steam corrupt disk error’ on Windows.
- In the Steam library, just right-click on the app that isn’t working.
- From the options that also appear, select the ‘properties’
- Then from the options on the left, tap on ‘Local files.’
- In the Local Files menu, just tap on Verify integrity of game files. Steam will then verify if all the files are functioning and also fix any issues its finds.
Repair Windows Drive | Steam Corrupt Disk
In order to fix the error, you can try repairing the whole Windows Drive holding Steam’s installation folder. This process will identify any errors in your PC and then remove them.
- First, open ‘This PC’ on your Windows device.
- Then right-click on the drive containing Steam’s installation folder (mostly C drive) and choose Properties.
- In the Properties window, then switch to the Tools tab then tap on the Check button in front of the option. That says This option will check the drive for file system error as well.
- Now let the scan complete and reopen Steam in order to check if the corrupt disk error on Steam is resolved.
Change Power Settings
The problem may cause via hard disk problems when the HDD turns off at the wrong moment. Just enough to corrupt the file that was downloading. This causes the Corrupt Disk error and avoids the file from downloading further. Try to disable the option to turn off the hard drive to save power in Power Options!
- Right-tap on the battery icon located in the system tray and then tap on Power Options. If you are not using Windows 10, just click on the Start menu and search for Control Panel. Now change the View by option to Large icons and click on the Power Options.
- Select the power plan you are currently using (usually Balanced or Power saver) and then tap on the Change plan settings. In the new window which opens, just click on Change advanced power settings.
- In this window, tap on the small plus button next to the Hard disk entry on the list in order to expand it. Do the same for the Turn off hard disk after changing the Setting option to Never via clicking on it.
- Do the same for all active battery plans since your computer will many times switch between them automatically. Check to see if the Corrupt Disk error still appears on your PC.
Reinstall Steam | Steam Corrupt Disk
Reinstalling Steam is one of the least famous methods and there is a reason why it’s placed so low on our list. The method also has solved the problem for so a lot of users but it should be a last resort. Because there are plenty of simpler methods you should try out before doing this.
- Make sure that you back up every library folder you want to preserve on your computer and take note of their proper locations. So that you can add them back when Steam is reinstalled.
- Tap on the Start menu and open Control Panel via searching for it. Just like that, you can tap on the cog icon in order to open Settings if you are using Windows 10.
- In Control Panel, choose to View as Category at the top right corner and tap on Uninstall a Program under the Programs section.
- If you guys are using the Settings app, tapping on Apps should immediately open a list of all installed programs on your PC.
- Locate the Steam entry on the list and tap on it once. Click on the Uninstall button above the list and then confirm any dialog boxes which may appear. Follow the instructions on-screen in order to uninstall Steam and restart your computer afterward.
- Redownload the Steam client via navigating to this link and run the downloaded executable on your computer via locating it in the Downloads folder and double-clicking on it. Just follow the instructions on the screen to install Steam again and then check to see if the same problem appears on your computer again!
Conclusion
Alright, That was all Folks! I hope you guys like this article and also find it helpful to you. Give us your feedback on it. Also if you guys have further queries and issues related to this article. Then let us know in the comments section below. We will get back to you shortly.
Have a Great Day!
Also See: How to Fix Reboot and Select Proper Boot Device Issue


