Do you want to open the RDP port to enable remote desktop access to your system? Windows 10 comes with a remote desktop client that remotely accesses the full Windows Desktop environment. It’s very essential for people who use several PC for work. Did you know about RDP port and how to tweak it for security?
All you need is to put the default port after using the RDP (Remote Desktop Protocol) is 3389. However, the port should be open using a Windows Firewall to make RDP accessible using the LAN. If you want to access it over the Network. Then the RDP port should be forwarded using the main Internet router to work efficiently.
Contents
Enable RDP Port Via Windows Firewall
If you want to enable RDP port through the Windows firewall then follow the steps below!
Step 1:
Head over to Windows Settings (Windows key + i)
Step 2:
Then move to Update & Security –> Windows Security and tap on Firewall & network protection from the right-hand listing. It’ll open a new window.
Step 3:
Tap the link ‘Allow an app through firewall’.
Step 4:
Then tap on Change settings
Step 5:
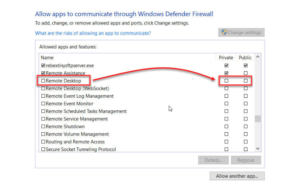
Look for Remote Desktop using the list. By default, it should be there. In case, if it’s not there, you should then tap on Allow another app button and move to the following:
C:\Windows\System32\mstsc.exe
Step 6:
If you want to enable Remote Desktop on the local area network. You can then check the checkbox marked with Private. And if you publicly want it available, you should then check the Public checkbox too.
Step 7:
Hit Ok for the modification to take effect.
Enable RDP Port Via Router (Via NAT Translation)
If you try to use Windows Remote Desktop over the Network, you want to do two steps:
Step 1:
Enable RDP port using Public network from Windows Firewall as we did in the above step.
Step 2:
Also, allow RDP port using the router that is providing you the Internet access and then decode the incoming port 3389 to the PC of our choice.
Remember that if you are connected to the Wifi through a public IP, you don’t want another step but normally people are attached to the Wifi using routers, both corporates or home.
The configuration for opening a port is quite different for each router. As I’m using Kerio Control for my office network, I will walk you through the steps via Kerio Control. The terminology should be identical for some routers so it’ll quite easy for you to follow the similar instruction for your specific router.
Step 1:
Head over to your router’s configuration page. However, it should be quite similar to your default gateway. For me, it is http://192.168.1.1
Step 2:
Once you logging in, head over to Traffic Rules –> Add a new rule
Step 3:
Specify the name of your rule and make it Generic. Keep the action to Allow and hit the Next button.
Step 4:
Then keep the source to Any. It means users can connect to this particular port from anywhere.
Step 5:
Just add a Firewall to the Destination. You can then keep it unchanged if you wish to.
Step 6:
At the bottom of the Services, choose the Port and then specify 3389.
Step 7:
From NAT Translation, turn on destination NAT, specify the IP address of your PC and also specify the port translation to 3389.
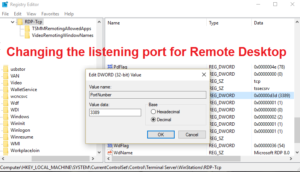
Modify Default Port Of RDP
After opening RDP over the Network, then try to keep the RDP port to 3389 is a security threat. It is suggested that you can modify the default port from 3389 to something higher than 10000. Normally I keep it between 30000 or 40000 which is quite safe as the port scanners will begin scanning from port 1.
If you want to modify the RDP port, follow the instructions below:
Step 1:
Head over to Run –> regedit to open the Registry Editor.
Step 2:
Then locate the following key:
HKEY_LOCAL_MACHINE\System\CurrentControlSet\Control\Terminal Server\WinStations\RDP-Tcp\
Step 3:
From the right-hand pane, double-tap on PortNumber
Step 4:
Modify the value to Decimal and specify the port number between 1001-254535.
Check When The Port 3389 Open & listening
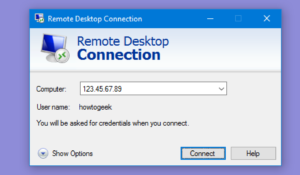
A time comes when you open the RDP port successfully but you can’t connect to the PC remotely. In this situation, you should ensure that you can access to port 3389 remotely. Follow the instructions below to check if port 3389 is open and listening.
Step 1:
Head over to PowerShell by moving to Run –> powershell
Step 2:
Execute the following command
tnc 192.168.1.2 -port 3389
Then replace the IP address 192.168.1.2 with your PC IP. You can also replace it with your router’s public IP if you allow public access to your PC through the router. However, the value of TcpTestSucceeded must be True.
Conclusion:
I hope this guide is essential for you and you can now control your remote desktop very easily. If you have any queries or questions or if I have left any confusion in this guide, then let me know in the comments section below. Your comments are highly appreciated!
Also Read:


