Strikethrough Text in Gmail: Formatting text is an essential part of writing online. You can not only change how your content looks, but it can also help make your content more approachable and easy to read. People are attracted to clarity, and using formatting to make your text clearer will help ensure people actually read it. That’s why mastering basic text formatting is an essential skill for anyone who works online.
This guide is going to cover basic text editing in Gmail, like how to strike through text, encourage it and highlight it. Also, it will cover other usability tips and tricks, like how to unsubscribe from marketing emails and enables preview mode in Gmail.
Contents
HOW TO STRIKE THROUGH TEXT IN GMAIL
While you might think that the ability to strike through text would be added by default in Gmail. The current version does not support strikethrough. While it might not be a feature that you use often. Sometimes, it is the only way to correctly format something.
To get strikethrough text into Gmail, simply format your text in Docs and copy and paste it into Gmail. To do so, follow the steps below.
Step 1:
Firstly, Log into Google Drive.
Step 2:
Then create a new document and type your text into it.
Step 3:
Choose the text you wish to strike through.
Step 4:
Also, choose “Format” and “Strikethrough.”
Step 5:
Now copy the text.
Step 6:
Open Gmail and tap “Compose.”
Step 7:
Paste the text.
This entire process is a little difficult, but it gets the job done. However, if you have configured Gmail to send in Plain Text only, the formatting will vanish. To re-enable Rich Text emails, follow these steps:
Step 1:
Firstly, Open Gmail and tap “Compose.”
Step 2:
Tap the three vertical dots in the bottom right corner of the blank email.
Step 3:
Also, check if there is a checkmark next to “Plain Text Mode,” tap it.
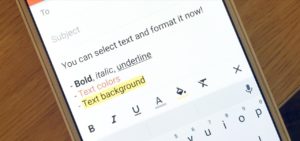
Now, try pasting again and the strikethrough should remain the same. Also, you’ve enabled Rich Text, you have several other formatting choices directly within Gmail.
BOLD TEXT IN GMAIL
The bolding text makes it stand out. Whether you want to draw attention to it, emphasize it or make it quite easy to find, bold text is an efficient way to quickly get your meaning across.
Step 1:
Open Gmail and select “Compose.”
Step 2:
Choose the underlined “A” next to “Send” in the latest email window to access text options.
Step 3:
Choose the text you want to embolden, then choose the “B” in the window.
You can also bold the text by highlighting it and hitting Ctrl + B (Cmd + B for Mac).
HIGHLIGHT TEXT IN GMAIL
Highlighting is rarely used in email outside of an office environment, but it is possible if you want to use it.
Step 1:
Firstly, Open Gmail and choose “Compose.”
Step 2:
Choose the text you want to highlight within the compose window.
Step 3:
Choose the underlined “A” next to “Send” in the compose window to access text options.
Step 4:
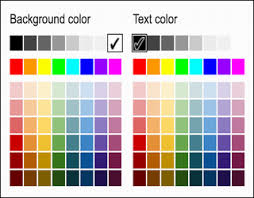
Pick another underlined “A” in the popup bar to choose color options.
Step 5:
Choose a background color in the left part of the pane.
Note: Also, just remember the left color palette changes the background color, while the right side changes the text color.
FAST UNSUBSCRIBE
Rarely the junk email makes it past Gmail’s filter. Also, you subscribed to an email and no longer want to receive it. You could find for the unsubscribe link at the bottom of the email – or, you could cheat. Gmail knows how irritating it can be to constantly receive junk, so it has made it easy to unsubscribe.
Step 1:
Firstly, open the email within Gmail.
Step 2:
Choose the gray “Unsubscribe” link next to the sender’s name at the top.
Step 3:
When the popup appears, tap “Unsubscribe,” and Gmail will automatically unsubscribe on your behalf.
While some marketing emails are quite easy to unsubscribe from. But some like to bury the link where it is complex to find to prevent you from doing so. This is a fast way around that.
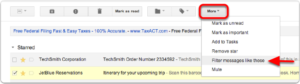
Of course, some irritating marketers know how to get around unsubscription rules. Also, to make sure you never see an email again, tap “Spam.” A popup appears to ask you if you want to report it as spam, or unsubscribe and report it as spam. Choose the second choice to ensure Gmail never displays you one of those emails again. However, use this option as it can damage a sender’s reputation.
USE KEYBOARD SHORTCUTS
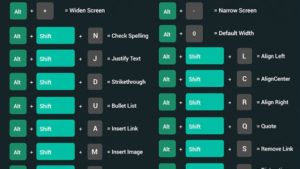
Gmail does a good job of helping you manage your inbox. Also, it is constantly launching changes to enables you to do more. One of the good parts of using Gmail is keyboard shortcuts, which are not turned on by default. To turn them on, follow these steps:
Step 1:
Firstly, Open Gmail and choose the settings cog icon on the right.
Step 2:
Then choose “Settings,” and scroll down to “Keyboard shortcuts.”
Step 3:
Also, toggle the setting to “Keyboard shortcuts on.”
All done! Now you can go nearly anywhere within Gmail using just your keyboard. Some of the most essential shortcuts are “g” than “I,” as it’ll take you to your inbox. “C” will open a window to compose the latest email. “E” will archive an email. And “j” and “k” will browse up and down between emails.
Conclusion:
Here’s all about strikethrough text in Gmail. Have you ever try this? For further queries and questions let us know in the comments section below!
Also Read: