As we all know Windows operating systems (OS) are shipped along with some pre-installed Visual C++ Redistributable Package(s) as well. The latest OS that is Windows 10 is shipped along with Visual C++ 2010 Redistributable Package. These packages are needed to run the Desktop programs or apps created via Visual Studio, and much more important whenever your machine does not have Visual Studio installed actually. In this article, we are going to talk about This Application has Requested the Runtime to Terminate it in an Unusual in Way Windows 10. Let’s begin!
Today, a strange thing happened on my Windows 10 Pro system. When configuring some options in Settings app, I suddenly received the error message which is related to Microsoft Visual C++ Runtime Library actually. You can have a look at the complete message:
Runtime Error!
Program: C:\Windows\ImmersiveControlPanel\SystemSettings.exe
This application has requested the Runtime to terminate it in an unusual way.
Please contact the application’s support team for more information.
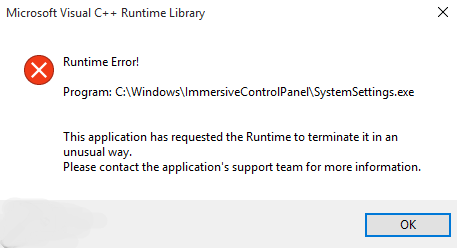
Here, tapping on the OK button does not really do anything, not even closing this error message actually. Also Settings app really becomes unresponsive, on the other hand. Just like you can see in the above screenshot, the error message is only related to the Settings app actually. That is actually a Universal App and it baked into the OS. Thus, it is not possible uninstall this app and then re-install it. But, if you like, you can re-register all apps which will eventually re-register Settings app and see if it solves this issue or not.
If re-registering did not really solve this issue, you guys will then have to update or install latest Visual C++ Redistributable Package(s). Let’s see how:
Contents
This Application has Requested the Runtime to Terminate it in an Unusual in Way Windows 10
- Click on Windows + E in order to open File Explorer. In the left pane, just tap on This PC. Now in the ribbon, and tap on Uninstall or change a program.
- Then in the Uninstall or change a program screen, from the list of installed programs, you need to look for Visual C++ Redistributable Package(s). Highlight them one-by-one and every time do a right click and choose Uninstall. Close the window as well.
- You have to use the following links in order to download the latest version of Visual C++ Redistributable Package(s) from Microsoft. Make sure you guys download an upgraded version if we compare to the one you uninstalled above.
- The download provides you a .exe file on which do a right tap and choose Run as administrator.
- This will then open the setup and you guys have to accept license agreement first and then tap on Install.
Then after few seconds, you will get Setup successful message. Just tap on Close and restart your machine.
After you reboot the machine, the error will no longer appear as well.
Reinstall display driver
- Now on your keyboard, just tap on the Windows key and X at the same time, and then select Device Manager from the list of choices.
- You have to locate and expand Display adapters category.
- Then right tap on the graphics card that you guys are using now and select Uninstall.
When prompted along with the notification, just tick the box for Delete the driver software for this device and tap OK.
- Now restart your computer whenever the uninstall finishes.
- Then check to see if the Runtime error stops now. If the problem persists, please continue along with the next option.
Update display driver | This Application has Requested the Runtime to Terminate
You guys can select to update the display driver via yourself or via Device Manager. Either way, it is always suggested that you get your drivers from legitimate sources actually. If you guys don’t have the time, patience or computer skills in order to update your drivers manually. You can also do it automatically along with Driver Easy.
Driver Easy will basically automatically recognize your system and then find the correct drivers for it. You don’t have to know exactly what system your computer is running actually. You guys don’t have to risk downloading and installing the wrong driver. And you don’t need to worry about making a mistake whenever you are installing.
You can also update your drivers automatically along with either the FREE or the Pro version of Driver Easy. However, with the Pro version it actually takes just 2 taps (and you get full support and also a 30-day money back guarantee):
- First of all, Download and install Driver Easy.
- Then run Driver Easy and tap on Scan Now button. Driver Easy will now scan your computer and also detect any problem drivers.
- Tap on the Update button next to a flagged device driver to automatically download and install the correct version of this driver (you can also do this along with the FREE version) as well.
Or you can also tap on Update All to automatically download and install the correct version of all the drivers. Those are missing or out of date on your system (this needs the Pro version – you guys will be prompted to upgrade when you click Update All) as well.
Perform a Clean boot
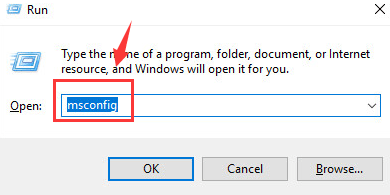
- So, on your keyboard, tap on the Windows key and R at the same time. Then just type msconfig in the search box and hit Enter.
- Head to the Services tab, press the Disable all button on the bottom right corner.
- Now on the same window, just tick the box for Hide all Microsoft services.
- Go to General tab, and then un-check the box for Load startup items.
- Then tap on Apply and OK in order to close the System Configuration window.
- Now restart your computer now. If the problem is gone, then you have to repeat the similar procedure to boot into normal mode. However, this time, you have to disable the applications one by one unless you locate the culprit app that is actually causing this error. If you guys find it, then go back to Method 1 and Method 2 in order to get the device driver reinstalled or updated as per your own need as well.
Further options | This Application has requested the Runtime to Terminate
Here are some of the solutions that are reported to be helpful to some users actually. Note that the error messages could also be different on different computers as well. So there could also be more than one resolutions, and you have to see for yourself which one is the correct one for your situation actually.
- Just uninstall PC Matic. PC Matic is basically an antivirus program that could be the cause of the Runtime error according to some of the users. If you guys have this program installed on your PC, then you should try to remove it. If you guys really like this product, then you should contact the manufacturer in order to see if they can offer some alternatives too.
- Uninstall AMD or ATI Catalyst Install Manager. If your PC is along with AMD CPU chips, you should try uninstall AMD Catalyst Install Manager or ATI Catalyst Install Manager in order to see if the error is gone.
- If none of the above methods help you, then you should consider getting your Windows 10 reinstall as well.
Conclusion
Alright, That was all Folks! I hope you guys like this “This Application has requested the Runtime to Terminate” article and also find it helpful to you. Give us your feedback on it. Also if you guys have further queries and issues related to this article. Then let us know in the comments section below. We will get back to you shortly.
Have a Great Day!
Also See: Windows Was Unable to Get a List of Devices from Windows Update