There is a hidden video editor Windows 10 that works like Windows Movie Maker or Apple iMovie. You can also use it to trim videos or make your own slideshows or home movies. You can also have it create videos automatically. This feature is a part of the Photos app.
Contents
Windows 10 Hidden Video Editor To Slow, Trim, Take Photos of or Draw On a Video

Step 1:
If you want to edit a video file, simply open it in the Photos app.
Step 2:
Also, you can do this right from File Explorer by right-tapping the video file and then choosing Open With > Photos.
Step 3:
It opens and plays in the Photos app. If you want to edit the video, tap “Edit & Create” on the toolbar.
Step 4:
You’ll also view lots of video editing tools you can use. Tap a tool to use it.
Step 5:
For instance, if you want to cut a section out of a video, tap “Trim” in the menu.
Step 6:
If you want to use the Trim tool, just drag the two handles on the playback bar to choose the portion of the video you like to keep. You can then drag the blue pin icon to view what appears at that video section or tap the play button to playback the selected section of the video.
Step 7:
Once you’re done, tap “Save a Copy” to save a copy of the trimmed section of the video. If you want to stop editing without saving your changes, tap “Cancel” instead.
Step 8:
The Photos app puts the edited video in the same folder as the original with the same file name. For instance, we edited a video named Wildlife.mp4 and then received a video file named WildlifeTrim.mp4.
Step 9:
Other tools work quite similarly. The “Add Slo-mo” tool enables you to select a slower speed, and then apply it to a video file section of slowing it down.
The “Save Photos” tool enables you to select a frame of the video and save it as a photo. Under the window, you’ll view “Previous Frame” and “Next Frame” buttons you can use to choose a particular frame of a video file.
The “Draw” tool is used for drawing on a video. You can also use a pencil, ballpoint pen, calligraphy pen, and eraser tools, and choose your favorite colors. Anything you draw seems smoothly on the display screen during the video—as if you were drawing it—and then fades out and disappears after a few seconds.
The “Create a Video With Text” and “Add 3D Effects” options both open the advanced video project interface, that we’ll discuss below.
Merge Videos, Add Text, & Apply 3D Effects
If you want to begin creating a video project, you can then tap the “Create a Video With Text” or “Add 3D Effects” tool. You can also tap the “Add to a Creation” button located at the top left corner with a video open. Then tap “New Video with Music.”
You can also get begin with a custom video project after launching the Photos app from your Start menu. You can then tap Create > Custom Video With Music on the app’s home page.
The “Automatic video with music” option also enables you to choose your own photos or videos. The Photos app automatically merges them into a custom video for you.
A prompt appears to add at least one video or image to create a custom video. You can also add images to get a slideshow or merge photos with a video if you want to.
However, you can also add one video to edit it, or more than one video to merge them.
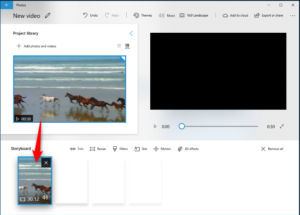
Whatever method you create a custom video project, you’ll end up on a display screen with a video preview, project library, and storyboard pane.
To add many videos to your project. Simply drag them from the project library to the storyboard. Also, tap the “Add photos and videos” option at the bottom of the Project library to add many videos to the library. You can also drag them to the storyboard.
Add a video and you’ll then view some editing tools in the Storyboard pane. Also, the standard Trim tool, you can resize a video via the Resize tool. Also, add visual filters with Filters, add text with Text, apply motion effects with Motion, and add 3D effects with 3D Effects.
What’s More?
Even if you like to edit a single video, you can then add that video to your project. Also, use the many editing tools, and then export the video to the new file. Or, if you want to merge videos, you can simply insert them into the storyboard and edit them simultaneously.
Editing Tools:
The editing tools are also self-explanatory. However, the Trim tool works in the same way as the Trim tool you view while editing an individual video. Well, the Resizes tool can also erase black bars from a video, that is necessary if you’re merging several videos with different aspect ratios into a single project.
Filter Tool:
The Filters tool also offers lots of filters—everything from Sepia to Pixel.
Text Tool:
The Text tool provides different styles and layouts of animated text that you can place in different areas in the video.
Motion Tool:
The Motion tool allows you to select various styles of camera motion for the video or photo.
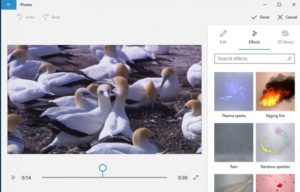
3D Effects Tool:
The 3D Effects tool provides lots of 3D effects you can apply to the video: everything from autumn leaves and winter raining to explosions, lightning bolts, or fires.
You can also apply many 3D effects, and each one has various choices you can use to customize it. Some 3D effects can be placed somewhere in the scene, while others apply to the whole scene.
In the Storyboard pane, you can simply the speaker icon to choose a volume level for each individual video. This is essential if you’re merging various videos and one is louder than the others.
Besides customizing every individual choice yourself, the “Themes” option located on the top bar of the window enables you to select various themes. This will select music, filters, and text styles that work simultaneously—complete with preview videos that display you how they will look.
Windows 10 Hidden Video Editor To Add Music To The Video:
Step 1:
If you want to apply music to a video. Simply tap the “Music” button on the top bar. The Photos app provides some music options you can select from.
Step 2:
You can also choose “Your Music” to add a custom music file.
Step 3:
You can also view an “Aspect Ratio” button on the toolbar. Simply use it to switch between various landscape and portrait orientations for your video.
Step 4:
Once you’re done, tap “Export or Share” to export your video project to a file.
Step 5:
You can also tap the “Add to Cloud” button if you like to upload your video project to Microsoft’s cloud. Then you can resume editing it on the Photos app on another computer you’ve signed in to use the same Microsoft account. Your video projects will appear at the bottom of “Video Projects” after you launch the Photos app.
The Photos app can export the video and tells you where it’s stored on your computer. The Photos app placed the video in the Pictures\Exported Videos folder on our computer.
While this isn’t the powerful video editor you can get on Windows, it’s also capable. Also, it is included on all Windows 10 computers and can do many basics with a pretty simple interface. Just give it a try the next time you like to edit a video on a Windows computer.
Conclusion:
Here’s all about “Hidden Video Editor”. Have you ever try to experience it? If yes, then share your views with us. If you want to share any other method or tips regarding the article then let us know below. For further queries and questions let us know in the comment section below!
Also Read:


