Do you want to set up System Restore in Windows? System Restore is a Windows feature that helps you to resolve some sort of crashes and other PC issues. Here’s how it works, how to set it up System Restore in Windows, and how to use it when things go wrong.
We’re going to use Windows 10 in this guide, but System Restore has been around a long time–and works in the same way in each model of Windows. The steps here are good for Windows 7, 8, and 10, and you’ll experience only small differences throughout the whole process.
Contents
- 1 What Is Meant By System Restore?
- 2 How Does System Restore Affect My Confidential Files?
- 3 How Does System Restore Affect PC Apps?
- 4 Can System Restore Delete Viruses or Other Bugs?
- 5 How to Turn On/Set-Up System Restore In Windows:
- 6 How To Create a Restore Point
- 7 How to Backup Your System to an Earlier Restore Point
- 8 Alternative Methods To Resolve System Issues
What Is Meant By System Restore?
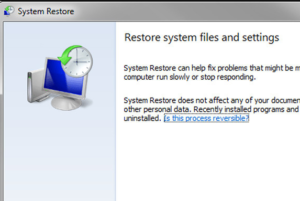
When something went wrong on your PC as a result of bad software–maybe an app you installed, or a driver that broke something necessary–it can be difficult to fix. System Restore enables you to back up your Windows installation back to its last working state.
It does this after creating “restore points” every so often. Recover points are snapshots of your Windows system files, some registry settings, program files, and hardware drivers. You can also make a restore point at any time via Windows automatically creates a restore point once in a week. Also, it creates a restore point right before a huge system event, like installing the latest device driver, app, or executing Windows update.
Then, if something went wrong, you can then run System Restore and point it to a recent restore point. It will rebegin those files, system settings, and drivers, returning your Windows system to that previous state.
This can be quite essential while troubleshooting some sort of issues. For instance, after installing a device driver that makes your PC unstable, you want to uninstall that driver. However, in some situations, the driver might not uninstall properly, or it might damage system files whenever you uninstall it. After using System Restore and choose a restore point that was created before you installed the driver. It can restore your PC files to the earlier state before any issue occurred.
Windows Restore can also essential for undoing the damage due to misbehaving app or Windows update. Certainly, apps and updates can cause issues with other apps or also system components, and just uninstalling the app probably not reverse the damage. Restoring to a point before the app was installed, however, can often wipe up the issue.
How Does System Restore Affect My Confidential Files?
System Restore is quite than making backups. However, it works on the underlying Windows system, besides everything on your hard drive. Also, System Restore can’t save old copies of your confidential files as part of its snapshot. Also, it can’t remove or replace any of your confidential files after you perform a restoration. So don’t count on System Restore as working like a backup. You should always have a good backup technique in place for all your confidential files.
How Does System Restore Affect PC Apps?
Once you backup your computer to an older restore point, any apps you installed when that point will get uninstalled. Apps that were installed when the restore point was created will still be in place. However, those apps that you uninstalled after making restore points will get backed up, but with a very big struggle. As System Restore only recover some sort of files, programs that get backed up often can’t work–or at least, work properly until you re-run their installers.
Windows also enable you to view exactly what programs will be affected after you move through the process. But it’s the best idea to recover to the current restore point possible to minimize issues with apps. Also, it’s a good idea to create manual restore points before undertaking huge installations or settings modifications so that you know you can return to a very recent restore point if you want to.
Can System Restore Delete Viruses or Other Bugs?
System Restore is not the best fix for erasing viruses or other malware. Since harmful software is typically buried within all sorts of places on a PC. However, you can’t depend on System Restore being able to root out all sorts of malware. Rather than, you should depend on a quality virus scanner that keeps you up to date.
If you want to Set up System restore in Windows dive down below!
How to Turn On/Set-Up System Restore In Windows:
For many people, System Restore protection is enabled by default for your main system drive (C:) but not other drives on your computer. For others, System Restore is not turned on by default for any drives. It can’t appear related to whether Windows was installed upgraded or fresh, how much disk space is available, what type of drives you have, or anything else we can check it out.
If you like to be protected after System Restore, you can then enable it for at least your system drive. In some cases, since all the things System Restore secures tend to be located on the PC drive anyway. If you want to enable System Restore protection for other drives–say, for instance, you install some programs to a different drive–you can do that too.
Step 1:
If you want to make sure System Restore is enabled–and to turn on it for particular drives–press Start.
Step 2:
Then input “Restore”.
Step 3:
Then tap “Create a restore point.” Don’t fret. This can’t actually create a restore point; it just opens the dialog where you get all the System Restore options.
Step 4:
On the “System Protection” tab, in the “Protection Settings” section, you’ll then view the available drives on your computer and whether a security is turned on for each drive.
Step 5:
To enable protection, choose a drive on the list and tap the “Configure” button.
(In our case, System Restore was already turned on for our C: drive. If it isn’t on your PC, that’s the first drive you might want to turn it on for.)
Step 6:
In the “System Protection” dialog that opens, tap the “Turn on system protection” option.
Step 7:
Then adjust the “Max Usage” slider to the number of hard drive space you like System Restore to use, and then tap “OK.”
Step 8:
You can then click “OK” again to exit the System Properties dialog. Just remember that when Windows creates a restore point, System Restore also creates restore point on all the drives that have system protection turned on.
How To Create a Restore Point
As we mentioned above, System Restore automatically creates restore points on a week, and whenever a huge event like an app or driver installation happens. You can also create a restore point yourself whenever you like it.
Step 1:
Initially, press Start, type “Restore”.
Step 2:
Then tap “Create a restore point.” On the “System Protection” tab, tap the “Create” button.
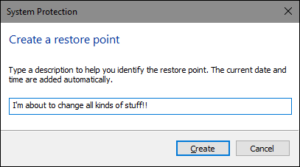
Step 3:
Write a description for your restore point that helps you to remember why you created it and then tap “Create.”
Step 4:
It takes a few seconds or so to create a restore point, and System Restore will enable you when it’s done. Tap “Close.”
How to Backup Your System to an Earlier Restore Point
Huh, so you have System Restore turned on, and you’ve been particular about creating restore points whenever you mess with your PC. Then, one day, the inescapable happens–something goes wrong with your system, and you like to recover to an earlier restore point.
You’ll then begin the restore process from the similar “System Protection” tab where you configure System Restore options.
Step 1:
Hit Start, type “restore,” and then tap “Create a restore point.”
Step 2:
In this step, on the “System Protection” tab, tap the “System Restore” button.
Step 3:
The welcome page of the System Restores wizard provides you a detailed description of the process. Tap “Next” to go on.
Step 4:
Another page displays the available restore points. By default, the only thing displaying might be the automatic weekly restore point and any manual restore points you’ve created. Simply choose the “Show more restore points” option to view any automatic restore points created before app or driver installations.
Step 5:
Choose the restore point you like to–remember. However, the recent working restore point is ideal–and then tap “Scan for affected programs” to have System Restore analyze any programs that will be uninstalled during the process.
Step 6:
System Restore will present you with two lists. The top list displays your programs and drivers that will be removed if you recover Windows to the chosen restore point. The bottom list display programs and drivers that might be restored by the process. Also, even programs and drivers that get backed up might not function properly until you do a full reinstall.
Step 7:
After you are ready to restore, tap the restore point you like to use and then tap Next. Remember that you can avoid the scanning step and just tap Next anyway. But it’s good to view what apps will be affected before you initiate the process.
Step 8:
Then, you’re asked to confirm the restoration. Also, remember you’ve chosen the right restore point and tap “Finish.”
Step 9:
System Restore alerts you that once it begins, the restore process can’t be interrupted. Tap “Yes” to start.
Windows will restart your computer and start the restore process. It can also take a while for System Restore to restart all files–plan for 15 minutes, possibly more. But after your computer comes back up, you’ll be executing at your desire restore point. Now it’s time to test whether it fixed whatever issues you were having. And make sure that System Restore creates an extra restore point right before starting the restore process, so you can always undo your actions after performing this same process and choosing the new restore point.
Alternative Methods To Resolve System Issues
If System Restore can’t fix your issues, there are many other methods you can go about addressing some of the problems System Restore is designed to fix.
If the issue was caused by the current update, you can then look at uninstalling that Windows Update or returning to an earlier “build” of Windows 10. This should resolve your issue that probably occurs because of Windows Update and problems with your particular software or hardware.
If you think that your system files are corrupted–or just like to check–you can try to use the System File Checker to scan for and resolve corrupt system files.
After you installed an update or hardware driver and the issue begins after that, you can then uninstall the driver or update and block them from being installed again.
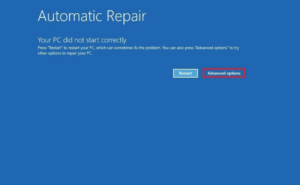
In case, if Windows can’t booting properly so you don’t do any of this, you can just boot into Safe Mode. Also, you visit the “advanced startup options” screen. As it will automatically appear when the Windows 10 can’t boot normally — and use the choices there.
Safe Mode is also essential if for some whatever reason System Restore can’t restore your computer to the selected restore point. You can also boot into Safe Mode and try to execute the System Restore again from there. After you return to a restore point from Safe Mode, System Restore can’t create the latest restore point during the whole process. It means that you can’t undo the restore.
Two recovery Tools:
Windows 10 provides two recovery tools that you can use if all else fails. The “Reset Your computer” feature can backup Windows to its factory default condition or perform a nice installation of Windows while keeping your confidential files intact.
System Restore can’t a cure-at-all. But it can resolve a lots of issues and unfortunately has been downplayed somewhat in previous or coming years between all of Windows’ other recovery tools.
Conclusion:
Here’s all about “Set Up System Restore In Windows”. After reading this article you can easily set up System Restore in Windows. Have you ever try to experience it? What are your views about System Resource? If you want to share any other method or tips regarding the article then let us know below. For further queries and questions let us know in the comment section below. Stay Tuned With us! ?
Till then! Stay Happy
Also Read:


