Runtime Broker is actually a Windows service that runs in the background. This is an important service that keeps an eye on what UWP apps are actually accessing on your system. Specifically, all UWP apps are supposed to declare what devices or also information on a system they will access and the Runtime Broker service. That makes sure they aren’t stepping out of line as well. In this article, we are going to talk about What Is Runtime Broker is and How to Fix High CPU Usage. Let’s begin!
Contents
- 1 What is Runtime Broker?
- 1.1 How to Fix Runtime Broker High CPU Usage
- 1.1.1 Change Windows 10 desktop settings
- 1.1.2 Turn off get tips, tricks, and suggestions
- 1.1.3 Customize the advanced update settings
- 1.1.4 Change registry settings
- 1.1.5 A misbehaving application
- 1.1.6 Quit OneDrive
- 1.1.7 Uninstall Groove music
- 1.1.8 Turn off background apps
- 1.1.9 Other fixes
- 1.1.10 Check if Runtime Broker is a virus
- 1.2 Conclusion
- 1.1 How to Fix Runtime Broker High CPU Usage
What is Runtime Broker?
The service is light and you won’t notice it unless you guys check in Task Manager. It’s also an important app so it has to run no matter what. If it isn’t running on your Windows 10 system, then you should be worried.
Runtime Broker will occasionally use a significant amount of processing power and then you guys will see it spike in the CPU column in Task Manager. But, it returns to 0% in a matter of seconds actually. The spike in CPU usage can be caught if you guys open a UWP app and you’re fast enough in order to find Runtime Broker in Task Manager’s processes list.
How to Fix Runtime Broker High CPU Usage
If the Runtime Broker is constantly through a significant amount of processing power, then it isn’t normal and indicates a problem either along with the system’s files. Try to restart your system and check if the service’s usage goes back down to normal. If it doesn’t, then you should try the fixes below.
Change Windows 10 desktop settings
The constant high CPU usage via Runtime Broker may be caused through your desktop settings. These include, however, are not limited to your lock screen settings and live tiles actually. Turn off the following on your system and check if the Runtime broker’s usage goes back down to normal as well.
- First of all, open the Settings app (Win+I keyboard shortcut).
- Head to Personalization>Lock Screen.
- Just open the Background dropdown and choose Picture.
- Choose a static picture.
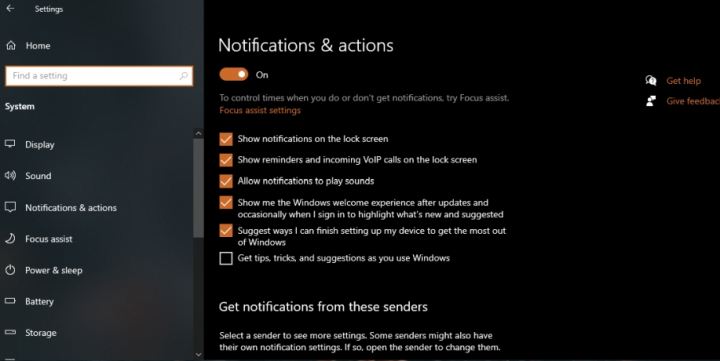
- In the Settings app, just head to System>Notifications and actions.
- Just uncheck the Get tips, tricks, and suggestions when you use Windows.
- Just open the Start Menu.
- Right-tap on the Photos app.
- Head to More and select Turn off the live tile.
Note: It may also help you to turn off all live tiles for all apps.
Turn off get tips, tricks, and suggestions
Keep in mind that any feature of Windows 10 that is actually based on a Universal Windows Application will actually activate the execution of the Runtime Broker process.
- One of these features is actually the application responsible to show tips and suggestions to Windows users regarding news and many other things. For this, we can turn it off from the system hence preventing Runtime Broker from being activated. For this, we will head to the Start or Configuration.
- There we head to the “System” section and in the new window, we head to “Notifications and actions” where we will also see the following. There we tap on the switch called “Obtain tricks, tips, and recommendations when using Windows” located in the “Notifications” section and hence we have disabled it.
Customize the advanced update settings
In some of the cases, your update settings can actually cause Runtime Broker high CPU issues to appear. In order to fix this problem, you have to turn off peer-to-peer updates.
This feature can be useful because it permits you to download updates from other PCs on the Internet and your local network as well.
But, many times that can lead to high CPU usage, however, you can fix the problem via doing the following:
- First of all, you have to open the Settings app and navigate to the Update & Security section
- In the right pane, just tap on Advanced options.
- Scroll all the way down and just tap on Delivery Optimization.
- Just locate the Allow downloads from other PCs option and turn it off.
After turning this feature off, you guys won’t download updates from other PCs. Rather, you’ll download them only and directly from Microsoft actually. With turning this feature off the problem along with Runtime Broker should be resolved.
Change registry settings
If changing the desktop settings doesn’t really fix high CPU usage via the Runtime broker. You guys can try to edit the Windows registry to fix the problem. Be warned though, this solution will actually cause problems with Reminders via Cortana. If you don’t use the feature, then you don’t have much to worry about.
- Click on the Win+R keyboard shortcut in order to open the run box.
- In the run box, then enter
regeditand click on the Enter key. - Head to this key:
HKEY_LOCAL_MACHINE\SYSTEM\CurrentControlSet\Services\TimeBroker. - Double-tap on the Start value and change its value to
00000004.
A misbehaving application
If you guys notice that the high load, memory, or disk use of Runtime Broker is caused via a specific application. Then you guys may do the following:
- If the app is not important, then you can uninstall it and be done with the issue.
- If the app is important, just check for updates. If an update is available download and installs it in order to see if it resolves the issue.
- If that is not the case, then try to uninstall the app, and then install it again after a PC restart.
Quit OneDrive
OneDrive may also be causing the spike in Runtime Broker’s usage. If you guys don’t use the app, then you can uninstall it but to see if it is indeed causing problems, just quit the app.
- You have to open Command Prompt with admin rights.
- Just run this command to quit OneDrive:
taskkill /f /im OneDrive.exe. - Check CPU usage via Runtime broker.
- If OneDrive was basically causing the problem, you can uninstall it along with this command (for 32-bit Windows):
%SystemRoot%System32OneDriveSetup.exe /uninstallor also this command (for 64-bit Windows):%SystemRoot%SysWOW64OneDriveSetup.exe /uninstall. - Now restart the system and install OneDrive again.
- Runtime Broker’s CPU usage should remain normal actually.
Uninstall Groove music
Groove Music is acually the stock audio player on Windows 10 and just like OneDrive, it may actually be the reason Runtime Broker is using so much CPU power. You will have to uninstall the app in order to fix problems with it.
- Just open PowerShell with admin rights.
- You have to run this command in order to uninstall Groove Music:
Get-AppxPackage -name Microsoft.ZuneMusic | Remove-AppxPackage Get-AppxPackage -name Microsoft.Music.Preview | Remove-AppxPackage.
You can also reinstall Groove Music from the Microsoft Store.
Turn off background apps
This solution will actually make a significant impact on the apps, then you use and how they function.
- First, open the Settings app (Win+I keyboard shortcuts).
- Head to Privacy>Bacground apps.
- Just turn the ‘Let apps run in the background’ switch off.
Other fixes
If you guys search the Internet for fixes for Runtime Broker issues. Then you will end up with dozens of suggestions on resolving the issue actually.
- Just change the local screen background from using Windows Spotlight. (That changes background images frequently) to Picture. You guys do so in the Settings application under Personalization > Lock Screen.
- Turn off P2P update functionality under Settings > Update & Security > Advanced Options > select how updates are delivered. Turn the option to off there as well.
Basically, anything else that runs as an application may actually cause the issue.
Check if Runtime Broker is a virus
Last but not least, you guys may also want to check if Runtime Broker is a legitimate Windows process, or also if it is a virus or not.
The easiest option in order to find out is to check if RuntimeBroker.exe is located in c:\windows\system32\.
- You can use Ctrl-Shift-Esc in order to open the Task Manager.
- Just locate the Runtime Broker process there under processes.
- Right-tap on the process, and choose the “open file location” menu item.
This basically opens the location on the computer the process has been started from. Anything but c:\windows\system32\
If it is, then head to Virustotal and upload the rogue file there to have it checked.
Conclusion
Alright, That was all Folks! I hope you guys like this article and also find it helpful to you. Give us your feedback on it. Also if you guys have further queries and issues related to this article. Then let us know in the comments section below. We will get back to you shortly.
Have a Great Day!
Also See: How to Install Pulse Sport on Kodi – Watch Live Sports