
Well, all know that Windows 10 basically comes along with built-in troubleshooters that help you to deal along with many issues on your system. Recently, I actually came around with a network-related problem on my Windows 10 Pro machine. In this scenario, there was actually no Internet connectivity on my system via the router was working perfectly and many other devices were able to connect it. Along with a built-in Windows troubleshooter for network issues, I finally found the root cause for the problem as well. In this article, we are going to talk about Windows Couldn’t Automatically Bind the IP Protocol Stack to the Network Adapter. Let’s begin!
The Windows Network Diagnostics enlisted the following issue, however, was unable to fix it:
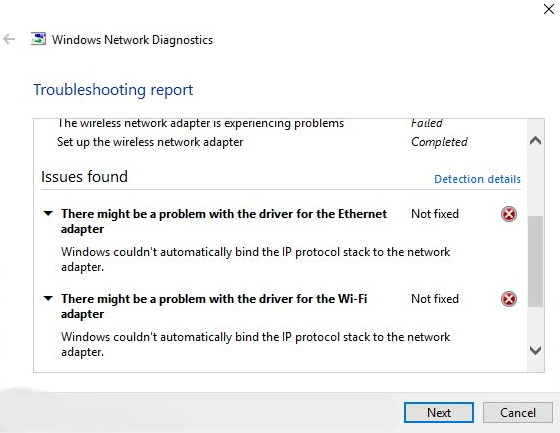
When the built-in troubleshooter was unable to fix the issue, we have to fix it manually. The reason behind this problem is that Windows is unable to get an IP address via Dynamic Host Configuration Protocol (DHCP) discover packets actually. On some of the systems that have this issue, it might also be possible that third-party Virtual Private Network (VPN) clients or also network tools installed are actually causing this problem. The first step in order to solve the problem is actually to delete these third-party clients and then reset Windows Sockets. If the issue still persists, then you guys have tried these fixes:
The reason the Windows couldn’t automatically bind the IP protocol stack error?
If you guys pay attention to the details, the error message is slightly pointing you to the source of the problem. We also investigated this particular issue by looking at many user reports. And the fixes that they used in order to resolve the problem. From what we actually gathered, there are a lot of culprits that are mostly reported as being responsible for the apparition of this issue:
- Windows is unable to fetch the IP address via DHCP – When many scenarios are met, Windows might have trouble fetching the IP address via Dynamic Host Configuration Protocol (because of a bad driver or some network tools that are actually conflicting).
- Virtual Private Network (VPN) client is interfering along with the connection – This is actually one of the most common reasons why this specific error occurs. This scenario is mostly encountered whenever the user tries to delete the VPN client without even following the official channels.
- Unsupported VPN software is installed during the upgrade – If you have recently made the upgrade to Windows 10, a Virtual Private Network software such as Cisco VPN might have left behind some remnant files that are actually interfering along with your wireless connection.
- WLAN AutoConfig service is turned off– A lot of applications or a bad Windows update might stop this service from being started at each and every system startup.
Further
If you guys are struggling to resolve this particular issue. Then this article will help you to troubleshoot the issue. Below you have a collection of fixes that other users in just the same situation have used to get the issue resolved.
For the best results, you have to follow the methods below in the order that they are presented until you find a fix. That is effective in resolving the issue in your specific scenario.
Windows Couldn’t Automatically Bind the IP Protocol Stack to the Network Adapter
Through Network Adapter Properties
- First, right-click on the network icon on the taskbar and choose Open Network and Sharing Center.
- In the Network and Sharing Center window, you have to click the Change adapter settings link.
- Then, in the Network Connections window, right-click on the network adapter with which you’re facing the issue and then choose Properties.
- Well, moving on, in your network adapter property sheet, then under This connection uses the following items section, keep only these entries checked and uncheck remaining ones actually:
- Client for Microsoft Networks
- File and Printer Sharing for Microsoft Networks
- QoS packet scheduler
- Link-Layer Topology Discovery Responder
- Internet Protocol Version 4 (TCP or IPv4)
- Link-Layer Topology Discovery Mapper I/O driver
- Microsoft LLDP Protocol Driver as well
- Internet Protocol Version 6 (TCP/IPv6)
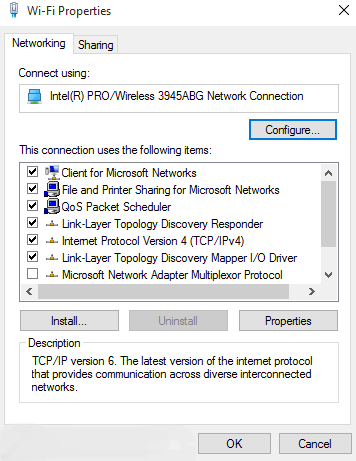
- Tap on OK and close Network and Sharing Center actually. You guys can now check the status of the issue and it must resolve it now. If it is not, carry on the steps provided in FIX 2.
Using Registry Editor | windows couldn’t automatically bind
- Press Windows + R and put regedit in the Run dialog box in order to open Registry Editor and then click OK.
- In the Registry Editor window, now navigate to the following registry key:
HKEY_LOCAL_MACHINE\SOFTWARE\Microsoft\Windows NT\CurrentVersion\NetworkCards
- You have to expand the NetworkCards registry key and you will see some keys numbered 2, 3, and so on. For each and every of this registry sub-key, in the corresponding right pane. Then you will see the Description registry string (REG_SZ). Via Description’s Value data, you guys can identify to which adapter the registry sub-key corresponds actually. So in this way, whenever you spot your network adapter’s registry sub-key, double-tap on k on the ServiceName registry string (REG_SZ) and copy its Value Data. This data will need in the next step.
- Now you need to navigate to this registry key:
HKEY_LOCAL_MACHINE\SYSTEM\CurrentControlSet\Services\Tcpip\Parameters\Interfaces\<Value Data of ServiceName string>
You can replace <Value Data of ServiceName string> along with the value we copied in the previous step.
- So, in the right pane, do a right-tap and choose New > DWORD Value. You can name the newly created registry DWORD (REG_DWORD) as DhcpConnEnableBcastFlagToggle. Double-tap on it in order to modify its Value data:

- Put the Value data equals 1 and tap on OK. You can close the Registry Editor and reboot, the problem should now fix after a restart.
Remove interfering CISCO VPN registry keys | windows couldn’t automatically bind
As per various user reports, it seems like older versions of the Cisco VPN are mostly responsible to cause this particular error. There’s a lot of user speculation that this happens as the older Cisco VPN builds are not designed in order to run play nice. Along with the latest Windows 10 updates (Anniversary Update and the Creators Update).
Apparently, the Cisco VPN app can also leave behind some registry keys (this one is actually causing the error). Even if the program uninstalls actually. Luckily, you guys can resolve this pretty easily through running an administrative CMD command. Here’s a quick guide on how you can do this:
- Tap on Windows key + R in order to open up a Run dialog box. Then, type “cmd” and tap on Ctrl + Shift + Enter to open up an elevated Command Prompt window actually. When prompted via the UAC (User Account Control), tap on Yes in order to grant admin rights.
- Inside the elevated CMD window, just type or paste the following command and click on Enter in order to delete the troublesome key.
reg delete HKCR\CLSID\{988248f3-a1ad-49bf-9170-676cbbc36ba3} /f
Note:
You have to keep in mind that if the key is already removed from your system. Then you’ll get a “The system was unable to find the specified registry key or value” error actually.
- You have to insert the following command and then click on Enter to complete the deletion of the key:
netcfg -v -u dni_dne
- Now reboot your computer and see if the error has been resolved at the next startup actually.
If you guys are still seeing the “Windows couldn’t automatically bind the IP protocol stack to the network adapter” error. Then just move down to the next method below as well.
Change the Startup Type of AutoConfig to Automatic as well
A lot of users have reported that the “Windows couldn’t automatically bind the IP protocol stack to the network adapter” error was resolved. After they change the Startup type of the AutoConfig service to Automatic actually.
Well, this service should enable via default at every startup, a 3rd party application, or a bad upgrading process to modify the standard behavior. Let’s now have a quick guide on making sure that the Startup Type of AutoConfig is turned on actually:
- Press Windows key + R in order to open up a Run dialog box. Then, type “services.msc” and then click on Enter to open up the Services screen as well.
- Inside the Services screen, you have to scroll down through the list of local services and locate WLAN AutoConfig. When you see it, then just double-click it.
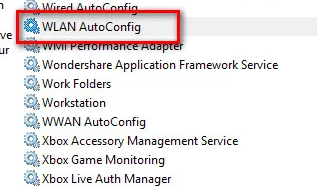
- Inside the Properties screen, then head to the General tab and set the Startup type to Automatic via the drop-down menu. Then, just tap on Apply in order to save the changes.
- Then reboot your machine. At the next startup, Windows should automatically start the WLAN AutoConfig service and now just resolve the issue.
If you guys are still prevented from accessing the internet through your Wi-Fi. Move down to the next method below too.
Conclusion
Alright, That was all Folks! I hope you guys like this “windows couldn’t automatically bind” article and also find it helpful to you. Give us your feedback on it. Also if you guys have further queries and issues related to this article. Then let us know in the comments section below. We will get back to you shortly.
Have a Great Day!
Also See: Failed to Open the Group Policy Object in Windows 10


The last option about WLAN AutoConfig solved my issue. So happy! Your article helped a lot. Thanks ?