Well, it’s possible to run a number of Linux distros natively on Windows 10. But, these Linux environments are limited in the features and tools that you guys can use. In Windows 10, there are only three distros you can select from Ubuntu, SUSE Linux Enterprise, and OpenSUSE Leap as well. All three distros depend on a command-line interface, so you’ll miss out on running any of the graphical experiences (GNOME, KDE, XFCE, or all other Linux-based graphical applications). In this article, we are going to talk about How to Download Windows Virtual PC Windows 10. Let’s begin!
In order to get a full-featured version of Linux on Windows 10. Installing your favorite distro (Linux-speak for “a distributor or distributed version”) on a second PC as well. This is always an option if you are fortunate to have one, but not everyone has one to spare. Luckily, you can just use your Windows 10 PC, it’s still possible for you to run a full-blown version of Linux using a virtual machine (VM) using Hyper-V. Let’s see what you need to do on Windows 10 in order to create a virtual machine using Hyper-V.
Contents
About Hyper-V | windows virtual pc
Hyper-V is basically a hardware virtualization product developed by Microsoft. That was first introduced with Windows Server 2008. Hyper-V is Microsoft’s native hypervisor which allows you to create multiple virtual machines (VMs) and then run them on the same physical server as well. All VMs on the host machine actually run in isolation from one another and share the same virtualized hardware resources. With Hyper-V, you guys can manage all running VMs from a single pane of glass, namely Hyper-V Manager.
Hyper-V combines virtual servers onto a single physical computer. That allows you to significantly reduce the associated costs and management overhead as well. Moreover, Hyper-V enables better use of hardware through allocating computing resources to the VMs which need them most. Thus, you can build an easily scalable virtual environment that fully complies with your business needs and objectives actually.
Hyper-V is also available as a server role in Windows Server and as a stand-alone product (Hyper-V Server) as well. Moreover, Hyper-V Server is absolutely free to install. However, before you begin the process of installing Hyper-V, make sure that your system meets all of the following requirements as well:
- 64-bit processor along with Second Level Address Translation (SLAT)
- VM Monitor Mode Extensions
- Minimum 4 GB of RAM
- Hardware-assisted virtualization (Intel VT or AMD-V)
- Hardware-enforced Data Execution Prevention, along with the NX bit for AMD systems or the XD bit for Intel systems
Hyper-V support | windows virtual pc
Here’s what you guys need to do to verify that your Windows 10 PC has Hyper-V support.
- First, open Start.
- Search for Command Prompt, left-click the top result, and then click “run as administrator.”
- Tap Yes on the UAC prompt.
- Then type the following command and click Enter: systeminfo.exe
- Under Hyper-V Requirements, If you guys see a “Yes,” your PC can run Hyper-V.
If in case, the command displays “No” under Hyper-V Requirements, then your Windows 10 PC hardware doesn’t support this feature. Or you may have to turn on these features manually in your system.
Now that you know your machine is Hyper-V capable, then you need to enable Hyper-V. Let’s see what you guys need to do:
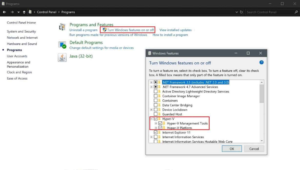
- First, open Control Panel.
- Tap on Programs.
- Then tap on Turn Windows features on or off
- A Windows Features pop-up box appears and you’ll have to check the Hyper-V option. You have to be careful that Hyper-V Management Tools and Hyper-V Platform are selected.
- Then click OK.
After Hyper-V is enabled, then you will be prompted to restart your Windows 10 PC to finish installing the requested changes. You have to restart your computer. Hyper-V is now turned on. The next step will be, you have to create a virtual machine using Hyper-V. Now that Hyper-V is enabled and then you have successfully added a virtualization layer to Windows 10. you’ll need to create a virtual machine (VM) for the Linux distro that you want to use. In order to do that, you’ll need to create a virtual switch in order to connect the VM to the Internet. Let’s see what you need to do next.
Create a virtual switch | windows virtual pc
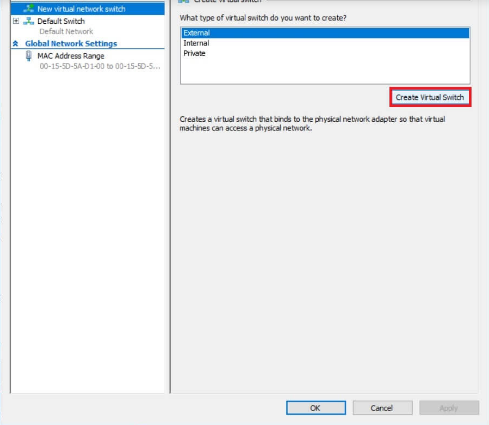
Use the following steps in order to configure a virtual switch on Hyper-V:
- First, open Start.
- Then open Hyper-V Manager.
- Tap on the Action menu.
- Choose New and then click Virtual Switch Manager.
Next, you have to follow the highlighted items on the menu. This will create a virtual switch actually. A virtual switch acts as an extra layer of security between your virtual machine and your Windows 10 PC as well.
- Choose New virtual network switch
- Then select External.
- Choose Create Virtual Switch.
Now, you guys need to customize your virtual switch.
- You have to enter a virtual switch name (e.g., Windows 10 Virtual Switch).
- Under connection type, your network adapter should use the External network option as well.
- Choose OK.
Now that you guys have successfully created a virtual switch, then you can create a virtual machine. The purpose of a virtual switch is to give protection by using security measures to provide an extra level of protection between virtual machines. The virtual switch is an added safeguard in case anything goes wrong actually. Let’s walk through what you need to do in order to create a virtual machine.
Create a Virtual Machine | windows virtual pc
- First open Hyper-V Manager
- Then open the Action menu
- Choose New and then Select Virtual Machine.
Next, it will take you to New Virtual Machine Wizard. That will walk you through the steps needed to set up a virtual machine in Windows 10 using Hyper-V. The New Virtual Machine Wizard is really straightforward and Windows 10 handles all the default virtual machine settings. All you guys need to do in the New Virtual Machine Wizard is to follow the prompts.
The New Virtual Machine Wizard takes the guesswork out of any questions you may have setting up a virtual machine actually. Setting up a virtual machine is actually a breeze using the New Virtual Machine Wizard. Windows 10 makes setting up a virtual machine fast and easy as well. Let’s see all you need to do to set up the virtual machine:
- Specify Name and Location
- Specify Generation
- Assign Memory
- Configure Networking
- Connect Virtual Hard Disk
- Pick Installation Options
- Summary
Depending on how you want to set up your VM, the New Virtual Machine Wizard will walk you step-by-step and also let you customize your VM on Windows 10 through Hyper-V. In the Windows 10 Fall Creators Update, Microsoft made it really easier to create a VM with Hyper-V Quick Create. Now, you can also create a VM using Windows 10 dev environment or Ubuntu 18.04.1 LTS as well. Quick Create can be launched independently of Hyper-V Manager and is a quick tool in order to use to create a VM in Windows 10.
Create a VM in Windows 10 | windows virtual pc
With Hyper-V Quick Create, Microsoft also shows that you can create a VM in Windows 10 in as little as three steps:
- First, open Hyper-V Quick Create from the start menu.
- Choose an operating system or choose your own using a local installation source. If you want to use your own image in order to create the virtual machine. Then choose Local Installation Source. Or choose Change Installation Source. Be sure to pick the .iso or .vhdx that you need to turn into a new virtual machine. If the picture is a Linux image, deselect the Secure Boot option. Secure Boot is only for Windows 10 dev environment actually.
- Choose “Create Virtual Machine”
From there, Hyper-V Quick Create will then create a VM for you without you needing to worry about it. Well, Be aware that if you do not have the OS already installed on your Windows PC. Then you will be required to download your preferred OS from within the Windows 10 app. You can also access Hyper-V Quick Create from the right pane within Hyper-V Manager as well.
When you’ve created a virtual machine, then you should see a screen like this (if you used Windows 10 dev environment).
Conclusion
Alright, That was all Folks! I hope you guys like this windows virtual pc article and also find it helpful to you. Give us your feedback on it. Also if you guys have further queries and issues related to this article. Then let us know in the comments section below. We will get back to you shortly.
Have a Great Day!


