If you guys have an Nvidia GPU on your system, then you may also have installed the GeForce Experience app as well. This app actually has two major functions; download and install the latest Nvidia driver, and optimize games for your system as well. In this article, we are going to talk about How to Remove Games from GeForce Experience. Let’s begin!
Game optimization has now become somewhat really famous. It’s basically whenever an app or your OS tries to free up as many resources as possible in order to help games run smoothly. Well, it can also change the graphics settings for a game so that it is more compatible along with the hardware on your system, that allows it to run better.
Contents
How to Remove Games from GeForce Experience
If you guys have added a game, you will soon find that adding it really was actually the simple part. There is actually no way in order to remove them, at least not from the app’s UI. That’s not to say that it is impossible, however, the method is unconventional.
- First of all, just press the Win+R keyboard shortcut in order to open the run box.
- Then in the run box, you need to enter
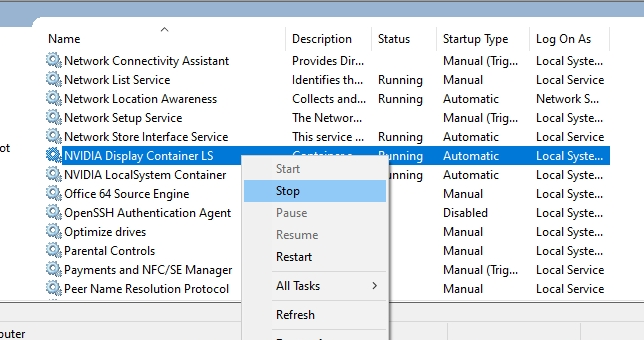
services.mscand click on the Enter key. - In the app that actually opens, you have to look for any and all Nvidia services.
- Right-tap on a service, and choose a Stop from the context menu. You have to repeat this for all of the Nvidia services.
- When you guys have stopped all the Nvidia services, then just open File Explorer.
- Now navigate to the following folder.
- In this folder, you have to look for the following files;
- journalBS.jour.dat
- journalBS.jour.dat.bak
- journalBS.main.xml
- journalBS.main.xml.bak
- It’s a really good idea to back them up (just copy them to a different location). Delete all of these four files.
- Now just restart your system.
- You have to open Nvidia GeForce Experience and all of the games will be removed from the home screen as well.
- The Nvidia services that you guys stopped will now restart automatically after you guys boot back to your system. You guys do not have to start them yourself actually.
How to Turn off Nvidia GeForce Experience
If you have got an Nvidia graphics card then you have almost certainly dealt along with GeForce Experience. However, for most of the people GeForce Experience works just fine at managing graphics drivers. Some folks run into issues with it. Well, from crashes to incorrectly installed graphics drivers; if GeForce Experience does not work for you, you guys may find it easier in order to switch it off. Do not worry though – you guys can turn off it and still manage your graphics drivers manually. There are basically two ways in order to do this:
Turn off it on startup
Well, by default, the program starts up whenever your computer does. You can just simply turn this off without even uninstalling the program entirely. If you want to do this, right-tap on your taskbar and choose the Task Manager.
Then at the top, tap on the Start-up tab. Scroll until you guys find the Nvidia GeForce Experience entry. Choose it, then just tap on turn off. You guys will have to restart your computer for your changes in order to take effect.
The program will also no longer launch on start-up, so unless you guys manually start it, it is effectively disabled as well!
Uninstall the program
You have to turn off GeForce Experience is as easy as uninstalling it via the “Add or Remove Programs” feature. This will only uninstall GeForce Experience, and the graphics driver that is installed will not be deleted. When you guys have uninstalled GeForce Experience you can also still manually update your graphics driver through downloading the driver from Nvidia’s website.
Tip:
If you guys do not have any problems running GeForce Experience, then you should keep it on your computer. As it is a great tool to manage your graphics drivers as well.
In order to do so, first tap on the Windows key on your keyboard, then type “Add or Remove Programs”. A new window will pop up as well. About halfway down, you will see another search bar too.
Just type in “GeForce Experience”, and you will see the entry for it. Just tap on it, and a button in order to Uninstall will appear. Tap on it, you have to follow the prompts and instructions until the process is complete as well. And Nvidia GeForce Experience will also be gone from your machine as well. Your installed drivers will remain, however, you will have to update and also install them yourself from that point on.
Tip:
Only ever install drivers that you downloaded directly from the Nvidia website. Otherwise, you guys run the risk of installing malware and viruses on your machine as well. You can also get GeForce Experience back if you want to use it again as well. Once again, you need to install it from the Nvidia website only!
Conclusion
Alright, That was all Folks! I hope you guys like this “how to remove games from geforce experience” article and also find it helpful to you. Give us your feedback on it. Also if you guys have further queries and issues related to this article. Then let us know in the comments section below. We will get back to you shortly.
Have a Great Day!


