
Communication is based on email when you work from a distance. There are many reasons why you cannot access an Outlook data file. However, the most well-known is the 0x8004010F error that appears while getting or sending emails in Outlook 2010/2013/2016. Assuming you have encountered this error, make sure that everything is recovered. You can solve this issue manually using one of the five strategies in this article without the involvement of a system director.
You can restart Outlook and check your internet connection, set up another Outlook profile, or change your Outlook delivery location to receive your emails. We recommend using the https://outlook.recoverytoolbox.com/outlook-data-file-cannot-be-accessed.html service, which includes an Online Recovery Tool to solve the “Outlook data file cannot be accessed” error.
Microsoft Outlook frequently displays the error code 0x8004010F. In most cases, it appears when you use Outlook to send or receive emails. Consider recognizing that this error can cause critical damage to you and others who cannot receive your messages. This guide will describe the reasons for this error and show you a reliable method to solve it manually.
Contents
- 1 Six Reasons for Outlook Error 0x8004010F
- 2 Five Reliable Methods to Solve 0x8004010F Error: Outlook Data File Cannot Be Accessed
- 2.1 1. Change the Outlook Delivery Location.
- 2.2 2. Set up another Outlook Profile.
- 2.3 3. A. PST File Recovery with the Microsoft Inbox Repair Device.
- 2.4 4. Consider Using the Recovery Toolbox for Outlook to Fix the 0x8004010F Error
- 2.5 5. How to Fix the Code 0x8004010F Error Online with the Recovery Toolbox for Outlook
- 3 How to Convert the Corrupt.OST File to a New Format (like .PST)
- 4 Conclusion
Six Reasons for Outlook Error 0x8004010F
Knowing the reasons behind the error 0x8004010F can assist you in keeping away from future issues with Outlook, so you should have a basic knowledge of the causes.
- Corruption of Outlook profile or Incorrect configuration.
- Damage caused by malware or viruses.
- Outlook profile issues.
- An issue occurred during the upgrade of Outlook, which brought about the 0x8004010F error in Outlook.
- The information files for Outlook are not stored in a suitable location.
- Outlook data documents are excessively large for the program to handle.
Five Reliable Methods to Solve 0x8004010F Error: Outlook Data File Cannot Be Accessed
1. Change the Outlook Delivery Location.
The error code 0x8004010F can be fixed by modifying the delivery location utilized by Outlook.
Follow these steps:
- Click the start button, and select the Mail icon in the Control Panel.
- Choose the “Show Profiles” option via the Mail Settings.
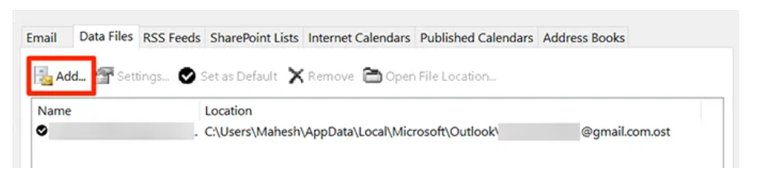
- Select the active profile, and click on the Data Files tab in the Properties Menu.
- Input the name and location of the data record corresponding to your profile. This file will act as the default option.
- Make sure you mark it, then close this window.
Move to the next method if you still need access to the Outlook data file after this approach.
2. Set up another Outlook Profile.
You can make another profile assuming the 0x8004010F issue is tormenting your PC. That can be completed in either an automated or a manual way.
If you would prefer the automated setup, kindly follow these steps:
- Click Start, and afterward, select Control Panel.
- Via the Mail Setup – Outlook discourse box, select Show Profiles.
- Choose the General tab and click the Add button to add anything. Make sure the box labeled “Always utilize this profile” is checked. In the “Add New Account” box, you will be permitted to fill in different information.
- Then, click the OK button. The email address will be displayed in the new window that has opened. Click OK, then Done.
For the manual setup of the profile, follow this method:
- Click Start, and afterward, select Control Panel.
- Choose Show Profiles via the Mail Setup – Outlook discourse box.
- Click the Add button after choosing the active profile. You should pick another name for the new profile.
- Give the new Outlook Profile a name. Select the OK button.
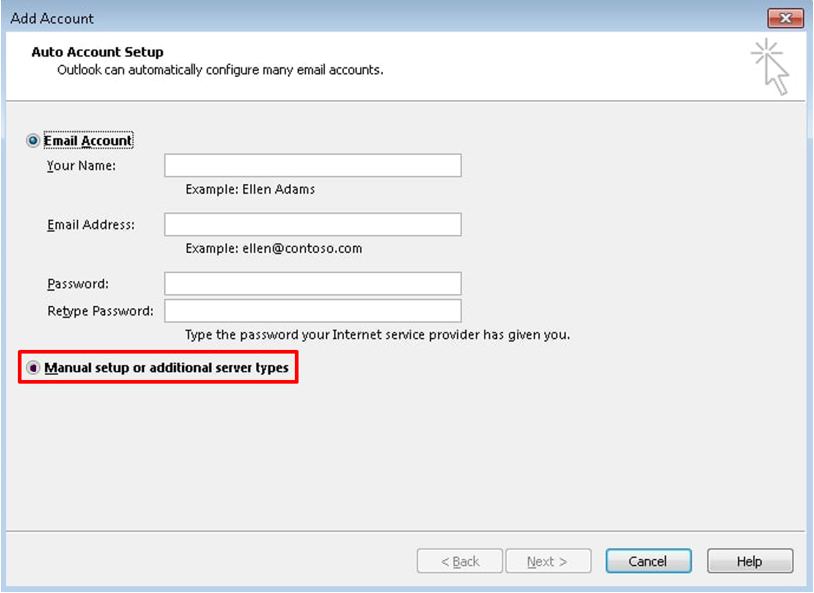
- In the Add Account discourse box, choose Extra Server Types or Manually Configure Server Settings, and press Next.
- In the Choose Service discourse box, choose Internet Email, and press Next.
- In the “Internet Email Settings” box, input your account details.
- Choose Test Account Settings to test your account. You can then approve this account.
- Select “Existing Outlook Data File,” after that, “Browse” and “Open Outlook Data File” starting from the drop-down menus. There will be a list of data files that show up. Afterward, you can choose the data file developed earlier in the Search. To get it done, press the OK button.
Hopefully, you won’t see the “Outlook data file cannot be accessed” issue any longer.
3. A. PST File Recovery with the Microsoft Inbox Repair Device.
You can utilize the Inbox repair device (SCANPST.EXE) to analyze and fix your Outlook data file errors. The Inbox Fix tools check the Outlook data files on your PC to see whether they look great.
You should utilize the Inbox Repair device in the following situations:
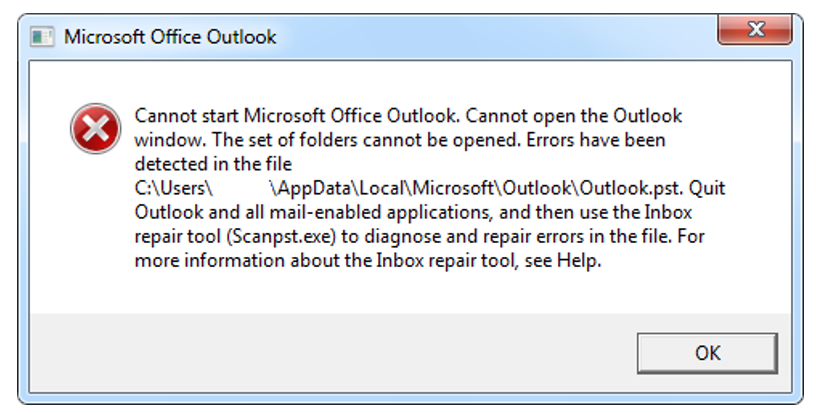
- You receive an email saying that Outlook cannot open your data file.
- You receive an email that says Outlook cannot open the set of folders.
- Do you think your Outlook data file might be damaged?
You can delete an offline Outlook Data File (.ost) if you’re using an Exchange email account, and Outlook will recreate the Outlook Data File (.ost) once it’s opened.
Take note of the Inbox Repair device to analyze or connect any data stored in an Exchange Mailbox. The device searches for mistakes (corruption), and if there are any, it permits you to allow the tool to repair those mistakes. If you can’t start the Inbox Fix tool, try to fix your Outlook program.
You might have to find your Outlook Data Files in Outlook before fixing bad .pst records:
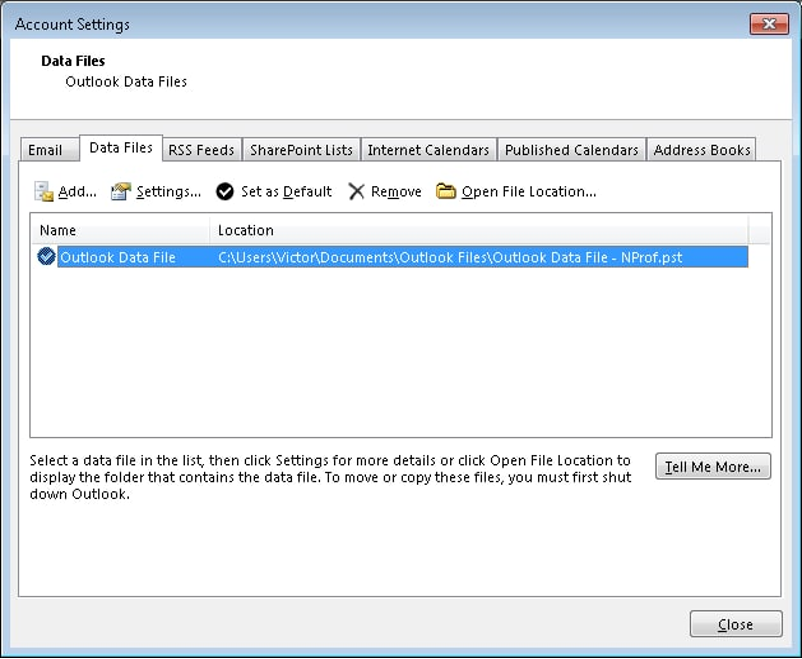
- Choose the file, and click Account Settings.
- Select the Data Files tab.
- You will see all Outlook Data Files (.PST) and Offline Data Files (.OST) recorded alongside the account name related to the files.
Repair an Outlook data file (.pst)
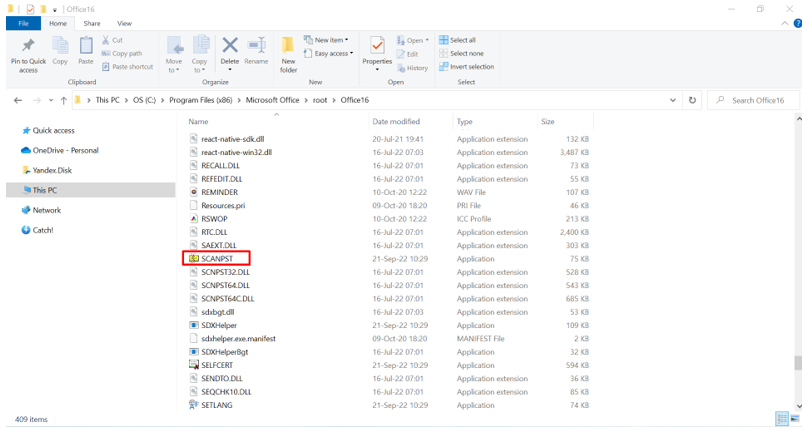
1. Exit Viewpoint and peruse one of the accompanying record areas:
- Outlook 2019: C:\Program Files (x86) \Microsoft Office\root\Office16
- Outlook 2016: C:\Program Files (x86) \Microsoft Office\root\Office16
- Outlook 2013: C:\Program Files (x86) \Microsoft Office\Office15
- Outlook 2010: C:\Program Files (x86) \Microsoft Office\Office14
- Outlook 2007: C:\Program Files (x86) \Microsoft Office\Office12
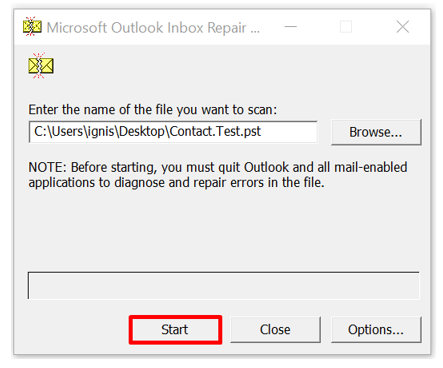
2. Open SCANPST.EXE.
3. Press Browse to choose the Outlook Data File (.pst) you need to scan. Kindly investigate the Finding the Outlook Data Files, assuming you need assistance finding your Outlook data file.
4. Press Start to begin the scan.
5. If the scan finds mistakes, choose Repair to begin the most common way of fixing them.
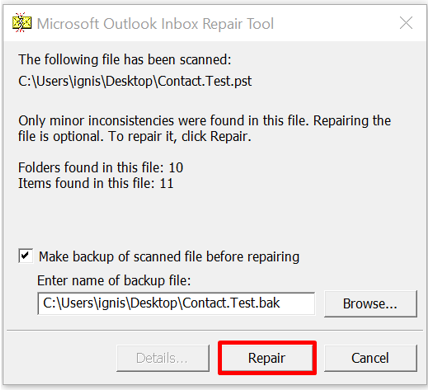
6. When the maintenance is completed, begin Outlook with the profile related to the Outlook Data File you recently fixed.
As you know, the scan makes a backup file during the repair cycle. To change the default location or name of this backup document, in the box labeled “Enter the name of the backup file,” enter another name, or decide to browse to choose the document you want to utilize.
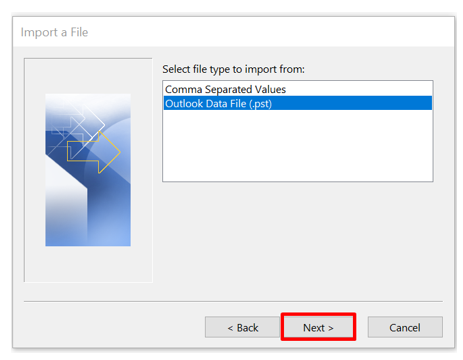
Go to File | Open and Export | Import Export | Import from one more file in your Microsoft Outlook.
You might run the device many times to fix your Outlook Data File. It might only recover some files if they are not corrupted. In these cases, we recommend using the Recovery Toolbox for Outlook, the famous tool for fixing Outlook. PST files.
You could utilize methods 4 and 5 if the SCANPST.EXE device needs to recover a PST document.
4. Consider Using the Recovery Toolbox for Outlook to Fix the 0x8004010F Error
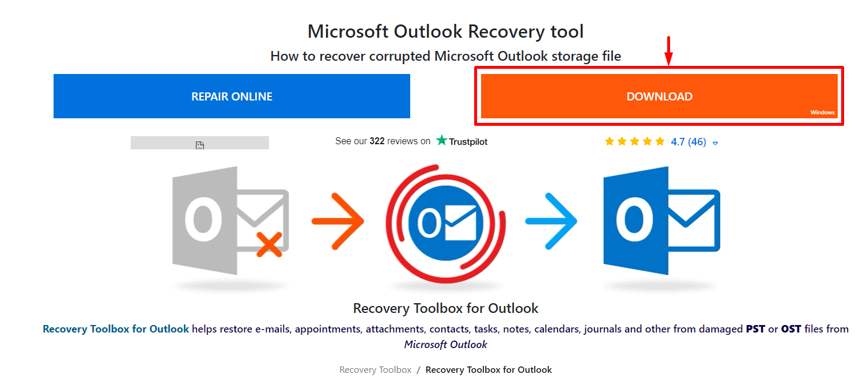
With the guide of the Recovery Toolbox for Outlook https://outlook.recoverytoolbox.com/outlook-data-file-cannot-be-accessed.html, you can reestablish any tasks, messages, Outlook contacts, connections, and WAB contacts from useful and damaged Outlook databases. This device could recover Outlook data files if there was an accidental deletion, an organizing issue, or the fragmentation of PST documents into many parts scattered randomly on the disc. The Recovery Wizard will guide you through each necessary step toward completing the cycle. Before recovery, a preview option is open and allowed to be used. Another significant element is trading recovered emails in another configuration (Vista Mail, Outlook Express, or EML).
The program automates the assignments in general. Thus, the time expected to recover data is considerably decreased.
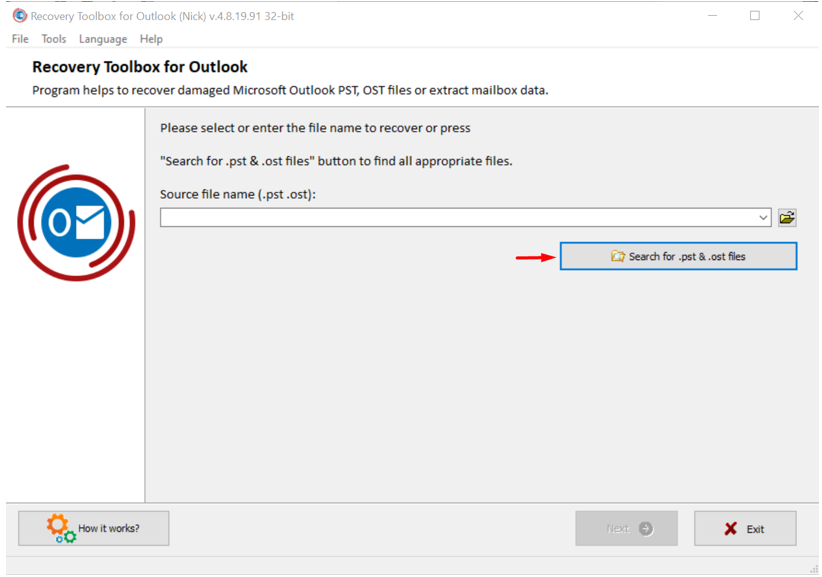
Use the Recovery Toolbox for Outlook, and recover your Outlook data
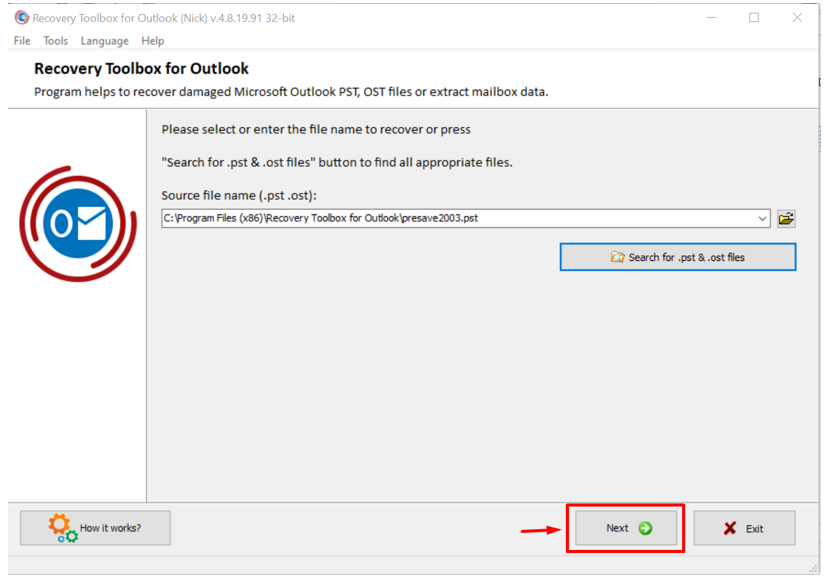
Stage 1: Download and Run the program.
Stage 2: Search for a corrupt .pst document on your computer.
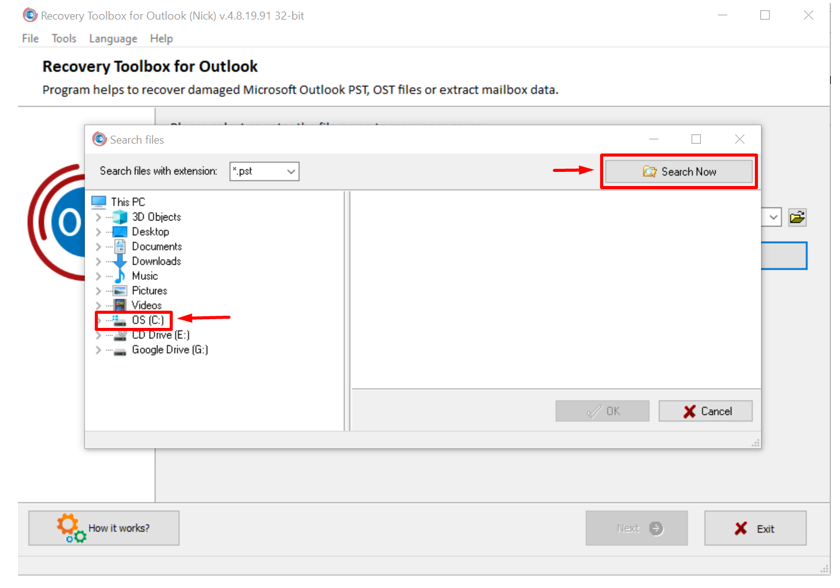
Stage 3: Select a location and click “Search Now.”
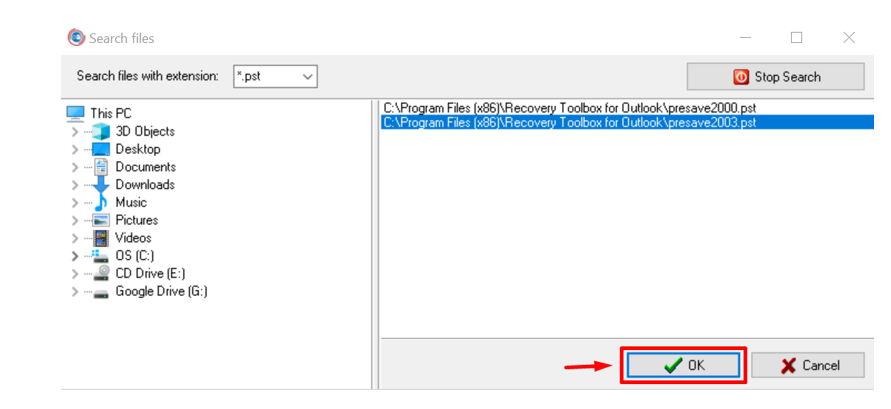
Stage 4: Select a corrupt .pst document and Click OK.
Stage 5: Choose the bad file and click Next.
Stage 6: Select Recovery Mode and Click Next.
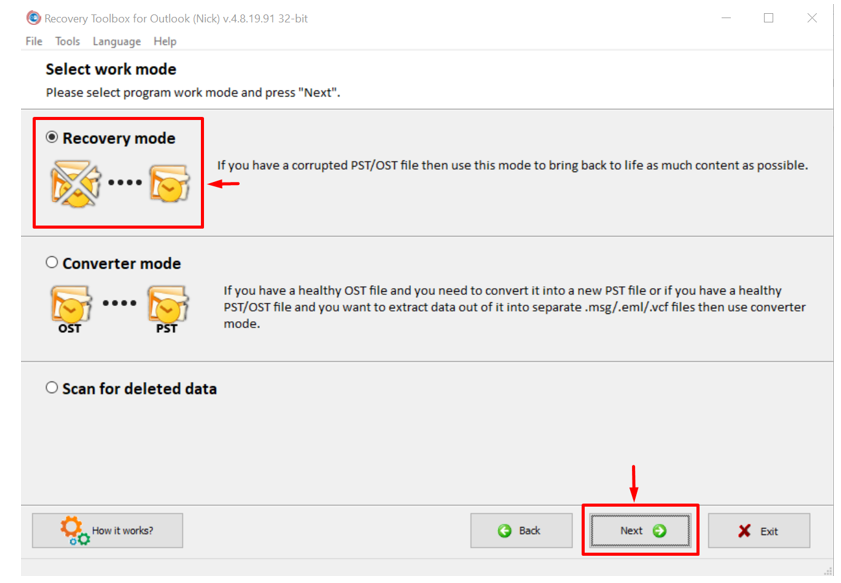
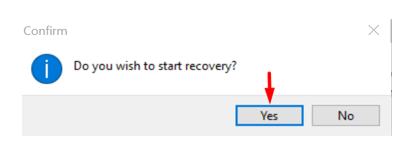
Stage 7: Affirm Yes to begin the recovery process.
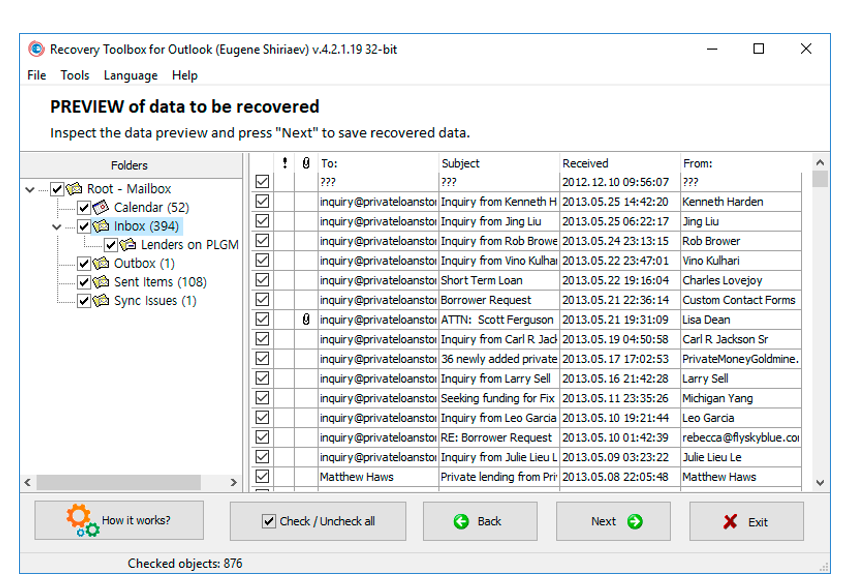
Stage 8: Examine the data preview and Click Close to store the recovery file in another location.
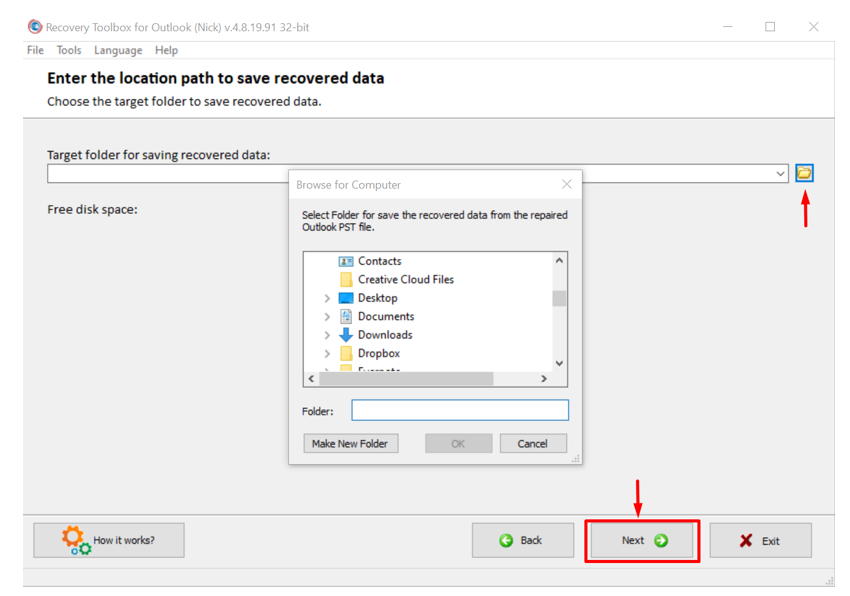
Stage 9: Input the location to store the .pst file and click Next.
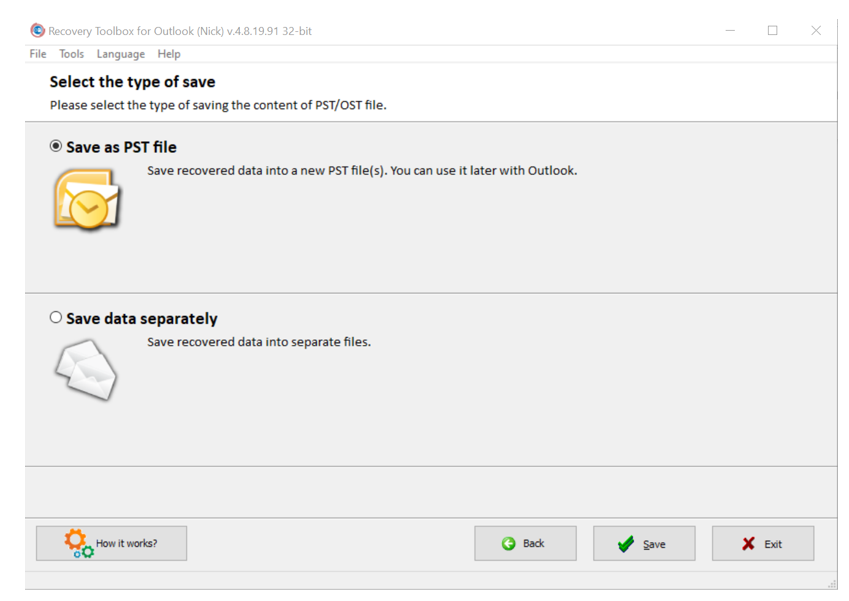
Stage 10: Save the recovered file as the new .pst document.
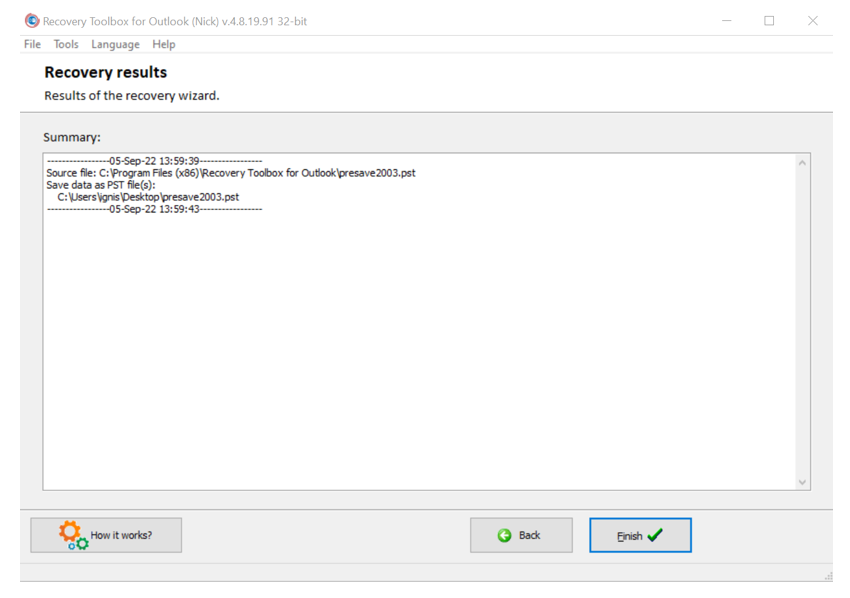
Stage 11: After checking the successful recovery results, click Finish to leave the Recovery Toolbox for the Outlook device.
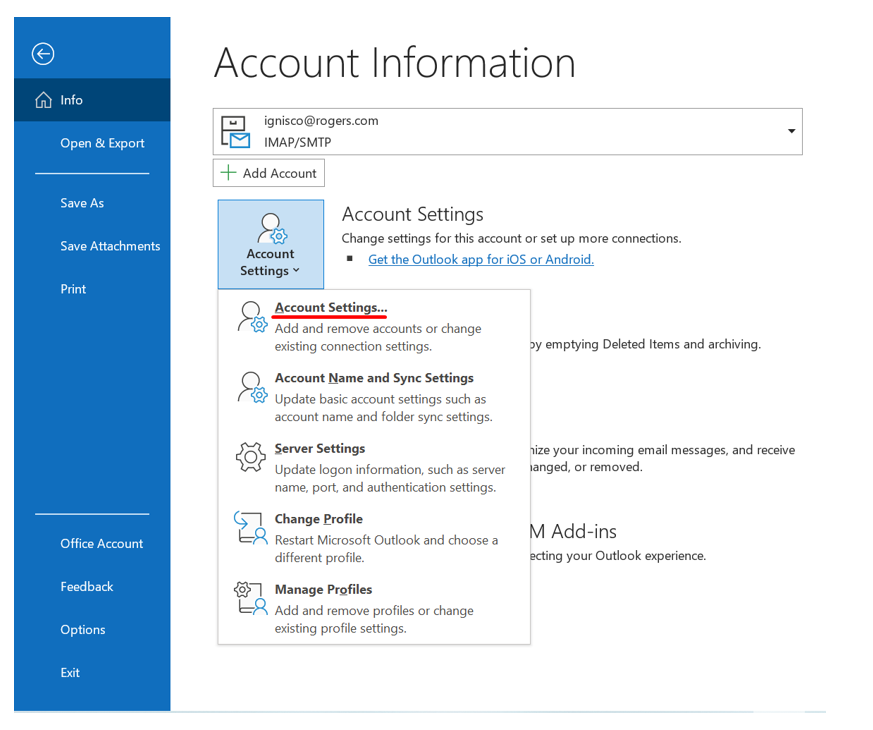
Lastly, you ought to replace the damaged file with a recovery one or add the recovered one .pst record to the data file list in Outlook. For the accompanying versions of Outlook: 2013, 2016, 2019, and 2021, it is done this way:
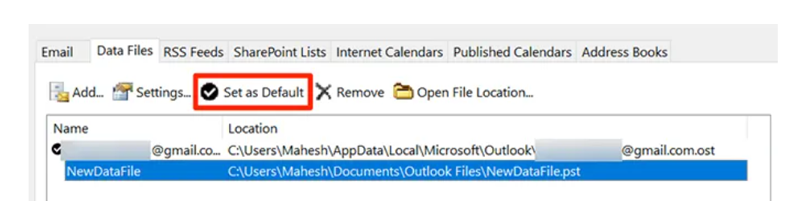
- Select the menu item “Record | Data.”
- Afterward, click the Account Settings button.
- In the pop-up menu, choose Account Settings.
- Select the Data Files tab and click remove.
- Press “Open File Location” and select the recovery file, then click “Set as Default.”
Done! The issue of a corrupt .pst record has been solved.
5. How to Fix the Code 0x8004010F Error Online with the Recovery Toolbox for Outlook
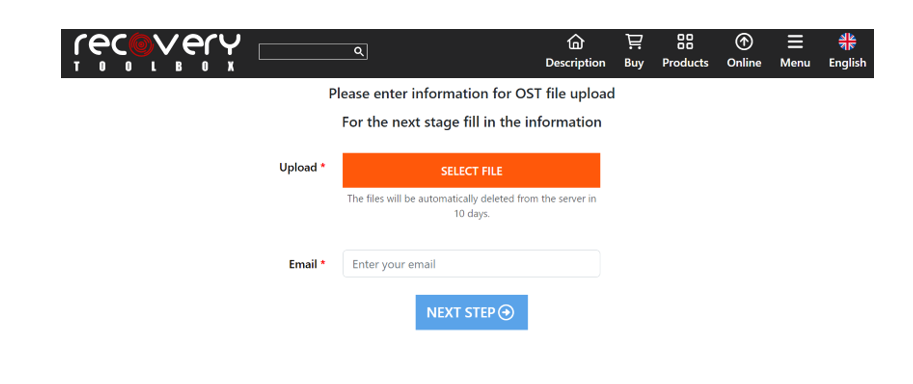
With the Recovery Toolbox for Outlook, you can recover any PST documents of various versions: ANSI (Outlook 97-2003), Unicode (2007 and above), and fix password-protected documents. The online Outlook recovery tool https://outlook.recoverytoolbox.com/online/ makes fixing mistakes on any gadget simple. You have no trouble fixing encrypted PST files and reestablishing OST files of any variant.
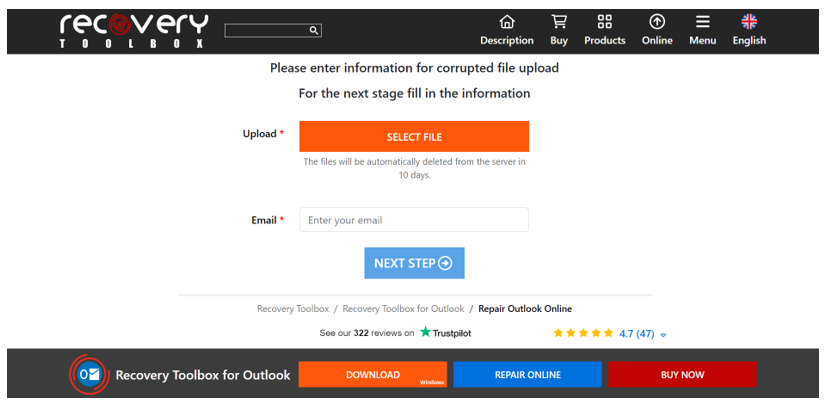
- Click the Select file button and choose an Outlook data file with the extension .pst or .ost.
- Enter your valid email address.
- Click the Next button.
- Sit tight for the corrupted .pst/.ost file to be recovered.
- Download the recovered Microsoft Outlook .pst file.
This way, it is possible to recover .pst Microsoft Outlook Individual Folder files on any gadget with a web browser by recovering the data from the corrupted Microsoft Outlook 2016 file with the PST extension.
More from us: How To Fix Outlook Error – Something Went Wrong And Outlook Couldn’t Set Up Your Account
How to Convert the Corrupt.OST File to a New Format (like .PST)
If Outlook can’t open a .ost file, try exporting it to a new folder. The Recovery Toolbox for Outlook highlights OST to PST file converter, a supportive tool you can utilize to solve this issue.
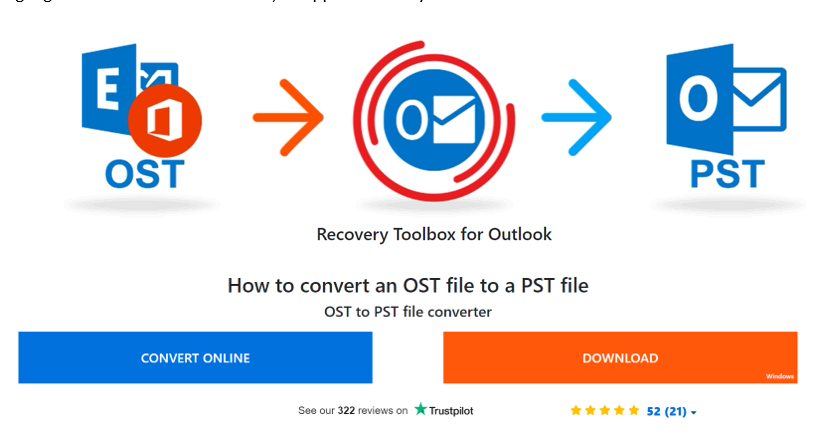
You might convert online on any platform (Computer, Mac) and upload the corrupted .ost file. Afterward, you can start the conversion cycle – it will export the data in a format compatible with .pst with no issues. After the process, you will see your recovered file. Export the .pst file and open it in another program, such as Mail Spring, Thunderbird, Mail Bird, etc.
Conclusion
With https://outlook.recoverytoolbox.com/outlook-data-file-cannot-be-accessed.html you can fix any PST file of various versions: ANSI (Outlook 97-2003), Unicode (2007 or more), and password-protected files. The Online Recovery Tool makes fixing mistakes online on any gadget simple. You have no trouble fixing encoded PST files and resolving PST documents of any form.
Anytime Outlook can’t get to a .ost file, you can endeavor to fix or convert it completely to a .pst design using https://osttopst.recoverytoolbox.com. These tools simplify saving your significant data on Microsoft Outlook or another email service.
Recovery Toolbox for Outlook can recover a wide range of items from damaged Exchange Server (OST) and Outlook (PST) storage files, including email messages with connections, notes, contacts, and undertakings. You can likewise utilize the Outlook PST fixer as a PST viewer.