No internet on connected Wifi: Sometimes it’s a confusing and difficult moment when your device is connected to the WiFi. But the Internet is not working. Unfortunately, there is no single answer to “No internet on connected WiFi” problems. It seems a big issue with your operating system settings or even the router. But don’t worry here is a step-by-step guide on ‘No Internet on Connected WiFi issue’ to help you fix this problem.
Where to look?
There are usually two places to look if you are facing network issues
- Router
- The device itself
If the Internet is not working on all the devices connected to the network, then maybe chances are there is a problem with your Router/Modem. You can also have a quick look at the ADSL cable to see if it’s broken or twisted.
In case, the issue is with a single device but the Internet is working fine on other devices. Then, there are chances that there is an issue with the device’s WiFi adapter which is causing the device a tough time communicating with the router. To help fix your ‘No Internet Access’ issue, we are going to list down some easy steps that should fix it. So, let’s get started.
No Internet on Connected WiFi Issues:
Restart Devices
The first thing is to Restart your Device it sounds funny but sometimes it works.
Turn off both the router and the modem and wait for 30 seconds before restarting them again. Additionally, you should also restart your PC to ensure things are clean. Once all the devices are reset, try connecting again to see if it works.
Check Modem Lights
The second option is to check the “Internet light” on the router and make sure it’s working. Make sure there is no unusual extraordinary light flickering on the router.
Ideally, the DSL lights should be green in a few cases, and the lights that indicate WiFi should blink. If you are not sure how to check, contact your ISP’s customer care services and confirm the ongoing Internet issue and ask them how much time will it take to fix the problem.
Use Built-in Troubleshooter
If the Intenet is fine from ISP end and the Internet is working on some of the connected devices, then chances are there is a problem with the WiFi adapter of your device. You can easily fix it with the built-in troubleshooter that comes with Windows and Mac.
In Windows, there is a built-in network troubleshooter that can solve or at least answer most of the network-related problems. Right-click on the network icon in the taskbar and select “Troubleshoot problems.” Then, Windows will automatically check problems and fix them. If it cannot fix it, then it will at least let you know what the problem is. You can search for the solution online, or even ask in the comments below we may be able to help.

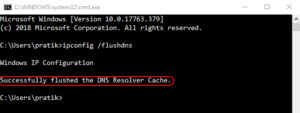
Flush DNS
Sometimes DNS cache issue can lead to not being able to access websites. You think that the internet isn’t working. So you should flush DNS to make sure it isn’t causing any trouble. How to do? Simply go to the Windows start menu and type “cmd”. Next, open it as an administrator.
On the command prompt, type the following command and press enter. This will flush the DNS cache.
Change Wireless Mode on Router
It happens only if you have an old Wi-Fi card or device. If you are connecting to the router via ethernet cable, then chances are there is a communication barrier between these two devices. And one way to fix that is by changing the Wireless mode.
There are many Wireless modes on a router like — 802.11 b or 802.11 b/g or 802.11 b/g/n, etc. This b, g, n, and ac are different Wireless standards.
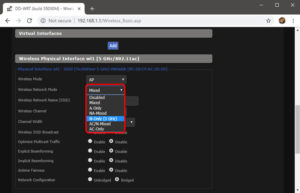
How to fix it ?
Simply log in to your router dashboard and look for the option that says “Wireless Mode”. Under the Wireless settings where you set WiFi SSID and password, etc. Next, to the Wireless mode, you’ll see a drop-down menu, Tap on that and choose 802.11 b and save changes. Now restart the WiFi on the devices which had the WiFi issues and see if this fixes the problem. If this doesn’t work, then try 802.11 g. If you still find the issue then see the next solution.
Obtain IP and DNS Automatically
If you are getting Internet access by connecting your smartphone to other WiFi networks, but not with your current WiFi network, then chances are there is an IP or DNS address conflict. Another way to check that is by pinging your router from the command line. If you get a timeout response or destination host unreachable, then it’s probably the IP address conflict.
Here are the following steps to change IP settings in Windows.
On Windows, we need to change the network adapter settings to obtain an IP Address automatically.
- Click on Start Menu
- Type Network and Sharing Center
- Click once you see the Network and Sharing Center Icon.
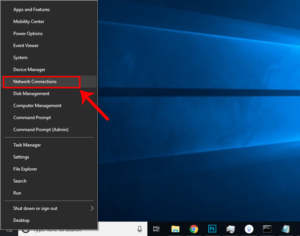
Alternatively, if you are in Windows 10 then what to do?
- Just right-click on the Start menu
- Click on “Network Connections“
- Click on Change Adapter Options (once the network window opens)
- Right-click on your Current Network Adapter ie. Wi-Fi
- Here you choose Properties
- When the new window pops up, choose Internet Protocol Version 4(TCP/IPv4)
- Then click on Properties
- A pop-up window will appear, select “Obtain an IP address automatically” and “Obtain DNS Server address automatically”.
- Then Click on OK to save changes
- You should connect automatically, if not, then try restarting your PC to start using automatic IP Address.
Fix Network Driver Issues
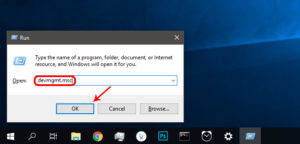
Certainly, a corrupted network driver can lead to bad internet. To fix the issue, Press Window+R keys and enter “devmgmt.msc” to open “Device Manager.”
Here expand “Network adapters” and find your “Wireless Network Adapter”. All you need to do is:
- Right-click on the network adapter
- Click on the “Update driver software” option
Note: Once you get the update driver pop-up. You will be presented with two options. You can update the driver either automatically or manually. Now try connecting your PC to the router using an Ethernet cable. If there is no problem then you should connect flawlessly.
- After connected, click on “Search automatically for updated driver software” and Windows will automatically find and install the right driver.
Note: But if you can’t connect, then you will have to manually download the latest driver from the manufacturer’s website on another internet-connected device and move it to your PC. Once you have the latest driver, use the “Browse my computer for driver software” option to manually install the driver software.
Reset Router
This is a difficult option, but it works too good. You can reset the router to factory settings means you will have to again password protect your router and change basic settings according to your needs.
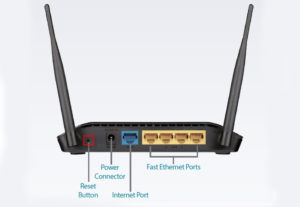
An easier and simple way to do this is to press the physical reset button on the router itself. The reset button is hidden inside a tiny hole, so you will have to check the router carefully to find the button. Once found, press the button and hold it until all the lights blink and the router restarts. You should be able to connect to the internet when the router restarts.
Reset Your Network
“Network Reset” disables and reinstall all your network adapters and set other networking components back to their original settings. In short, it’ll delete all of your stored WiFi credentials and VPN connections. This is why resetting your network should be your last resort.

- To do that on Windows, type Network Reset on the Start Menu search.
Note: A window will open warning you about what will happen when your network is reset.
- Click the “Reset now” button to continue and restart your PC.
Conclusion:
I hope the above tips help you to fix most of the software related problems. However, if there is a hardware problem then you will have to contact an expert technician. Which method do you like the most? Let us know in the comment section below!
Also Read: How to Fix Mega Error “Out of HTML 5 Offline Storage Space” in Chrome