In this digital era, email has become a crucial form of communication, whether for personal or business use. One of the frequently used email platforms is Microsoft Outlook, a part of the Microsoft Office suite that seamlessly integrates with other applications within the bundle. A question often asked by Outlook users is, “How can I forward an email as an attachment?” In our daily workflow, we may need to forward messages for various reasons, and understanding how to do so effectively can enhance our productivity. In this blog post, we’ll guide you through this process step by step, explaining how to forward an email as an attachment for different versions of Outlook, including Outlook 2007 to 2019 and Outlook.com.
As we delve deeper into the specifics of forwarding an email as an attachment in Outlook, remember that the process may differ slightly depending on the version you’re using. However, the core steps remain the same across all platforms. Whether you’re a novice user or an Outlook veteran looking to brush up on your skills, this guide will provide you with the necessary knowledge to handle your emails more effectively by learning to forward an email as an attachment.
Contents
Forward an Email as an Attachment; Is it Important?
Before we dive into the specifics, let’s explore why you might want to forward an email as an attachment in the first place. It can come in handy when you want to forward an incoming email to someone in its original format, ensuring the recipient knows the message hasn’t been edited. Or perhaps you wish to attach an email to your message to provide a record of a conversation. In any case, forwarding an email as an attachment can add authenticity and credibility to your communication.
How it Works in Different Versions of Outlook
It’s important to note that the steps for forwarding an email as an attachment can differ based on the version of Outlook you’re using. Don’t worry, we’ve got you covered for all the main versions, including Outlook 2007 to 2019 and Outlook.com.
Outlook 2019, 2016, 2013, 2010, and Outlook for Microsoft 365
- Preparing to Forward Email
Open your Outlook application. Navigate to the inbox or folder where the email you wish to forward is located. Click on the email to select it. If you’re forwarding multiple emails, hold the ‘Ctrl‘ key while clicking on each email.
- Initiating the Forwarding Process
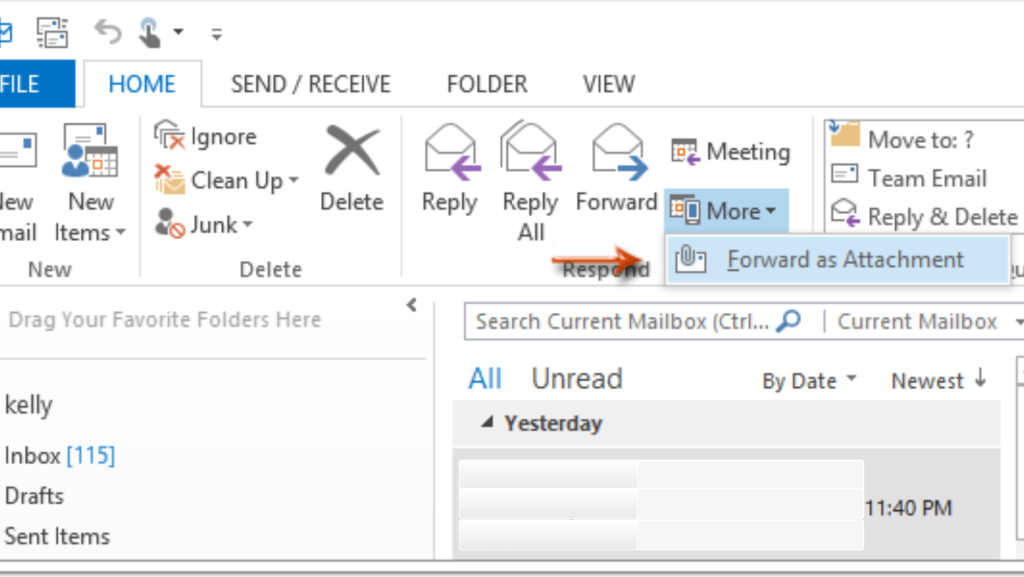
Go to the ‘Home‘ tab located at the top of your Outlook application. Locate the ‘Respond‘ group within the ‘Home‘ tab. Click on ‘More Respond Actions‘ in the ‘Respond‘ group. If you’re using Outlook 2010, you only need to select ‘More‘.
- Forward as an attachment
From the dropdown options, select ‘Forward as Attachment‘. Alternatively, press ‘Ctrl+Alt+F‘ on your keyboard.
- Composing the Forwarding Email
In the ‘To‘ field of the new email draft that opens, input the recipient’s email address. Write a brief message in the body of the email, explaining why you’re forwarding the original email as an attachment.
- Sending the Forwarded Email
Review your email to ensure all information is correct. Click ‘Send‘ to forward the original email as an attachment.
Outlook 2007 and 2003
For older versions, the process is slightly different. Follow these steps carefully:
- Step 1: Launch your Outlook application and navigate to the inbox or folder where the email you wish to forward is stored.
- Step 2: Click on the email you want to forward to select it.
- Step 3: Navigate to the ‘Actions’ menu in the toolbar.
- Step 4: From the ‘Actions’ dropdown menu, click on ‘Forward as Attachment’. You can also use the ‘Ctrl+Alt+F’ keyboard shortcut as an alternative.
- Step 5: A new forwarding message will open. Here, enter the recipient’s email address in the ‘To’ field.
- Step 6: In the body of the new email, write any message or comments you want to send along with the attached email.
- Step 7: Review your email and the attached message to ensure all information is correct.
- Step 8: Finally, click ‘Send’ to forward the original email as an attachment to the recipient.
Outlook.com
For those using the web-based Outlook.com, the process is different. Follow the steps below:
- Step 1: Open your web browser and sign in to your Outlook.com account.
- Step 2: Click on ‘New Message‘ to start composing a new email.
- Step 3: Locate the email you want to send as an attachment in your Inbox pane.
- Step 4: Click and drag the email from the Inbox pane to the new message window. A ‘Drop messages here‘ box will appear.
- Step 5: Release the email in the ‘Drop messages here‘ box to attach it to your new message.
- Step 6: In the ‘To‘ field of the new message, enter the recipient’s email address.
- Step 7: In the ‘Subject‘ field, write a descriptive title to let the recipient know the message contains a forwarded email.
- Step 8: Add any additional text or information you wish to send in the body of the email.
- Step 9: Review your email and the attached message to ensure all information is correct.
- Step 10: Finally, click on ‘Send‘ to forward the original email as an attachment to the recipient.
Setting Up Outlook to Automatically Forward an Email as an Attachment
If you find yourself frequently forwarding emails as attachments, you may want to set Outlook to do this automatically. This feature is available for both the desktop and web versions of Outlook.
For Outlook 2019, 2016, 2013, and 2010; and Outlook for Microsoft 365
Follow the step-by-step guidelines carefully:
- Step 1: Open your Outlook program and click on the ‘File‘ option in the top left corner of the main menu.
- Step 2: In the dropdown menu, select ‘Options‘.
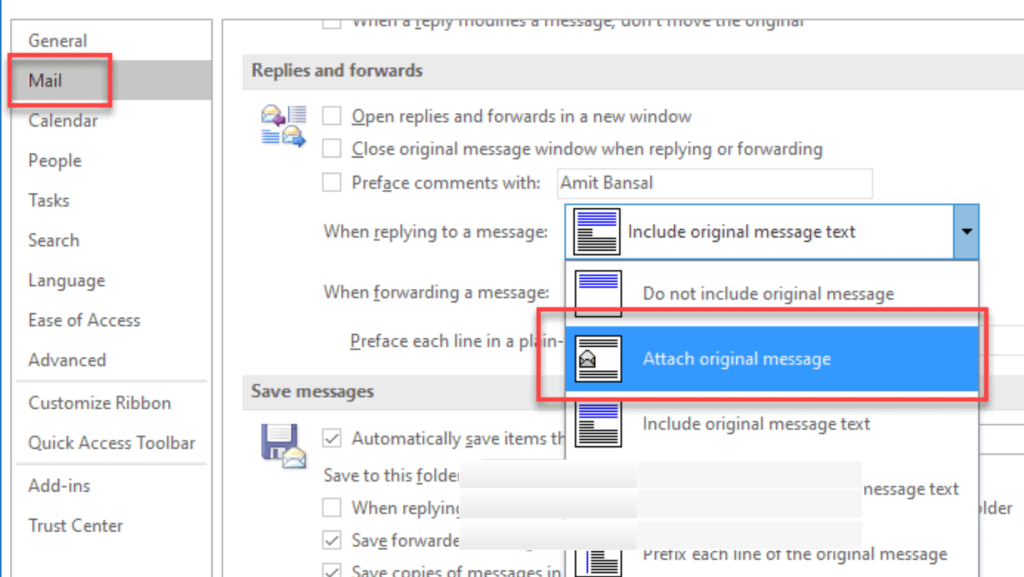
- Step 3: In the Options window that appears, select the ‘Mail‘ category.
- Step 4: Scroll down to the ‘Replies and forwards‘ section.
- Step 5: In this section, find the dropdown menu next to ‘When forwarding a message‘.
- Step 6: Click on the dropdown menu and from the options that appear, select ‘Attach original message‘.
- Step 7: After selecting this option, click ‘OK‘ to save your changes and close the Options window.
Now, all your forwarded messages in Outlook will be sent as attachments by default.
Forward an Email as an Attachment For Outlook 2007 and 2003
Follow the steps given below carefully:
- Step 1: Open Outlook and click on the ‘Tools‘ menu located at the top of your screen.
- Step 2: In the dropdown menu, select ‘Options‘.
- Step 3: In the Options window that appears, select the ‘Preferences‘ tab.
- Step 4: Look for the ‘E-mail‘ section within the Preferences tab.
- Step 5: In the ‘E-mail‘ section, click on ‘E-mail Options‘.
- Step 6: In the E-mail Options window, find the ‘On replies and forwards’ section.
- Step 7: In this section, click on the dropdown menu next to ‘When forwarding a message‘.
- Step 8: From the options that appear in the dropdown, select ‘Attach original message‘.
- Step 9: After making your selection, click on ‘OK‘ to close the E-mail Options dialog box.
- Step 10: Finally, click on ‘OK‘ once more to close the Options dialog box and save your changes. This sets up Outlook to forward all emails as attachments by default.
Explore our other articles:
- How to Install Google Chrome on Ubuntu: A Simple Guide for 2023
- Step-by-Step: Addressing Desktop Window Manager High GPU Usage in Windows 10/11
- The Ultimate Guide: Screen Recording on Your iPhone with Ease (4 methods)
Wrapping Up
In conclusion, whether you are using an older version of Outlook, a recent one, or even Outlook.com, forwarding an email as an attachment is a straightforward process. It’s a helpful tool to use when you want to maintain the original format of an email or send a record of a conversation. With these instructions, you are well on your way to mastering this handy feature!
And there you have it! By following these steps, you can navigate your way through Microsoft Outlook like a pro. But remember, mastering any software takes time and patience. So don’t be discouraged if you don’t get it right on the first try. Continue exploring the platform, and you’ll soon find yourself utilizing its various features with ease. It’s our hope that this guide has made your email management tasks simpler, and maybe even a little more enjoyable. After all, productivity and enjoyment aren’t mutually exclusive – even when it comes to managing your emails in Outlook!
FAQs and Troubleshooting
In Outlook, you can retrieve a sent email by navigating to your Sent Items folder. Once there, find and double-click on the email you wish to retrieve. Now, go to the Message tab and select the Actions dropdown arrow, then click on Recall This Message.
Background synchronization for Outlook on iOS and Android facilitates instant notifications for new emails, calendar alerts, updates to badge counts, and syncing of mailbox and calendar data while the app runs in the background.
Indeed, Outlook for iOS and Android offers support for shared mailboxes. This feature is available when both the user’s mailbox and the shared mailbox are based in Exchange Online and utilize Microsoft’s native synchronization technology.
A shared mailbox is a distinct type of mailbox, established with the -Shared parameter. Instead of relying on different credentials, users access this shared mailbox through specific permissions.