Today, our lives increasingly revolve around screens, and the art of screen recording on a Mac has transformed from a nifty trick to an indispensable skill. Whether you’re a content creator capturing the latest gaming release, an educator crafting tutorials, or a professional presenting a demo, the ability to record your screen is as crucial as the content itself.
But let’s be real – while Macs are known for their intuitive design and user-friendly interfaces, screen recording can sometimes feel like you’re trying to solve a Rubik’s Cube blindfolded. From navigating the settings to tackling the dreaded “no sound” issue, it’s not always a smooth experience.
In this article, we’re diving deep into the question of how to record a screen on a Mac. Our guide will demystify the process and provide you with tips and tricks to elevate your recording game. We’ll explore the Mac screen recorders, tackle common pitfalls, and even throw in some expert hacks that’ll have you recording like a pro.
Contents
Utility of Screen Recording Tools
Screen recording on a Mac is more than just another feature; it is a key to enhanced productivity, creativity, and communication for modern users. For professionals, these tools are a game-changer.

Imagine you’re working on a complex project with a remote team. Instead of lengthy emails and confusing text instructions, a screen recording can succinctly demonstrate processes, providing clear, visual guidance that transcends geographical barriers. This saves time and reduces misunderstandings, fostering a more efficient workflow.

In the sphere of education, Mac screen recorders have revolutionized the way knowledge is shared. Educators can record streamed content like lectures, tutorials, and demonstrations, making learning more accessible and engaging. Later, students can revisit these recordings at their own pace, a blessing, especially in the decade of online learning.

For content creators and artists, screen recording on a Mac is a window to showcase their process – be it digital art creation, music production, or video editing. This not only serves as an educational resource for their audience but also adds a layer of authenticity to their work. The latest macOS updates, with their improved frame rate and resolution options, ensure that the creative process is captured in the highest quality, preserving the precious details of their work.

Lastly, in customer support, screen recordings provide a way to visually explain solutions to clients, enhancing understanding and satisfaction. This visual approach, supported by Mac’s intuitive recording tools, transforms customer interactions, making them more effective and personal.
In essence, screen recording on a Mac is not just a feature – it’s a multifaceted tool that adapts to various needs, enhancing how we work, learn, create, and communicate in an increasingly digital world.
How to Screen Record on Mac?
In-Built Tools for Screen Recording
The most straightforward method is using the built-in tools provided by macOS. QuickTime Player, an often-underestimated application, is a reliable option for basic screen recordings. Its user-friendly interface allows you to record the entire screen or just a selected portion, making it ideal for quick captures or tutorials. QuickTime also enables you to record audio, either through a microphone or the system audio.
Another built-in option is the macOS shortcut. By pressing Command + Shift + 5, users can access a simple yet powerful screen recording tool. This feature, integrated into recent macOS versions, lets you choose between recording the entire screen or a selected portion. It also includes options to set a timer for delayed recording and show mouse clicks in the video, which is particularly helpful for instructional videos.
Standalone Screen Recorders
For users seeking more advanced features, third-party applications offer a wealth of functionality. Apps like Camtasia and ScreenFlow are popular among professionals for their extensive advanced capabilities, allowing you to record Zoom calls, add effects, and even incorporate picture-in-picture videos. These apps cater to detailed project requirements, making them ideal for creating high-quality tutorials or presentations.
Another noteworthy third-party option is OBS Studio, a gaming and live-streaming community favorite. OBS provides more control over the recording process, including customizing the frame rate and resolution, and it supports live streaming to platforms like Twitch and YouTube. This makes it a go-to choice for users looking to share their content in real-time.
Each of these methods, whether built-in tools or third-party apps, offers distinct advantages, catering to a range of screen recording needs on a Mac. From simple captures to complex, professional-grade recordings, the options available ensure that every user finds a solution that fits their specific requirements.
Common Issues and Solutions
Audio Not Being Captured
Screen recording on a Mac, while generally seamless, can sometimes be spoiled by technical hiccups. One common issue users face is not being able to record the screen with audio. This can be particularly frustrating for those creating tutorials or recording streaming content. A solution to this is to use a third-party audio capture tool like Soundflower or Loopback, which can route the system audio to the recording.
Large File Size
Another frequent challenge is the file size of screen recordings, which can be unexpectedly large, especially for long sessions. This is often due to high default quality settings. To manage this, users can adjust the recording quality in their chosen tool, opting for a lower resolution or frame rate. Additionally, using video compression software post-recording can significantly reduce file size without drastically compromising quality.
Low Recording Quality
Users may also encounter issues with recording clarity or lag. This is often due to excessive system load or outdated software. Ensuring that your Mac is running the latest version of macOS can alleviate many of these issues, as Apple continuously optimizes performance and fixes bugs in updates. If performance issues persist, closing unnecessary applications and clearing the system cache can free up resources and improve recording quality.
To sum up, while screen recording on a Mac is usually straightforward, encountering technical difficulties isn’t uncommon. Fortunately, with a combination of system updates, third-party tools, and a few tweaks in settings, most of these problems can be effectively managed, ensuring a smooth and successful recording experience.
Step-by-Step Guide to Easy Screen Recording on Mac
To provide you with an example of how to record video on a Mac easily, let’s focus our attention on the best in-built tools. Specifically, on one that’s commonly referred to as “Command + Shift + 5”. Why? Because it’s as simple as that, the key combination opens a window and presents all its features in front of you.
Step 1: Access the screen recording tool

Press “Command + Shift + 5” on your keyboard to open the screen recording tool. Select either “Record Entire Screen” or “Record Selected Portion” based on your needs. If you choose the latter, you can drag to select the specific area you want to record.
Step 2: Adjust options
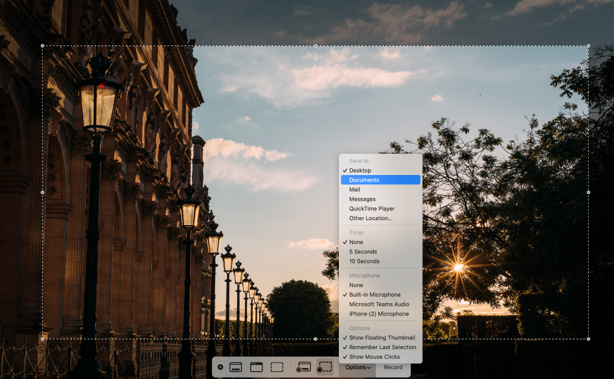
Click on “Options” to set preferences like destination folder, timer delay (if required), and whether to show mouse clicks in your recording. If you intend to record your voice or other external audio, select your microphone.
Step 3: Make a recording
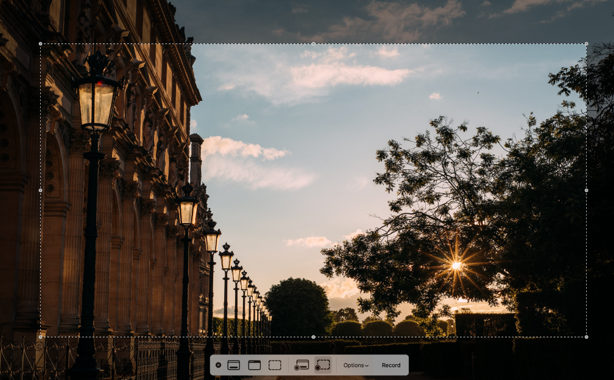
Click on “Record” to start. The recording begins immediately or after the timer delay you set. Click the “Stop” icon in the menu bar (top of the screen) or press “Command + Control + Esc” to stop recording.
Step 4: Find your recording
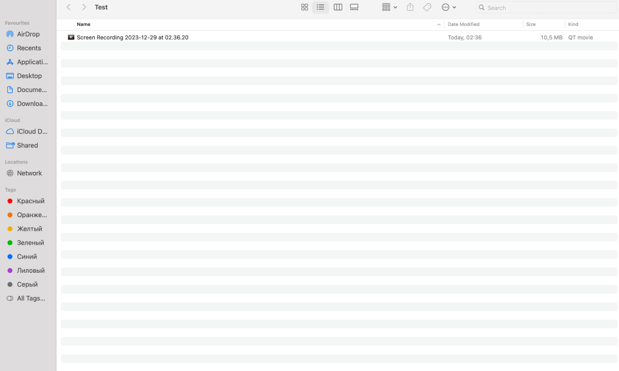
The recording automatically saves to the location you selected, ready for viewing and sharing. Consider using editing software to merge and trim your clips, once you have finished recording.
The Verdict: Screen Recording is Irreplaceable
Now that we learned how to screen record on Mac, available built-in tools and third-party app options, we are now equipped with a versatile feature catering to various needs, from professional presentations to creative content creation.
The simplicity and functionality of macOS make it accessible to all users, whether beginners or tech-savvy individuals. With this guide, you’re now prepared to capture and share your screen content with ease and confidence, unlocking the full potential of your Mac’s screen recording capabilities.