Apple – the name that’s synonymous with cutting-edge innovation and design. The Cupertino giant’s approach to user experience is a cocktail of simplicity, intuitiveness, and hidden surprises that keep you exploring. However, some features might not be as accessible to the new user or to someone who’s never ventured beyond the basics of their iPhone. One such feature is the screen recording function, tucked away within your device but potentially making a massive difference in the way you share and record content. At the end of this post, you will be able to seamlessly navigate around the issue of Screen Recording on Your iPhone.
In this article, we’re all about turning the spotlight onto this underestimated function and making it easy and accessible for all. Let’s delve into the world of iPhone screen recording, dissect the process step-by-step, explore its applications, and discover some alternative methods that might add an extra layer of flexibility to your digital routine.
Contents
Screen Recording on Your iPhone Using the Control Center
If you’re looking for a reliable screen recorder, the iPhone has a built-in tool that is more than sufficient. It allows you to record not just the visuals but also the audio from your device. What’s more, it’s capable of broadcasting third-party apps such as WhatsApp and Telegram. Here’s how to do it:
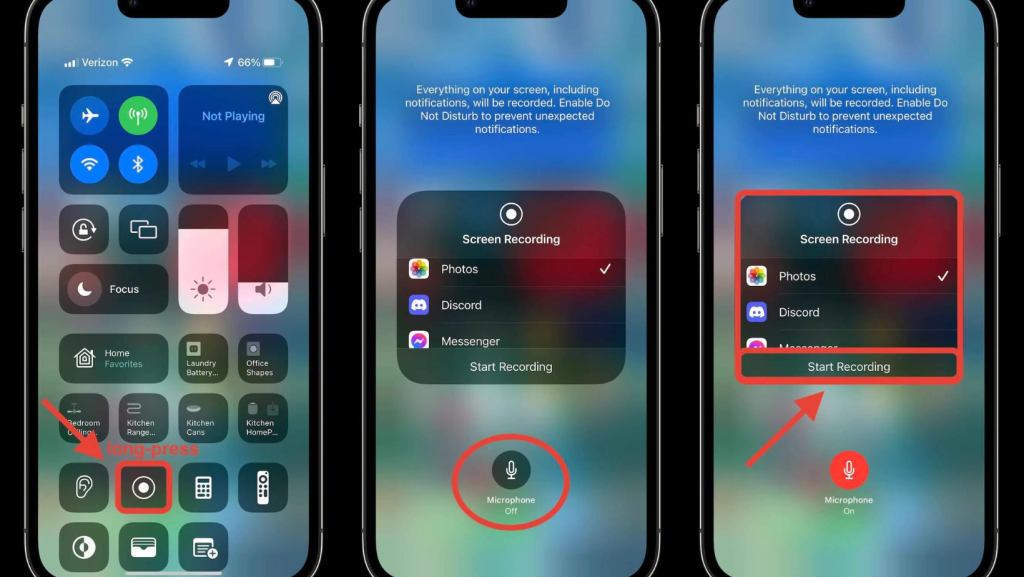
Step 1: Add Screen Recorder to Control Center
Open the Settings app on your iPhone and choose Control Center. Scroll down to find Screen Recorder, and tap the green plus icon next to it. It should now appear under the “Included Controls” section.
Step 2: Open the Control Center
For iPhones and iPads without a home button, swipe down from the upper-right corner of the screen. If your device has a home button, swipe up from the bottom edge of the screen to access the Control Center.
Step 3: Record the Screen
Touch and hold the Record button, then tap Microphone if you want to record the audio. Make sure the Microphone icon is turned off if you don’t want audio. Next, tap Start Recording. Your device will begin recording after a three-second countdown.
Reminder: It’s important to note that the native screen recorder saves the recording directly to the Photos app. However, you can choose to broadcast the recording to other supported apps, such as Facebook Messenger and Telegram. The screen recorder will capture everything on your screen, including notifications. So if you want to prevent random alerts from appearing on the screen, you can turn on Airplane Mode or enable Do Not Disturb.
Step 4: Stop Recording
To stop recording, tap the red status bar at the top of your screen and select Stop in the pop-up. Alternatively, open the Control Center and hit the red Record button to stop the recording.
Screen Recording on Your iPhone Using a Mac
If you’re a Mac user and want to record your iPhone screen, QuickTime Player can be an excellent choice. It doesn’t display the red recording button during the recording and allows you to capture the screen in high quality, making it ideal for creating presentations or guides.
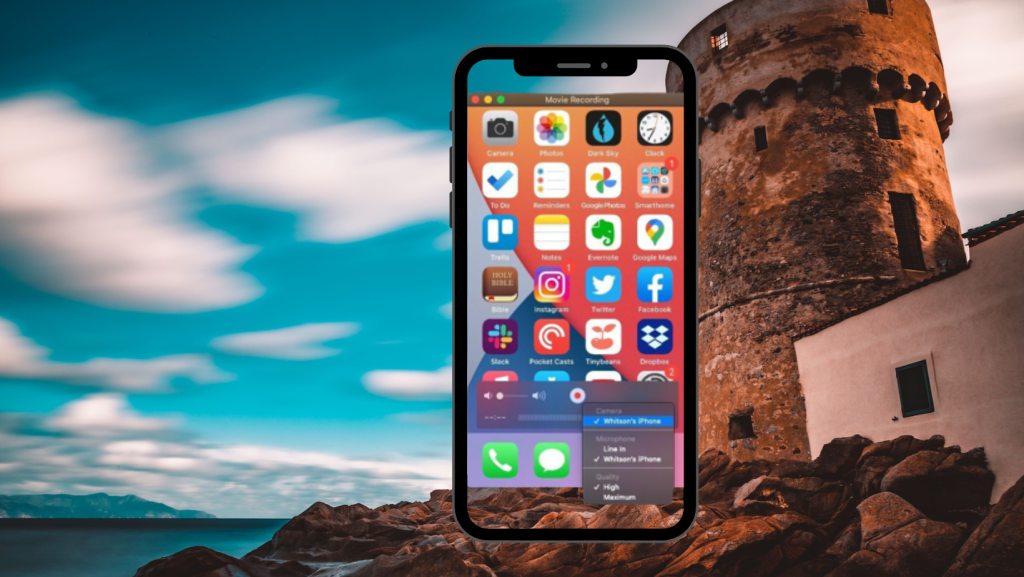
Step 1: Connect Your iPhone to Your Mac
Connect your iPhone or iPad to your Mac and launch QuickTime Player.
Step 2: Set Up the Recording
Click the File menu, then choose New Movie Recording. Click the downward arrow next to the Record button and choose your iPhone under “Camera“. If you want to record audio, select Built-in Microphone under the Microphone section. To record in high quality, ensure High is selected under the Quality section.
Step 3: Record the Screen
Your device screen will now appear on your Mac. To start recording, hit the Record button. To stop, press the red Record button again and save your video to your desired location.
Screen Recording on iPhone Using a Windows PC
While QuickTime Player is not available for Windows, you can still record your iPhone screen on a PC using third-party tools such as LonelyScreen or AirServer.
- Preparation for Screen Recording
Visit the Lonely Screen website on your computer. Download and install the appropriate version of the Lonely Screen application for your operating system.
- Setting up Your iPhone
Swipe up from the bottom of the screen or down from the upper right corner (depending on your iPhone model) to access the Control Center. Tap on the “Screen Mirroring” or “AirPlay Mirroring” option. From the list of devices, select “Lonely Screen“.
- Initiating Screen Recording on Lonely Screen
Your iPhone’s screen should now be mirrored. Click on the small arrow at the bottom right of the Lonely Screen window to expand the menu. Locate the red record button in this expanded menu and click it before recording.
- Conducting the Screen Recording
Navigate back to your iPhone and start the activity you want to record. Once you’ve finished, click the record button on Lonely Screen again to stop the recording.
Note: It’s worth mentioning that Lonely Screen did not function properly on Windows 7. However, it did work well on Windows 10.
Editing the Screen Recordings
The native Photos app on iPhone has significantly improved its photo and video editing capabilities over the years. Here’s how you can use it to enhance your screen recordings.
Step 1: Open the Photos App
Head over to the video you want to edit and tap on the Edit button.
Step 2: Edit Your Video
You can now use basic editing tools such as cropping and filters. You can also flip the video and adjust the exposure or shadows as per your needs. Once you’re done, tap Done to confirm the changes.
Next, tap the Share button and choose the desired app to share your screen recording.
Best Third-Party Screen Recorder for iPhone
The App Store has a plethora of screen recorders, but in our testing, we found Record It! to be the best. It offers an impressive set of editing tools that allow you to adjust the playback speed, trim your video, change the background color, and even rotate your clips. Plus, it has professional-grade filters that let you embellish your videos with ease. Once the editing is done, you can share your video directly to YouTube or other supported platforms.
That’s all there is to know about screen recording on your iPhone. While the built-in screen recorder is sufficient for most needs, we’ve also covered other methods for those who wish to go the extra mile with their recordings.
Explore our other articles:
- The Fun Side of Snapchat: A Comprehensive Guide to Play Games on Snapchat
- Be an Early Adopter: How to Get iOS 15/ iPadOS 15 Beta Without a Developer Account
- A Comprehensive Guide to Enabling Dark Mode on Your Chromebook
Wrapping Up
So, there you have it! You’ve embarked on the journey of Screen Recording on Your iPhone and learned how to leverage this feature using four different methods. The versatility of this function is astounding. From capturing an unforgettable virtual chat with loved ones, creating tutorial videos, and documenting bugs, to recording a perfect gaming session, the possibilities are endless. In an era where content is king, learning how to effectively capture and share your digital experience can make all the difference.
Furthermore, remember that the learning doesn’t stop here. The world of technology is a constantly evolving landscape that brings new possibilities every day. As we have seen, even a feature as simple as screen recording can have multiple methods and applications. Embrace your digital curiosity, explore, experiment, and stay updated. As an Apple user, your device is much more than a communication tool; it’s a digital canvas waiting for your touch. So why wait? Start recording, creating, and sharing today!
FAQ: Troubleshooting iPhone Screen Recording
Your iPhone might have restrictions enabled that prevent screen recording. Navigate to Settings > Screen Time > Content & Privacy Restrictions > Content Restrictions. Scroll down to Screen Recording and allow it if it isn’t already enabled.
This could be because you haven’t turned on the microphone in screen recordings, or some apps may not have microphone access.