Whenever it comes to working from home, and there are few things worse than running late for a meeting because of webcam failure. Other kinds of users are also affected via malfunctioning cameras, such as gamers. In this article, we are going to talk about How to Fix 0xa00f4244 nocamerasareattached Error. Let’s begin!
0xa00f4244 NoCamerasAreAttached is actually a common error message shown on the screen of Windows 10 users when attempting to open the Camera app. The webcam screen turns black and shows the white text, just like in the image below.
Contents
- 1 We Can’t Find Your Camera
- 1.1 How to Fix 0xa00f4244 nocamerasareattached Error
- 1.1.1 Check the webcam drivers
- 1.1.2 Run Windows Update
- 1.1.3 Check the webcam cover, cable, and switch
- 1.1.4 Check webcam permissions
- 1.1.5 Verify webcam compatibility
- 1.1.6 Check Your Antivirus Program
- 1.1.7 Tweak the registry
- 1.1.8 Check your Internet security application
- 1.1.9 End any processes currently via your webcam
- 1.1.10 Reset the Camera app
- 1.1.11 Reinstall the Camera app
- 1.1.12 Uninstall recent system updates
- 1.1.13 Reset BIOS settings to default
- 1.2 Conclusion
- 1.1 How to Fix 0xa00f4244 nocamerasareattached Error
We Can’t Find Your Camera
It mostly happens to laptops or monitors along with integrated webcams. However, the error can occur on external webcam adapters, too. Don’t worry, though, because you should be able to handle this matter without even turning to a professional. It’s typically a simple fix that never crossed your mind, such as pressing a key combination that enables the webcam.
How to Fix 0xa00f4244 nocamerasareattached Error
Maybe you are encountering the 0xa00f4244 nocamerasareattached error, or you guys might be getting the “we can’t find your camera” message. Many times, the error message “no cameras are attached” may show instead.
Don’t just worry. Follow these tested methods to fix the 0xa00f4244 nocamerasareattached error code, and then start your Windows camera once again.
Check the webcam drivers
It also says so in the error message: you should inspect your webcam drivers to make sure that everything is in working order. There are three approaches to this: reinstalling the device, updating the driver, or also rolling back the driver.
How to reinstall the webcam device:
- Right-tap on the Start button and head to Device Manager
- Just look for your webcam in the Cameras group
- Right-tap on the webcam entry and choose Uninstall device
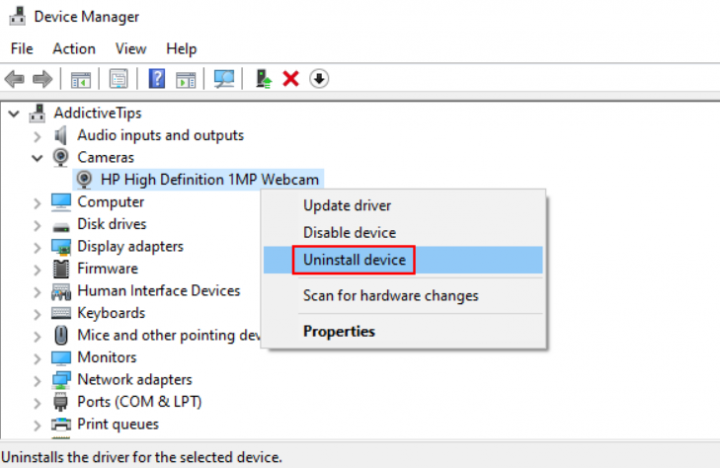
- Proceed along with the device removal
- Right-click any entry and choose Scan for hardware changes
- Restart your computer. Windows will then auto-reinstall the webcam adapters
- Open the Camera app and check for errors as well
How to update your camera driver:
- In Device Manager, right-tap on your webcam and select Update driver
- Tap on Search automatically for drivers and wait
- If the online search doesn’t return anything, then just tap on Search for updated drivers on Windows Update
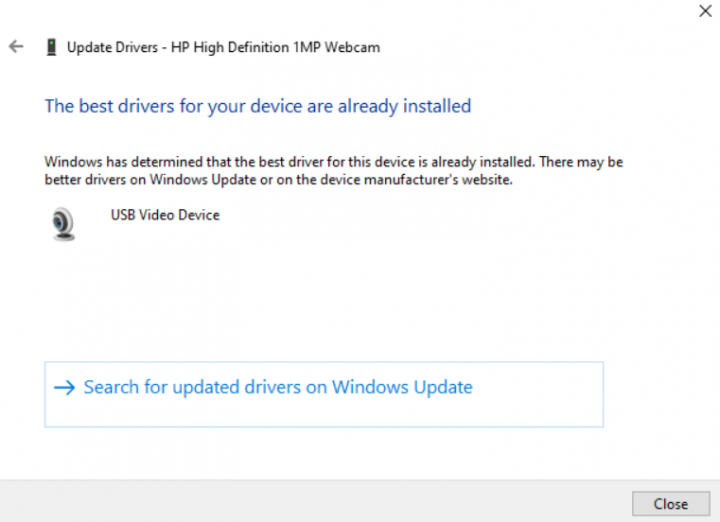
If Windows can’t find a newer driver for your webcam, then just head to the official website in order to find and download a newer version. Then, retrace the steps above and then use the Browse my computer for driver software to manually update the webcam driver as well.
How to roll back your webcam driver:
- Go to Device Manager
- Right-click your webcam and choose Properties
- Switch to the Driver tab
- Tap on Roll Back Driver and follow the instructions
- If the Roll Back Driver button is greyed out, and then you can’t perform a rollback, so you guys can skip this entire step
- Then restart your PC and open the Camera app to inspect results
Run Windows Update
Because the 0xa00f4244 NoCamerasAreAttached error is triggered via the Camera app, and since the Camera app is intertwined with Windows. Then you should check for system updates and download any available updates. Here’s how you can easily make it happen:
- Tap on the Win key, type Check for updates, and hit Enter
- Click Check for updates and then wait until the online search is complete
- If there’s anything available, tap on the Download
- Don’t just turn off or restart your PC during the update
- When it’s done, open the Camera app and check for errors
Check the webcam cover, cable, and switch
Some laptops and monitors along with integrated webcams have covers or buttons you guys must physically push or pull to toggle the webcam. It’s a security measure against webcam hijackers. Such as, MSI laptops require you to press FN + F6 to toggle the webcam. Meanwhile, ASUS systems work along with F10.
Since the 0xa00f4244 NoCamerasAreAttached error message clearly indicates that Windows has trouble identifying your webcam. Just make sure to push the button or flip the switch responsible for turning the webcam back on.
In many cases, it’s important to connect your monitor to the computer unit using a special cable for the webcam. Also, even if the device is built into the display. Just check the webcam case for a cable and plug it in.
If the cable was already installed, then try detaching and reattaching it. You can also try via a different USB port in case the original port is malfunctioning.
Check webcam permissions
Your device and apps need webcam access. For example, Microsoft Teams can’t work along with a webcam without your permission. Otherwise, you will keep seeing the 0xa00f4244 NoCamerasAreAttached on your screen as well. It particularly applies to users who actually have recently gone through a major Windows update or who have refreshed the operating system.
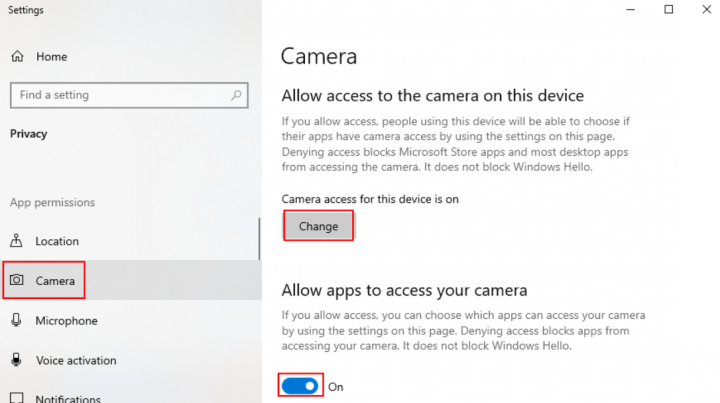
- Sign in to Windows 10 along with administrator rights
- Right-tap on the Start button and go to Settings
- Choose Privacy
- At app permissions on the left side, choose Camera
- Tap on Change and make sure that Camera access for this device is enabled. You can also permit camera access to other apps, such as Skype
- Turn on Allow apps to access your camera
- At Choose which Microsoft Store apps can access your camera, and then set Camera to On
- Now scroll down to Allow desktop apps to access your camera and set it to On
Verify webcam compatibility
If you guys purchased or received your webcam a long time ago, then it’s also possible that the hardware is unsupported via Windows 10. In that case, there’s actually nothing to do except buy a new webcam. There’s a simple trick to instantly discovering this: finding a file called stream.sys. Here’s what you guys should do:
- Right-tap on the Start button and choose Device Manager
- Now expand the Cameras category in order to look for your webcam
- Right-tap on the webcam device and select Properties
- Switch to the Driver tab and tap on Driver Details
- In the list of files, just look for stream.sys. If you find it, it means that the webcam is unsupported via Windows 7 and newer versions. So you guys have to replace it with a new one. Otherwise, you’re good to go
Check Your Antivirus Program
Although a lifeline for all Windows computers, also the antivirus program is known to cause trouble along with the running of other programs occasionally. In order to make sure that it’s not the case with your camera app, then check your antivirus settings and see if it is blocking the camera.
Even if everything is clear in the settings, just ensure that your antivirus does not cause the problem. Temporarily disable it and then recheck your camera again.
Tweak the registry
- In the Windows Search bar, just type regedit.
- Right-tap on the Registry Editor and run it as an administrator.
- Tap on File, choose Export, and backup your registry. If something goes wrong, then you can restore it with ease. In addition, you can create a Restore Point, just in case.
- Now, you have to follow this path:
- For 32 bit system:
HKEY_LOCAL_MACHINESOFTWAREMicrosoftWindows media foundationPlatform
- For 64-bit system:
HKEY_LOCAL_MACHINESOFTWAREWOW6432NodeMicrosoftWindows media foundationPlatform
- For 32 bit system:
- Right-click in the right window and select New and choose DWORD (32-bit) Value.
- Now name this value EnableFrameServerMode.
- Right-click and select to Modify this newly created registry value.
- Set its value to 0 (zero) and then save changes.
- Restart your PC and you should be good to go as well.
Due to the difference in encoding standards certain cameras just won’t work in Windows 10. And that can lead to error 0xa00f4244 in the Camera app, however, this registry change should fix that.
Check your Internet security application
If you guys have a cyber-security solution installed on your computer. Then it could have a special feature dedicated to blocking webcam access, also in an effort to stop spies from watching your every move.
Because the application overrides your computer settings. Then it could be the reason why you keep getting the 0xa00f4244 NoCamerasAreAttached error code.
In order to fix this problem, just locate the webcam feature in your Internet security program and then shut it down to permit webcam access to all your installed applications.
End any processes currently via your webcam
Windows Camera is just one app that needs webcam access, however, there might be others currently running on your computers, such as Skype, Zoom, or Microsoft Teams. To prevent software conflicts, it’s a good idea to terminate all other processes besides the Camera app as well. Here’s how you can do it easily:
- Right-tap on the taskbar and select Task Manager
- Now locate all apps along with camera access beside Camera
- Choose each app and click Disable
- Also, turn off the Camera app
- Relaunch Windows Camera and then check for errors
Reset the Camera app
If there’s something wrong along with the Camera app that could trigger the 0xa00f4244 NoCamerasAreAttached error code, then you can easily reset its settings from Microsoft Store. However, keep in mind that all app data will be deleted as well. Here’s what you have to do:
- Click the Start button, type Camera, and tap App settings
- Scroll down and press the Reset button
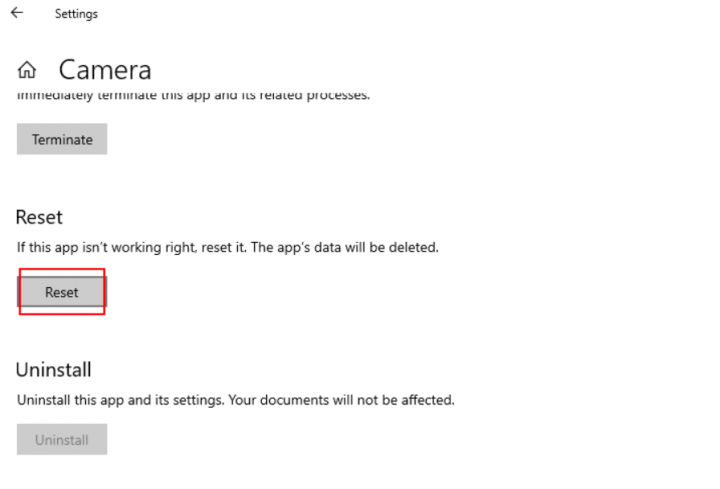
- Click Reset again in order to confirm
- Open the Camera app and then check for errors
Reinstall the Camera app
The reset option sometimes fails in order to fix the 0xa00f4244 NoCamerasAreAttached error. A better but more complicated solution is just to uninstall the Camera app and set it up again. To do this, you guys must first make sure that all its processes are properly closed.
How to terminate all Camera app processes:
- Tap on the Windows button, type Camera, and select App settings
- Scroll down and tap on Terminate
- Right-click the taskbar and head to Task Manager
- Now look for the Camera process. If you guys can still find it here, select it and click End task
How to reinstall the Camera app using Apps and Features:
- Right-tap on the Start button and head to Apps and Features
- Find and choose Camera (by Microsoft Corporation)
- Tap on Uninstall and proceed with the app removal
- Press the Win key, then type Microsoft Store, and hit Enter
- Tap on the Search button on top, type Windows Camera, and select this app
- Click Get and then Install as well
If you can’t remove the Camera app from Apps and Features as the Uninstall button is greyed out. Then you can force the app’s uninstall along with the help of PowerShell.
How can you reinstall the Camera app using PowerShell:
- Tap on the Start button, type Windows PowerShell, and choose Run as administrator
- Then type
Get-AppxPackage -allusers | Select Name, PackageFullNameand press Enter - Now locate the Name entry that says
Microsoft.WindowsCamera - Copy the
PackageFullNameassociated along with that entry (e.g.Microsoft.WindowsCamera_2018.826.98.0_x64__8wekyb3d8bbwe) - Just type
Remove-AppxPackage PackageFullNameand replacePackageFullNamewith what you copied (e.g.Remove-AppxPackage Microsoft.WindowsCamera_2018.826.98.0_x64__8wekyb3d8bbwe). Tap on Enter - Now type
Add-AppxPackage -register “C:\Program Files\WindowsApps\PackageFullName\appxmanifest.xml” -DisableDevelopmentMode. ReplacePackageFullNamewith what you copied (e.g.Remove-AppxPackage Microsoft.WindowsCamera_2018.826.98.0_x64__8wekyb3d8bbwe). Click Enter
Uninstall recent system updates
A system update that rolled out lately might not be fully compliant along with Windows 10. That results in problems with Microsoft Store apps. It can be tricky to tell, however, it makes sense if you started receiving the 0xa00f4244 NoCamerasAreAttached error code right after finishing a system update.
In order to test this, you can uninstall the most recent Windows update. Don’t worry because you can reinstall it later anyway.
- Tap on Win key + R, type control panel, and press Enter
- Click Programs and Features as well
- Choose View installed updates on the left side
- Tap on the Installed On column to sort the updates (newest first)
- Double-tap on the first update on the list
- Then tap Yes in order to confirm its removal
- Now reboot your PC and open the Camera app
Reset BIOS settings to default
A lot of users reported that they got rid of the 0xa00f4244 NoCamerasAreAttached error message via resetting BIOS settings to default. It’s an easy task that needs just a couple of clicks. Here’s what you need to do:
- Reboot your PC and instantly press the key shown on the screen to enter BIOS mode
- Head to the advanced BIOS settings
- Find the option that resets configuration data and turn on it
- Then save the current BIOS configuration and exit to Windows
- Open the Camera app in order to check for improvements
Conclusion
Alright, That was all Folks! I hope you guys like this article and also find it helpful to you. Give us your feedback on it. Also if you guys have further queries and issues related to this article. Then let us know in the comments section below. We will get back to you shortly.
Have a Great Day!
Also See: How to Turn on Omegle Camera – Tutorial


