Sometimes your Android starts behaving weird with the Internet. That dreaded “Connected but no Internet Access” message is just vague. Many reasons can lead up to this issue. Here are some of the things you can try to fix the problem.
Contents
- 1 Fix Android Connected To WiFi But No Internet
- 1.1 Check If You Are Connected to the Internet
- 1.2 Check If Mobile Data is Turned Off
- 1.3 Disable and Enable WiFi on Android
- 1.4 Check Time and Date Settings
- 1.5 Forget and Reconnect to WiFi Network
- 1.6 Check If Router is Blocking Network Traffic
- 1.7 Change your DNS
- 1.8 Change Wireless Mode on Router
- 1.9 Reboot or Reset WiFi Router
- 1.10 Reset Android Network Settings.
- 1.11 Factory Reset
- 2 Conclusion:
Fix Android Connected To WiFi But No Internet
Since there is no particular reason for this connectivity problem. There are several possible fixes. Below we have listed a few fixes which you can try to restore the Internet.
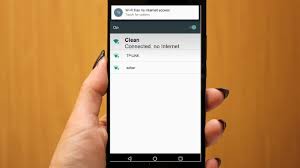
Check If You Are Connected to the Internet
Sometimes you might be facing this issue because your router is not connected to the internet. So, try to connect to that router wirelessly using another device and see if you can access the internet.
Log into your router and check if all the ISP PPPoE configuration details are accurate. It should include your username and password. If you are unsure, call your ISP.
Check If Mobile Data is Turned Off
When you have mobile data turned on and then connect to a WiFi network. You are not able to access the internet. So, try disabling mobile data to fix the issue.
Sometimes when you connect to a WiFi network, Android will prioritize WiFi over mobile data. However, some networks require users to log in before they can access the internet. Even after logging in, Android might not see it as an active connection and still use mobile data. Under such circumstances, Android might not be able to connect to the internet on both networks.
In order to be clear on what your specific device is communicating to you, refer to the WiFi Users Manuals for a more detailed explanation.
TL;DR, try disabling mobile data and then connect to the WiFi network.
Disable and Enable WiFi on Android
Just like a PC, you can reset the WiFi adapter in Android as well. Most networking issues get solved due to a Wi-Fi reset because it forces your Android to flush the DNS and re-check the configuration files. However, you would need to access the hidden settings panel.
Just open the phone dialer and dial *#*#4636#*#*. It will trigger the hidden Testing settings panel. Here, navigate to “WiFi Information” and then click on “WiFi API” and later select “disableNetwork”. This will shut down the Wi-Fi module.
After a few seconds click on the “enableNetwork” to begin the Wi-Fi service and probably the issue should be fixed.
If it’s easy to remember *#*#4636#*#*, you can definitely remember *#*#info#*#*. Just associate numbers with letters on the dialer.
Check Time and Date Settings
Another thing that looks common but ill-configured time and date settings can cause a lot of problems. Generally, Android devices are configured to obtain time and date information automatically from your network operator. However, if you’ve changed those settings then reset the settings again. Because when the setting set to manual, the clock may not be updated due to a restart.
To set up Automatic date & time all you to do is:
- Open the “Clock” app.
- Tap on the “Settings” menu.
- Here tap “Change date and time”.
- In the next screen, toggle the buttons next to “Automatic date and time” and “Automatic time zone”.
- Make sure if you don’t want automatic time settings, then manually set proper time by selecting the options “Set date”, “Set time”, and “Select time zone”.
- All done!
- Now reboot your device and try to connect to the WiFi network again.
Forget and Reconnect to WiFi Network
Here is another solution to fix it. When you reconnect the WiFi network, you might be provided with a new local IP address which hopefully fixes the issue.
- Just open your Android Settings and navigate to “WiFi”.
- Next, click on the WiFi network and select the option “Forget”.
- Now, tap on the WiFi network again and enter the password
- Then click on the “Connect” button.
- All done!
If it can’t work then proceed to the next solution.
Check If Router is Blocking Network Traffic
Sometimes Router blocks network traffic. If that’s the case and you don’t know it then look at the WiFi router’s admin page or the web portal.
The router admin page differs from model to model and manufacturer to manufacturer. So, consult your router manual, go to the appropriate settings page and see if the router is blocking your device. Some routers have the IP address of the portal, username, and password written on the back of the device.
Change your DNS
Check if you can access websites from their IP Address then chances are there is a problem with your ISP’s domain name server. Simply switching to Google DNS (8.8.8.8; 8.8.4.4) will resolve the issue.
- Simply go to your WiFi setting
- Long-press the WiFi network whose DNS you would like to change
- Then choose the “Modify network”.
- Choose Static under IP options
- Then enter the static IP, DNS1, and DNS2 IP address.
- Save changes
- All done
Change Wireless Mode on Router
It happens only if you have an old Wi-Fi card or device. If you are getting Internet access on other devices, then chances are there is a communication barrier between your Android and router.
There are different Wireless modes on a router. For instance, you might have seen something like 802.11 b or 802.11 b/g or 802.11 b/g/n, etc. This b, g, n, and ac are different Wireless standard.
To fix the issue:
- Login to your router dashboard and look for the option that says – Wireless Mode.
Note: It’s under the Wireless settings where you set WiFi SSID and password.
- Next, you’ll see a drop-down menu, click on that and choose 802.11 b and save changes.
- Now restart the WiFi and check if this fixes the problem.
Note: If this doesn’t work, then try 802.11 g. If you still find no luck then see the next solution.
Reboot or Reset WiFi Router
Make sure that your Android device is not blocked on the router level and there is no issue with the wireless mode. Try rebooting the router. No matter if you trigger the reboot via the admin page or the physical buttons. So, select your choice and reboot the router, it takes a few seconds to complete the process.
If rebooting did not work, the next step is to reset the router. Make sure that resetting the router will remove all the settings and ISP IP address configurations. So, note down the credentials and backup the important data beforehand so that you can configure the router once you are done with the reset.
Reset Android Network Settings.
If all the above procedures didn’t solve the internet connectivity issue, then it is time to reset Android network settings.
- Open the Settings app and go to “Reset options”.
- Click on the “Reset Wi-Fi, mobile & Bluetooth” option.
- Next tap on the “Reset Settings” button at the bottom.
- After resetting, try to connect to the WiFi network and see if it fixes the issues.
- All done!
Factory Reset
Al last if nothing else works then the last hope is factory reset your Android device. To do a factory reset:
- Open the Settings app
- Navigate to “Reset options”.
- Then click on “Factory data reset”.
- On the confirmation page, tap on the “Reset Phone” button to factory reset the Android device.
Note: It takes some time to complete. Hopefully! your device is fully charged or at least has over 70% battery before doing the factory reset.
Conclusion:
That’s all the troubleshooting steps we can come up with. If you found some other tricks, do let us know in the comment section below!


I tried all these methods for this problem. Even bought new phone witch solved problem. Then had same problem with different device. Found ip and gateway address didn’t match router. Hope this info can help someone like myself.
Both devices were moto g7 power phones.
Thanks
This fixed my problem
we are glad to know it worked.
I found another way to connect android wifi to internet. Turn off wifi and Mobile data. Turn on Hotspot. Wait for internet connection. Takes seconds. Then turn off hotspot and turn back wifi.