
SSD is actually one of the major hardware aspects I give importance to personal computers such as laptops and desktops. In my opinion, it really boosts the performance of a PC as well. You guys will experience a big difference on the same PC whenever you change the disk from a traditional mechanical hard disk to SSD. Although you can feel the difference, how can you measure the disk speed improvement after migrating your computer to SSD? Here is the really simple tool you can use to check the SSD speed in Windows 10, 8.1 and older versions. This is one of the best SSD benchmark tools for any user that can use it without much technical knowledge. In this article, we are going to talk about How to Check SSD Speed in Windows 10 – Tutorial.
Whenever it comes to checking the SSD speed, basically we have to check the data writing and reading speed of the disk. How fast it can write and read a certain size of data under certain conditions as well. There are a lot of tools along with extra parameters and configurations available in order to check the SSD speed. However, for normal home or business user, the CrystelDisk tool is really simple and easy to use.
Contents
Read/write speed of SSD
On Windows 10, the Task Manager can provide you a snapshot of the current read/write speed for your disk. It works regardless if you guys are using an SSD or an HDD. In order to use the Task Manager to find the read/write speed of an SSD, you have to first find a large file, preferably 1GB. You guys will have to copy the file from one location to the other on your SSD. Just go ahead and start the copy.
However, the file is still copying, open the Task Manager and then head to the Performance tab. Choose Disk from the column on the left and then look under the performance graphs for Read and Write speeds. The speed that Task Manager reports is actually a rough estimate. It’s a snapshot that actually means that it’s providing you the speed for a given time and speeds may vary relying on what you’re doing on your system i.e., what apps you guys have open.
For a more accurate test, just use an app called AS SSD Benchmark. It’s a free app that can give you a more accurate reading of your SSD’s speed. Download and run it. The default 1GB test will do the trick. It will take a while to complete. Click the Start button at the bottom and allow the app to finish all four tests that it runs.
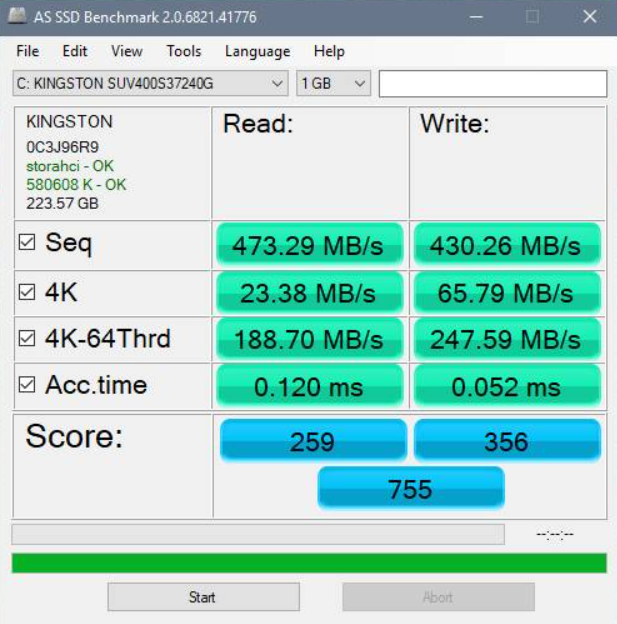
The Seq test is what you guys want to look at for your SSD’s read/write speeds. The many other tests are random 4K block tests, also test for speed whenever disk activity is distributed across 64 threads, and also for access time. Using these four tests, the app provides you a score for how fast your SSD is. Because the app doesn’t give benchmarks and because the score can differ based on the brand and age of the SSD. Then you want to take it with a grain of salt.
We’re not actually saying the score is meaningless, however, it doesn’t determine everything about your SSD. Use this tool along with other tools that can gouge the health of your SSD.
Slow SSD Read or Write Speed on Windows 10
It can be really hard to pinpoint the exact problem that your system could also be facing. We will also be listing down some tips that will hopefully get your SSD up and also running again.
Free up space to improve performance
The less space on your SSD, and the slower it will perform. If your SSD is at 90 percent capacity or even higher, and you also notice some performance issues. At this point, you guys should first try and clear up some space. The most obvious thing that you can try is just to start deleting unnecessary files and folders from SSD that may also be occupying the space.
Another idea that works is to turn off hibernation when this could free up a lot of disk space for you. Just follow these steps:
- First of all, open ‘Command Prompt’ from ‘Windows Search’.
- Then type ‘cmd’
- Right-tap on the top search result and select command prompt with administrative rights i.e. Choose the option ‘Run as administrator’
- Then type ‘powercfg -h off’
- Tap on ‘Enter’
When you followed the steps mentioned above to clear off some space in your SSD. Now check if there have been any improvements in the SSD read/write speed as well. If it didn’t work, then just move on to the next solution.
Enable AHCI mode
The Advanced Host Controller Interface (AHCI) specifies the operation of Serial ATA (SATA) actually host controllers in a non-implementation-specific manner in its motherboard chipsets as well. The specification actually describes a system memory structure for PC hardware vendors in order to exchange data between host system memory and attached storage devices. This mode is really crucial for you to get the best out of the SSD. If it’s not enabled, your SSD will actually run slow. You can also easily enable AHCI in Windows 10.
Optimize your SSD
After some time of using an SSD, especially after installing a lot of applications. It is actually recommended in order to optimize SSD. You have to follow these steps:
- Now search for ‘Defrag’ in the ‘Start menu’
- Choose Defragment and Optimize Drive
- Select the SSD drive and tap ‘Optimize’
Optimizing it from time to time basically helps bring it back to its original state.
Update Firmware of the SSD
Just like much other hardware, SSD manufacturers release patches and updates periodically for SSDs as well. The firmware of SSDs is really important for running them smoothly and efficiently. So remember to keep checking for a firmware update as well. In order to update your SSD, follow these steps:
- Tap on the ‘Win + R’ keys to open the ‘Run’ dialog box.
- In the ‘Run’ dialog, then type ‘devmgmt.msc’
- Tap on ‘Enter’
- In the ‘Device Manager’ windows locate ‘Disk drives’ and then tap on the arrow and expand it.
- Right-tap on the SSD and click ‘Update Drivers’
- You guys will be prompted for options on ‘How do you want to search for drivers?’ Just tap on ‘Search automatically for drivers’.
Windows will now search for any new updates available for your SSD and then install them. When the process is completed. Just check if your issue is resolved.
Configure correct Boot order
Another reason an SSD drive is slow could be that the boot sequence is actually wrongly configured. If the first priority is given to the hard drive, rather than SSD, the computer will run slow. This Windows guide will also show how you can boot into Windows 10 firmware settings (UEFI/BIOS), and then change the boot order easily.
Conclusion
Alright, That was all Folks! I hope you guys like this article and also find it helpful to you. Give us your feedback on it. Also if you guys have further queries and issues related to this article. Then let us know in the comments section below. We will get back to you shortly.
Have a Great Day!


