Do you want to change your Windows background? The Windows 10 blue wallpaper is good to look at, but it’s more interesting to select the background you like on your PC. After this, you’re going to be the one begining at the screen all day and don’t like to be squinting at a dark blue logo for a few minutes. You should also look into modifying your icon size, or saving the nice Windows 10 lock screen wallpapers so you have lots of wallpaper options. If you want more granular customization, try to turn on Light Mode or Dark Mode on Windows 10 and consider modifying these beautiful themes.
May be some users don’t know that Microsoft supplies a selection of amazing wallpapers with its OS, and thus they can’t experiment with modifying the standard background. We’ve always chosen something rather than the default background, so, in this guide, we’re going to discuss how that’s done in Windows 10. If you like to learn how to modify your desktop wallpaper, then dive down below:
Contents
Method 1: Change Your Windows Background Via Personalization Settings Window

The shortest and easiest way to change the background is in the Personalization panel. So:
Step 1:
Right-tap on the desktop and choose Personalize from the menu.
Step 2:
Alternatively, write “personalization” into the search box, and tap the first result.
When the window appears, follow steps 3 and onward (below) to successfully modify your Windows 10 login screen background and desktop wallpaper.
The long way to access the Personalization panel is tapping the Action Center icon that is located next to the system clock on the taskbar. You can then tap the All Settings panel (gear icon), and choose the Personalization option when the Settings app opens on the display screen. You can also just locate the Settings app and move into the Personalization section from there.
Step 3:
In the Personalization window, the 1st tab is the Background tab, which enables you to modify your desktop image to saved images, a solid color, or a slideshow of different backgrounds.
Step 4:
After choosing the Picture option, you can select your desktop image by tapping Browse and choosing a photo from your PC’s hard drive or Windows’ small selection of themed images.
Step 5:
After choosing a folder for the Slideshow option, then you can tap Browse and choose a folder containing images you want your PC to cycle through. After you’ve selected a folder, now decide how long you need each picture to be on your display before cycling to the other.
Step 6:
Remember that if you have different monitors, another image will be chosen for each monitor, and each one will also cycle through your pictures. For both an image or a slideshow, you can select to fit the image to the screen, stretch it, or choose from one of many other options that ensure your pictures will appear the way you’d like them to on your display(s).
At last, you can choose a solid color as your background, either from a palette or simply by creating your custom colors.
Options To Choose Image:
- Fill: The option enlarges or limits your image size so that your desktop space is filled. The picture is either expand or cropped to make this happen.
- Fit: It makes your picture as large as possible to fit in the required space. They are neither cropped nor distorted.
- Stretch: The option either expands or squashes your picture to the same dimensions as your display. After you check the size and it doesn’t match the size of the image well, this can seems really ugly.
- Tile: It puts your picture on the display many times, filling up the given space, but it might or might not fit the images into space.
- Center: The option puts your picture in the middle of the screen. You might have one small image in the middle of a big blank space. Also, you may have just the middle part of a big image.
- Span: It makes the picture span on all your displays after you have more than one installed on your PC or device.
Method 2: Change Your Windows Background Via Modifying Login Screen Image
If you want to modify the login screen image — or already modified your background image — just tap on the Lock Screen tab on the left side of the Personalization menu. It is quite similar to a background image. However, users can either choose a saved picture from the PC’s hard drive or specify a slideshow. Users also have the option to select the Windows Spotlight variant, which shows a randomly generated picture from the Bing search engine. After you make a selection, the changes happen automatically.
Remember that there are two sign-in screens. One is for your password and one for the lock screen. If you want to modify the password screen as well. You can then look for the toggle in Lock Screen saying Show Lock Screen Background Picture On the Sign-In Screen. Doing this will ensure the picture will appear in both places, enabling for the smoother transition.
Also, you select which apps show details on the lock screen or the apps that display instant statuses. For each, just tap on the icon and choose an app from the resulting list. Make sure not all apps can display detailed information. So, there are lots of instant status options. As you add many apps to Windows 10, you’ll be presented with lots of options, enabling you to select the information you like to be shown on your lock screen.
Method 2: Change Background Via Right-Tap Menu
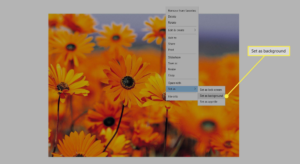
If you try to set an image as your desktop background in Windows 10, the instant way to do it is simply by using the right-tap menu. Head over to the File Explorer and browse to the image that you like to use as your wallpaper. Then, right-tap or click and hold on it, and select“Set as desktop background” in the menu.
Method 3: Set slideshow With Several Desktop Wallpapers
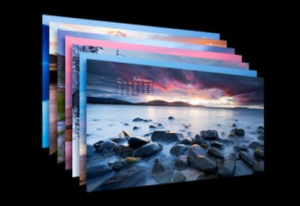
If you like to use more than one image as wallpapers in Windows 10:
Step 1:
Head over to the Settings app and move to Personalization > Background. Then, tap or click on the Background drop-down and choose Slideshow from the list (as mentioned above).
Step 2:
In the other section, known as “Choose albums for your slideshow,” then tap on Browse.
Step 3:
Then navigate or move to choose the folder that has the pictures you like to be used on your desktop. After you find it, choose it and tap or click on “Choose this folder.”
Step 4:
Windows 10 modifies the desktop background right away, initiating to play a slideshow with images from the folder you select. Remember that you can only try to use one folder. If no folder on your PC has the pictures you want. Then try to create a folder with pictures selected just for this purpose.
Step 5:
By default, the images you’ve select become a slideshow that modifies at the specific time interval you want. Then you use the “Change picture every” list and select the time span you like. If you want the picture to play in random order, tap or click on Shuffle also.
Step 6:
Also, if you want to adjust the location of the wallpapers on your desktop. Then follow the same steps as we’ve mentioned above for setting an image as a desktop background. You just click or tap on the “Choose a fit” drop-down list. Or else choose the option you want: Fill, Fit, Center, Stretch, Tile, Span.
Conclusion:
Here’s all about “Change Your Windows Background”. You don’t need to use the same or boring wallpaper that everyone else has. Modifying it to suit your own preferences is best and straightforward. Is this article helpful? If yes, then share it with your friends and stay tuned with us. For further queries and questions let us know in the comment section below!
Also Read:


