The problem lies along with the incorrect sound configuration, damaged cable, headphone jack might also be damaged, Bluetooth connectivity issues, as well. These are just a few issues that can also cause the headphone not working issue. However, the cause can vary as different users also have different system configurations and setups. In this article, we are going to talk about How to Fix Headphone Jack not Working in Windows 10. Let’s begin!
Contents
- 1 How to Fix Headphone Jack not Working in Windows 10
- 1.1 Set Your Headphone as Default Device
- 1.2 Change Default Sound Format
- 1.3 Turn off Front Panel Jack Detection | Headphone Jack not Working
- 1.4 Let Windows Automatically Update Your Audio/Sound Drivers
- 1.5 Manually Update Your Sound/Audio Drivers
- 1.6 Run Audio Troubleshooter | Headphone Jack not Working
- 1.7 Disable Audio Enhancements
- 1.8 Conclusion
How to Fix Headphone Jack not Working in Windows 10
Set Your Headphone as Default Device
- Tap on Windows Key + I in order to open Settings and then select System.
- From the left-hand tab, you have to tap on Sound.
- Now just under Output, tap on “Manage sound devices“.
- Under Output devices, just tap on Speakers (which are currently Disabled) and then click on the Enable button as well.
- Now just head back to the Sound Settings and from the “Choose your output device” drop-down choose your headphones from the list as well.
If this doesn’t really work then you guys can always use the traditional way in order to set your Headphones as the default device:
- Right-tap on your Volume icon and select “Open Sound Settings”. Now under Related Settings, just tap on the Sound Control Panel.
- Just make sure you are on the Playback tab. Right-click in an empty area and then choose “Show Disabled device“.
- Now right-click on your Headphones and then choose “Set as Default Device“.
This should definitely help you in order to resolve the headphone problem. If not then just continue along with the next method.
Change Default Sound Format
- Right-tap on your Volume icon and choose “Open Sound Settings”.
- Now under Related Settings, just tap on the Sound Control Panel.
- Then make sure you guys are on the Playback tab. Then double-tap on the Speakers or Headphones (default).
Note: The Headphones will also appear as Speakers actually.
- Now just switch to the Advanced tab. From the “Default Format” drop-down try changing to a different format and then tap on Test each time you change it to a new format.
- When you start hearing audio in your headphones, tap on Apply followed via OK.
Turn off Front Panel Jack Detection | Headphone Jack not Working
If you guys have installed the Realtek software, open the Realtek HD Audio Manager. And then check the “Disable front panel jack detection” option that is under Connector Settings in the right-side panel. The headphones and many other audio devices should work without even any problem.
Let Windows Automatically Update Your Audio/Sound Drivers
- You have to right-click on your Volume icon and then select “Open Sound Settings”.
- Now, under Related Settings tap on the Sound Control Panel. Just make sure you guys are on the Playback tab.
- Then just choose your Speakers/Headphones and tap on the Properties button.
- Now under the Controller Information, then tap on the Properties button.
- Tap on the Change Settings button (Needs Administrators permission) as well.
- Just switch to the Driver tab and tap on the Update Driver button.
- Choose “Search automatically for updated driver software“ as well.
- All done! The sound drivers will then automatically update and now you guys can check if you are able to fix the headphone jack not working in Windows 10 issue.
Manually Update Your Sound/Audio Drivers
- You have to right-click on “This PC” or “My Computer” and then choose Properties.
- In Properties windows in the left plane, just select “Device Manager.”
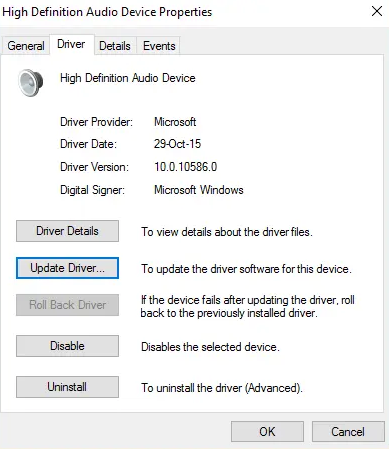
- 3. Expand Sound, Video, and Game controllers, and then right-click on High Definition Audio Device and just choose Properties.
- Now just switch to the Driver tab in the High Definition Audio Device Properties window and then tap on the Update Driver button.
This should also update the High Definition Audio Device Drivers. Just restart your PC and then see if you guys are able to resolve headphones not detected in Windows 10 issue.
Run Audio Troubleshooter | Headphone Jack not Working
- Tap on Windows Key + I in order to open Settings and then click on the Update & Security icon.
- From the left-hand menu, just make sure you guys choose Troubleshoot.
- Now under the “Get up and running” section, you need to tap on “Playing Audio“.
- Next, just tap on Run the troubleshooter and then follow on-screen instructions in order to fix the headphones not working issue.
Disable Audio Enhancements
- You have to right-click on the Volume or Speaker icon in Taskbar and choose Sound.
- Next, just switch to the Playback tab and then right-click on Speakers, and choose Properties.
- Then switch to the Enhancements tab and then just tick mark the option ‘Disable all enhancements.’
- Tap on Apply followed via OK and then restart your PC in order to save changes.
Conclusion
Alright, That was all Folks! I hope you guys like this article and also find it helpful to you. Give us your feedback on it. Also if you guys have further queries and issues related to this article. Then let us know in the comments section below. We will get back to you shortly.
Have a Great Day!
Also See: How to Update Realtek Drivers in Windows


